Mazda 3 Service Manual: Front Power Window Regulator Removal/Installation
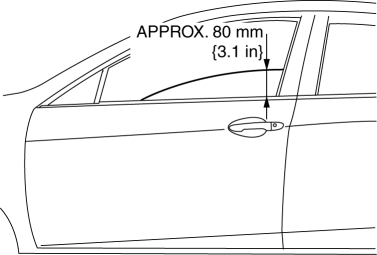
1. To access the glass installation bolt, position the front door glass so that the distance from the top of the front door glass to the upper part of the front beltline molding is approx. 80 mm {3.1 in}.
2. Disconnect the negative battery cable..
3. Remove the following parts:
a. Inner garnish.
b. Front door trim.
c. Front door speaker.
d. Front door glass.
e. Front power window motor.
4. Remove the nuts.
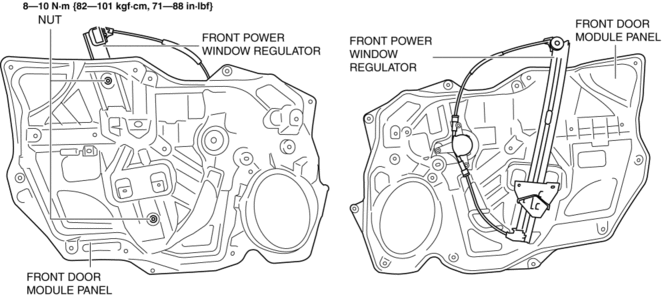
5. Install in the reverse order of removal.
CAUTION:
-
When installing, do not allow the cable to come out from the drum housing.
 Front Door Glass Removal/Installation
1. To access the glass installation bolt, position the front door glass so that
the distance from the top of the front door glass to the upper part of the front
beltline molding is approx. 80 mm { ...
 Glass Antenna
Purpose, Function
4SD
The AM/FM radio waves and RDS-TMC (Radio Data System-Traffic Message Channel)
radio waves are converted to an electrical signal and the signal is sent to
the audio ...
Other materials:
Receiver/Drier Removal/Installation
MZR 2.0, MZR 2.5, SKYACTIV-G 2.0
1. Disconnect the negative battery cable..
2. Discharge the refrigerant..
3. Remove the aerodynamic under cover No.2..
4. Remove the aerodynamic under cover No.1..
5. Remove the front bumper..
6. Disconnect the block joint type pipes by grasping female sid ...
PCM Removal/Installation [Mzr 2.0, Mzr 2.5]
1. Remove the battery cover..
2. Disconnect the negative battery cable..
3. Remove the following items:.
Battery
PCM cover No.1
4. Disconnect the PCM connector..
5. Remove the battery tray and PCM component..
6. Remove in the order indicated in the table.
...
Head restraints
In the Subaru Solterra, head restraints are installed on every seat
and are engineered to provide crucial support for the head and neck, helping to
reduce the risk of injury during sudden braking or collisions.
WARNING
■ Head restraint precautions
Always follow these safety recommendations ...
