Mazda 3 Service Manual: Oil Seal (Differential) Replacement [Fw6 A EL]
1. Remove the aerodynamic under cover No.2 and the splash shield as a single unit..
2. Remove the oil seal.
a. Drain the ATF..
b. Disconnect the drive shaft (LH) from the transaxle..
c. Disconnect the drive shaft (RH) from the joint shaft..
d. Remove the joint shaft..
CAUTION:
-
The oil seal is easily damaged by the sharp edges of the drive shaft splines. Do not let the splines contact the oil seal.
e. Remove the oil seal using a flathead screwdriver.
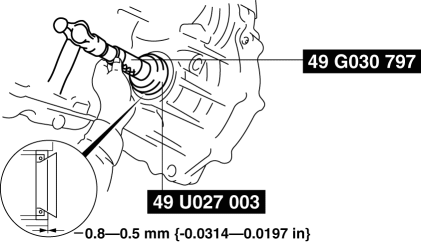
3. Using the SSTs
and a hammer, tap a new oil seal in evenly until the SST
(49 U027 003
) contacts the transaxle case.
4. Coat the lip of the oil seal with ATF.
5. Install the joint shaft..
6. Install the drive shaft (RH) to the joint shaft..
7. Install the drive shaft (LH) to the transaxle..
8. Add the ATF..
9. Install the aerodynamic under cover No.2 and the splash shield as a single unit..
10. Perform the “Mechanical System Test”..
 Oil Seal (Differential) Replacement [C66 M R]
1. Remove the aerodynamic under cover No.2 and the splash shield as a single
unit..
2. Drain the manual transaxle oil..
3. Disconnect the drive shaft (LH) from the MTX..
4. Disconnect the driv ...
 Oil Seal (Differential) Replacement [G35 M R]
1. On level ground, jack up the vehicle and support it evenly on safety stands.
2. Remove the aerodynamic under cover No.2..
3. Drain the oil from the transaxle..
4. Remove the front splash shi ...
Other materials:
Auxiliary Jack Inspection
1. Disconnect the negative battery cable..
2. Remove the following parts:
a. Upper panel.
b. Shift lever knob (MTX).
c. Selector lever knob (ATX).
d. Shift panel.
e. Side wall.
f. Console.
g. Auxiliary jack.
3. Connect a commercially-available nonresistant plug to the auxiliary jac ...
Advanced Park guidance screens
The Subaru Solterra Advanced Park system provides clear and intuitive guidance
screens on the multimedia display, helping the driver easily understand vehicle
positioning and parking operations in real time.
Guidance screen (When assistance starts)
Target parking space box (blue)
Ad ...
Rear Wiper And Washer Switch Inspection
1. Disconnect the negative battery cable..
2. Remove the following parts:
a. Front scuff plate (Driver‘s side).
b. Front side trim (Driver‘s side).
c. Hood release lever.
d. Lower panel.
e. Column cover.
f. Wiper and washer switch.
3. Verify that the continuity between the rear w ...
