Mazda 3 Service Manual: Oil Seal (Differential) Replacement [G35 M R]
1. On level ground, jack up the vehicle and support it evenly on safety stands.
2. Remove the aerodynamic under cover No.2..
3. Drain the oil from the transaxle..
4. Remove the front splash shield..
5. Separate the drive shaft and joint shaft from the transaxle..
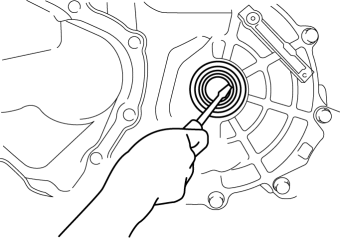
6. Remove the oil seals using a screwdriver.
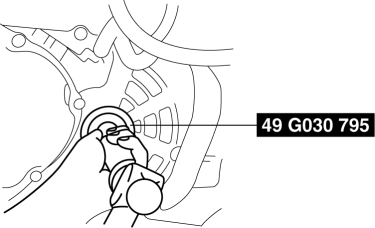
7. Using the SST
and a hammer, tap each new oil seal in evenly until the SST
contacts the transaxle case.
8. Coat the lip of each oil seal with transaxle oil.
9. Insert the drive shaft and joint shaft to the transaxle..
10. Install the front splash shield..
11. Add the specified amount and type of oil..
12. Install the aerodynamic under cover No.2..
 Oil Seal (Differential) Replacement [Fw6 A EL]
1. Remove the aerodynamic under cover No.2 and the splash shield as a single
unit..
2. Remove the oil seal.
a. Drain the ATF..
b. Disconnect the drive shaft (LH) from the transaxle..
c. Disc ...
 Oil Seal (Differential) Replacement [G66 M R]
1. On level ground, jack up the vehicle and support it evenly on safety stands.
2. Remove the aerodynamic under cover No.2..
3. Drain the oil from the transaxle..
4. Remove the front splash shi ...
Other materials:
Fuse Panel Description
Fuse block (Engine compartment)
*1 With xenon fusion headlights
*2 With halogen headlights
Fuse block (Left side)
...
Oil Pressure Switch Removal
MZR 2.0, MZR 2.5, MZR 2.3 DISI Turbo
WARNING:
A hot engine can cause severe burns. Turn off the engine and wait until it
is cool before removing the exhaust system.
1. Disconnect the negative battery cable.
2. Remove the aerodynamic under cover No.2..
3. Disconnect the connecto ...
Operating Tips for AAC
AAC stands for Advanced Audio Coding,
which is standardized voice compression
established by the ISO *1 working group
(MPEG). Audio data can be created and
stored at a higher compression ratio than
MP3.
This unit plays files with the extensions
(.aac/.m4a/.wav *2 ) as the AAC files.
*1 Int ...
