Mazda 3 Service Manual: Front Door Key Cylinder Switch Inspection
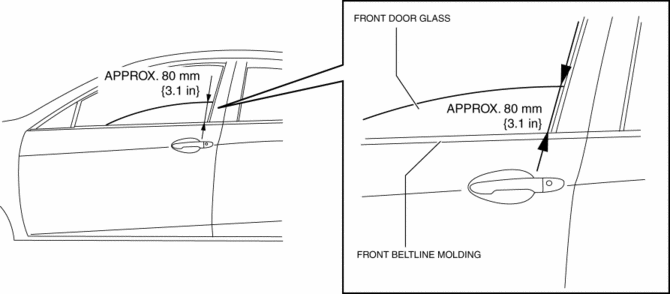
1. To access the glass installation bolt, position the front door glass so that the distance from the top of the front door glass to the upper part of the front beltline molding is approx. 80 mm {3.1 in}
.
2. Disconnect the negative battery cable..
3. Remove the following parts:
a. Inner garnish.
b. Front door trim.
c. Front door speaker.
d. Front door glass.
e. Front door module panel.
f. Front door latch and lock actuator.
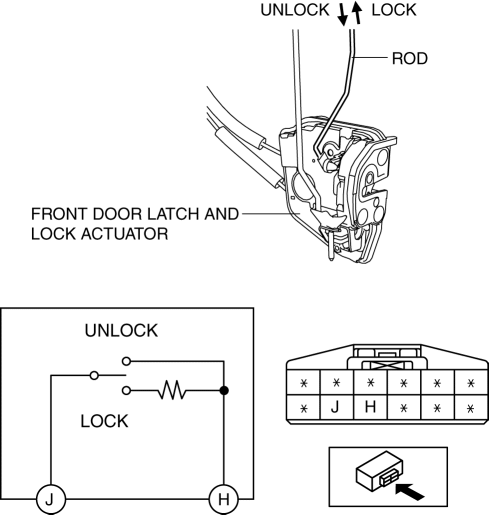
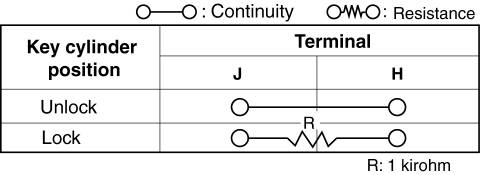
4. Move the rod of the door key cylinder switch in the direction of the arrow shown in the figure, and verify that the continuity is as indicated in the table.
-
If not as indicated in the table, replace the front door latch and lock actuator.
 Front Door Key Cylinder Removal/Installation
1. To access the glass installation bolt, position the front door glass so that
the distance from the top of the front door glass to the upper part of the front
beltline molding is approx. 80 mm { ...
 Front Door Latch And Lock Actuator Inspection
1. The following actuators and switches are integrated with the front door latch
and lock actuator. Inspect the front door latch and lock actuator according to each
inspection procedure for the fo ...
Other materials:
Adjuster Anchor Removal/Installation
WARNING:
The side air bag sensor is attached to the lower part of the B-pillar. When
working around the B-pillar, disconnect the negative battery cable or work carefully,
avoiding excessive impact to the lower part of the B-pillar.
1. Remove the following parts:
a. Front sc ...
Forced Ignition On [With Advanced Keyless Entry And Push Button Start System]
NOTE:
In order to perform a forced ignition ON, the M-MDS (IDS) is necessary. If
the servicing is being done outside of an Authorized Mazda dealership, contact
an Authorized Mazda dealership for instructions.
The forced ignition ON procedure forces a power supply to each part w ...
Air Cleaner Element Inspection [Mzr 2.0, Mzr 2.5]
1. Remove the air cleaner element..
2. Inspect the following items:
Has the replacement interval come?
Is the air cleaner element soiled, damaged, or bent?
Are the air cleaner case and the air cleaner element correctly sealed?
Is the correct air cleaner element inst ...
