Mazda 3 Service Manual: Fuel Pump Unit Removal/Installation [Mzr 2.0, Mzr 2.5]
WARNING:
-
Fuel is very flammable liquid. If fuel spills or leaks from the pressurized fuel system, it will cause serious injury or death and facility breakage. Fuel can also irritate skin and eyes. To prevent this, always complete the “Fuel Line Safety Procedure”, while referring to “BEFORE SERVICE PRECAUTION”.
-
A person charged with static electricity could cause a fire or explosion, resulting in death or serious injury. Before draining fuel, make sure to discharge static electricity by touching the vehicle body.
1. Complete the “BEFORE SERVICE PRECAUTION”..
2. Remove the battery cover..
3. Disconnect the negative battery cable..
4. Remove the rear seat cushion..
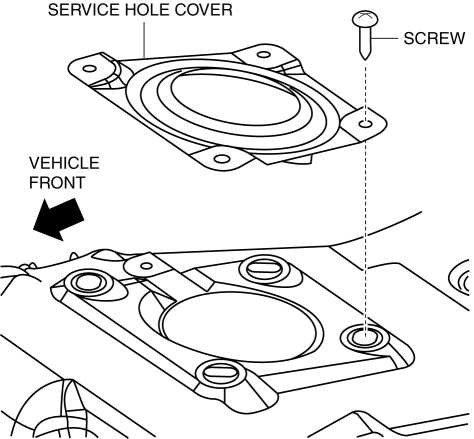
5. Remove the service hole cover.
6. Disconnect the fuel pump unit connector.
7. Disconnect the joint hose of fuel-filler pipe side.
8. Disconnect the breather hose of fuel-filler pipe side.
9. Remove the following parts as a single unit.
-
Fuel tank
-
Joint hose
-
Breather hose
-
Fuel pump unit
-
Fuel hose
10. Remove the order indicated in the table.
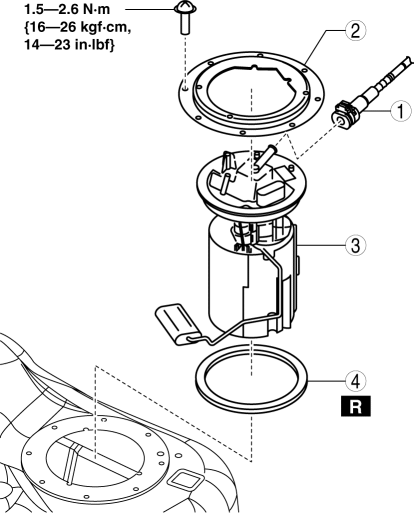
|
1 |
Quick release connector (See QUICK RELEASE CONNECTOR REMOVAL/INSTALLATION [MZR 2.0, MZR 2.5].) |
|
2 |
Set plate |
|
3 |
Fuel pump unit |
|
4 |
O-ring |
11. Install in the reverse order of removal.
12. Complete the “AFTER SERVICE PRECAUTION”..
 Fuel Pump Unit Inspection [Mzr 2.0, Mzr 2.5]
Continuity Inspection
1. Remove the battery cover..
2. Disconnect the negative battery cable..
3. Disconnect the fuel pump unit connector.
4. Inspect for continuity between fuel pump unit termi ...
 Fuel Shut Off Valve Inspection [Mzr 2.0, Mzr 2.5]
Except for Mexico
NOTE:
The fuel shut-off valve cannot be removed and inspected as it is built into
the fuel tank.
1. Perform the fuel tank inspection..
If there is any malfu ...
Other materials:
Oil Cooler Removal/Installation [Fw6 A EL]
1. Remove the battery cover..
2. Disconnect the negative battery cable..
3. Remove the aerodynamic under cover NO.2..
4. Drain the ATF..
5. Drain the engine coolant..
6. Remove in the order indicated in the table.
1
Water hose (connected to the water pipe)
...
Front Seat Back Component [Vehicles Without Power Seat System] Removal/Installation
WARNING:
Handling a front seat (with built-in side air bag) improperly can accidentally
operate (deploy) the air bag, which may seriously injure you. Read the service
warnings before handling a front seat (with built-in side air bag)..
CAUTION:
After removing a front seat ...
Purge Solenoid Valve Inspection [Mzr 2.0, Mzr 2.5]
Airflow Inspection
1. Remove the battery cover..
2. Disconnect the negative battery cable..
3. Remove the purge solenoid valve..
4. Inspect airflow between the ports under the following conditions.
Measured condition
Continuity between A—B
...
