Mazda 3 Owners Manual: Operating the Driver's Power Window
Normal opening/closing
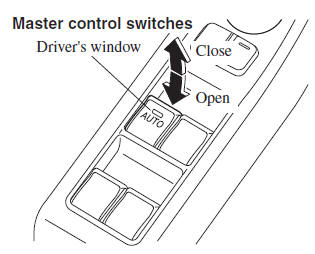
To open the window to the desired position, lightly hold down the switch.
To close the window to the desired position, lightly pull up the switch.
Auto-opening/closing
To fully open the window automatically, press the switch completely down, then release. The window will fully open automatically.
To fully close the window automatically, pull the switch completely up, then release. The window will fully close automatically.
To stop the window partway, pull or press the switch in the opposite direction and then release it.
Power window system initialization procedure
If the battery was disconnected during vehicle maintenance, or for other reasons (such as a switch continues to be operated after the window is fully open/closed), the window will not fully open and close automatically.
The power window auto function will only resume on a power window that has been reset.
- Switch the ignition ON.
- Make sure that the power window lock switch located on the driver's door is not depressed.
- Press the switch and fully open the window.
- Pull up the switch to fully close the window and continue holding the switch for about 2 seconds after the window fully closed.
Jam-safe window
If a person's hands, head or an object blocks the window during the auto-closing operation, the window will stop and open halfway.
| WARNING
Make sure nothing blocks the window
just before it reaches the fully closed
position or while holding up the power
window switch:
Blocking the power window just before
it reaches the fully closed position or
while holding up the power window
switch is dangerous. In this case, the jam-safe function cannot prevent the window from closing all the way. If fi ngers are caught, serious injuries could occur. |
NOTE
- Depending on driving conditions, a closing power window could stop and start opening when the window feels a shock that is similar to something blocking it.
- In the event the jam-safe function activates and the power window cannot be closed automatically, pull and hold the switch and the window will close.
- The jam-safe window function does not operate until the system has been reset.
Engine-off power window operation
The power window can be operated for about 40 seconds after the ignition is switched from ON to off with all doors closed. If any door is opened, the power window will stop operating.
NOTE For engine-off operation of the power window, the switch must be held up firmly throughout window closure because the auto-closing function will be inoperable.
 Power Windows
The ignition must be switched ON for the
power windows to operate.
WARNING
Make sure the opening is clear before
closing a window:
Closing a power window is dangerous.
A person's ...
 Operating the Passenger Power Windows
To open the window to the desired
position, hold down the switch.
To close the window to the desired
position, pull up the switch.
NOTE
The power windows may be operated
when the power ...
Other materials:
Smart City Brake Support
(SCBS)
The Smart City Brake Support (SCBS) system is designed to reduce damage in
the event
of a collision by operating the brake control (SCBS brake) when the system's
laser sensor
(front) detects a vehicle ahead and determines that a collision with a vehicle
ahead is
unavoidable. It may also be ...
Torque Converter Clutch (TCC) Non Operation [Fw6 A EL]
TROUBLESHOOTING ITEM
Torque converter clutch (TCC) non-operation
DESCRIPTION
TCC does not operate when vehicle reaches TCC operation range.
POSSIBLE CAUSE
Signal malfunction
...
i-ACTIVSENSE
i-ACTIVSENSE is a collective term covering a series of advanced safety and
driver support
systems which make use of a Forward Sensing Camera (FSC) and radar sensors.
These
systems consist of active safety and pre-crash safety systems.
These systems are designed to assist the driver in safer ...
