Mazda 3 Owners Manual: HomeLink Wireless Control System*
NOTE HomeLink and HomeLink house are registered trademarks of Johnson Controls.
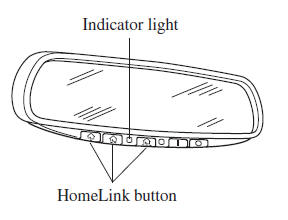
The HomeLink system replaces up to 3 hand-held transmitters with a single built-in component in the auto-dimming mirror. Pressing the HomeLink button on the auto-dimming mirror activates garage doors, gates and other devices surrounding your home.
| WARNING
Do not use the HomeLink system with
any garage door opener that lacks the
safety stop and reverse feature:
Using the HomeLink system with any
garage door opener that lacks the
safety stop and reverse feature as
required by federal safety standards
is dangerous. (This includes garage
doors manufactured before April 1,
1982.)
Using these garage door openers can
increase the risk of serious injury or
death. For further information, contact
HomeLink at 1-800-355-3515 or www. Homelink.com or an Authorized Mazda Dealer. Always check the areas surrounding garage doors and gates for people or obstructions before programming or during operation of the HomeLink system: Programming or operating the HomeLink system without verifying the safety of areas surrounding garage doors and gates is dangerous and could result in an unexpected accident and serious injury if someone were to be hit. |
NOTE The programming will not be erased even if the battery is disconnected.
 Hazard Warning Flasher
The hazard warning lights should always
be used when you stop on or near a
roadway in an emergency.
The hazard warning lights warn other
drivers that your vehicle is a traffic hazard
and that ...
 Pre-programming the HomeLink
System
Pre-programming the HomeLink
System
NOTE
It is recommended that a new battery be
placed in the hand-held transmitter of the
device being programmed to HomeLink
for quicker training and accurate
transmission of the radio-frequency s ...
Other materials:
Quick Release Connector (Emission System) Removal/Installation [Mzr 2.0, Mzr
2.5]
Quick Release Connector Type
CAUTION:
Verify the type and location, and install/remove properly.
Except for Mexico
Mexico
Type A Removal
CAUTION:
Be careful not to damage the evaporative pipe when unlocking the retainer.
NOTE:
When removing the quick r ...
Engine Exhaust (Carbon monoxide)
WARNING
Do not drive your vehicle if you smell exhaust gas inside the
vehicle:
Engine exhaust gas is dangerous. This gas contains carbon monoxide (CO),
which is
colorless, odorless, and poisonous. When inhaled, it can cause loss of
consciousness and
death. If you smell ...
Engine Tune Up [Mzr 2.3 Disi Turbo]
NOTE:
If the accelerator pedal is depressed continuously for a specified time,
the engine speed may decrease to the idle speed. This is due to the fuel cut
control operation, which prevents overheating, and it does not indicate a malfunction.
Engine Tune-up Preparation
1. Verify ...
