Mazda 3 Owners Manual: Seat Operation
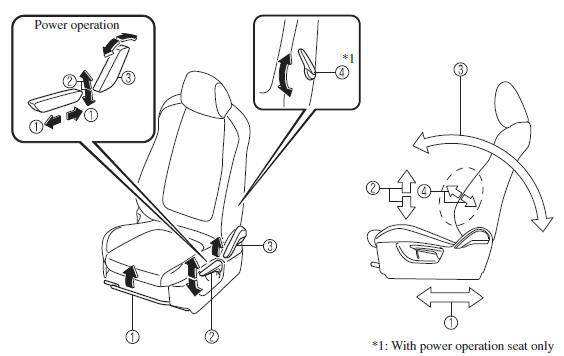
*1: With power operation seat only
1. Seat Slide
(Manual Seat)
To move a seat forward or backward, raise the lever and slide the seat to the
desired position
and release the lever.
Make sure the lever returns to its original position and the seat is locked in place by attempting to push it forward and backward.
(Power Seat)
To slide the seat, move the slide lifter switch on the outside of the seat to
the front or back
and hold it. Release the switch at the desired position.
2. Height Adjustment (Driver's Seat)
(Manual Seat)
To adjust the seat height, move the lever up or down.
(Power Seat)
To adjust the seat height, move the switch up or down.
3. Seat Recline
(Manual Seat)
To change the seatback angle, lean forward slightly while raising the lever.
Then lean back
to the desired position and release the lever.
Make sure the lever returns to its original position and the seatback is locked in place by attempting to push it forward and backward.
(Power Seat)
To change the seatback angle, press the front or rear side of the reclining
switch. Release the
switch at the desired position.
4. Lumbar Support Adjustment (Driver's Seat) *
To increase the seat firmness, move the lever downward. Move the lever upward to decrease firmness.
 Front Seat
...
 Seat Warmer
The front seats are electrically heated. The
ignition must be switched ON.
Press the seat warmer switch to illuminate
the indicator light while the ignition
is switched ON. The mode changes as
...
Other materials:
Charging equipment
Charging equipment and names
AC charging inlet
Charging indicator and charging inlet light
DC charging inlet
Charging port lid
AC charging cable (if equipped)*
Charging port
*: For safe handling procedures and precautions related to the AC charging cable,
always refer to the ...
Disc Pad (Front) Replacement [Mzr 2.3 Disi Turbo]
1. Remove in the order indicated in the table.
2. Install in the reverse order of removal.
3. After installation, pump the brake pedal a few times and verify that the brakes
do not drag.
1
Clip
2
Retaining clip
(See FRONT BRAKE (DISC ...
Saving Fuel and Protection of the
Environment
How you operate your Mazda determines
how far it will travel on a tank of fuel. Use
these suggestions to help save fuel and
reduce CO2.
Avoid long warm-ups. Once the engine
runs smoothly, begin driving.
Avoid fast starts.
Drive at lower speeds.
Anticipate when to apply the brakes
(a ...
