Mazda 3 Owners Manual: Seat Warmer
The front seats are electrically heated. The ignition must be switched ON.
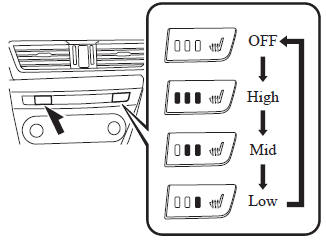
Press the seat warmer switch to illuminate the indicator light while the ignition is switched ON. The mode changes as follows each time the seat warmer switch is pressed.
WARNING
Be careful when using the seat warmer:
The heat from the seat warmer may be
too hot for some people, as indicated
below, and could cause a lowtemperature
burn.
Do not use the seat warmer with anything having high moistureretention ability such as a blanket or cushion on the seat: The seat may be heated excessively and cause a low-temperature burn. Do not use the seat warmer even when taking a short nap in the vehicle: The seat may be heated excessively and cause a low-temperature burn. Do not place heavy objects with sharp projections on the seat, or insert needles or pins into it: This could cause the seat to become excessively heated and result in injury from a minor burn. |
| CAUTION Do not use organic solvents to clean the seat. It may damage the seat surface and the heater. |
NOTE
- If the ignition is switched off while the seat warmer is operating (High, Mid or Low) and then switched ON again, the seat warmer will automatically operate at the temperature set before switching off the ignition.
- Use the seat warmer when the engine is running. Leaving the seat warmer on for long periods with the engine not running could cause the battery power to be depleted.
- The temperature of the seat warmer cannot be adjusted beyond High, Mid and Low because the seat warmer is controlled by a thermostat.
*Some models.
 Seat Operation
*1: With power operation seat only
1. Seat Slide
(Manual Seat)
To move a seat forward or backward, raise the lever and slide the seat to the
desired position
and release the lever.
Make s ...
 Rear Seat
...
Other materials:
Decoration Panel Removal/Installation
1. Remove the following parts:
a. Passenger-side front scuff plate.
b. Passenger-side front side trim.
c. Glove compartment.
d. Passenger-side lower panel.
2. Remove the screw.
3. Pull the decoration panel in the direction of the arrow (1), (2) shown in
the figure, while remove the hoo ...
Joint Shaft Disassembly [Skyactiv G 2.0]
1. Disassemble in the order indicated in the table.
1
Snap ring
2
Joint shaft component
.
3
Dust seal
4
Bearing
5
Dust cover
6
...
ABS HU/CM Removal/Installation
WARNING:
If the ABS HU/CM configuration is not completed, it could result in an unexpected
accident due to the ABS being inoperative. If the ABS HU/CM or ABS CM is replaced,
always use the automatic configuration function so that the ABS operation conditions
are correct.
CAUTI ...
