Mazda 3 Service Manual: Seat Warmer Unit Removal/Installation
Removal
WARNING:
-
Handling a front seat (with built-in side air bag) improperly can accidentally operate (deploy) the air bag, which may seriously injure you. Read the service warnings before handling a front seat (with built-in side air bag)..
CAUTION:
-
After removing a front seat, do not operate the slider lever. If the slider lever is operated, the left and right slide positions will deviate, and the slide adjuster may be damaged after the front seat is installed.
-
Verify that there are no malfunctions in the sliding mechanism after installing a front seat.
-
When performing the procedure with a front seat removed from the vehicle, perform the procedure on a clean rag so as not to damage or soil the seat.
-
When the passenger's seat is removed, perform the seat weight sensor inspection using the M-MDS after installing the passenger's seat..
-
When the passenger's seat is replaced with a new one, perform the seat weight sensor calibration using the M-MDS..
1. Switch the ignition to off.
2. Remove the battery cover..
3. Disconnect the negative battery cable and wait 1 min or more
.
4. Remove the following parts:
a. Front seat side cover.
b. Front seat.
c. Front seat back trim.
d. Front seat cushion trim.
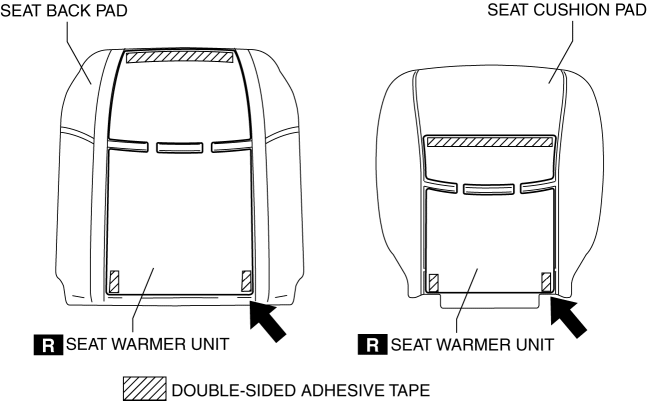
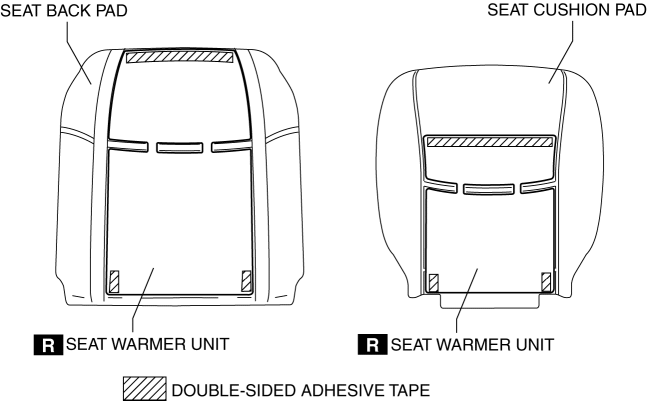
5. Peel off the seat warmer unit from the position of the arrow shown in the figure.
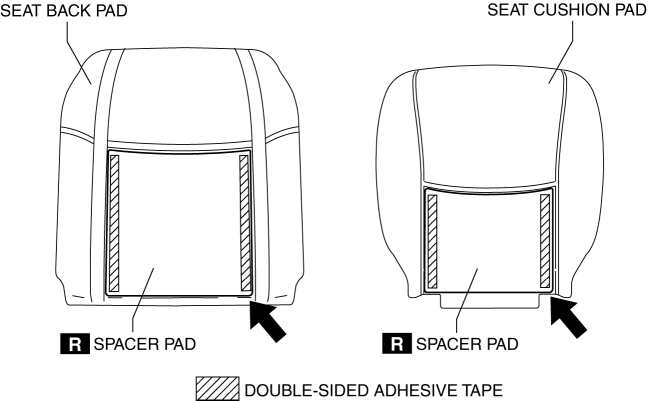
6. Peel off the spacer pad from the position of the arrow shown in the figure.
CAUTION:
-
There is a possibility for it to become unusable when seat pad are damaged.Carefully remove the spacer pad glued onto the seat pad.
Installation
NOTE:
-
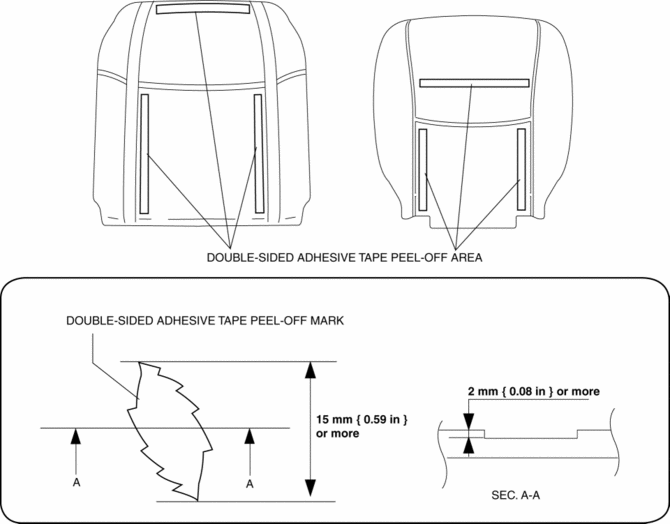
If there are any peel-off marks from the seat back pad and seat cushion pad remaining after they have been peeled off, the seat pad cannot be reused and it must be replaced with a new one.
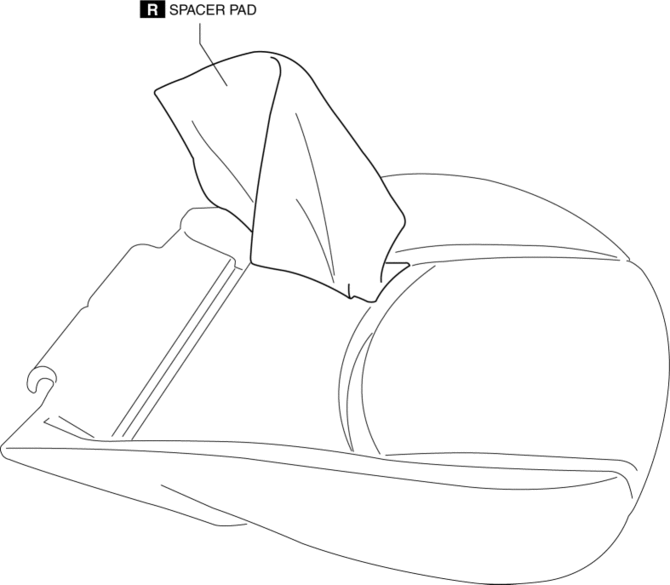
1. Stick the spacer pad onto the seat pad shown in the figure.

2. Stick the seat warmer unit onto the seat pad.
3. Install the following parts:
a. Front seat cushion trim.
b. Front seat back trim.
c. Front seat.
d. Front seat side cover.
4. Connect the negative battery cable..
5. Install the battery cover..
6. Inspect the seat warmer unit..
 Seat Warmer Unit Inspection
WARNING:
Handling a front seat (with built-in side air bag) improperly can accidentally
operate (deploy) the air bag, which may seriously injure you. Read the service
warnings before han ...
 Seat Weight Sensor Calibration [Two Step Deployment Control System]
CAUTION:
If any of the following work is performed, perform the seat weight sensor
calibration using the M-MDS.
Replacement with a new seat weight sensor
Replacement ...
Other materials:
Digital key
In the Subaru Solterra, a compatible smartphone can function as a
fully integrated replacement for the traditional electronic key when the dedicated
Digital Key App is installed. This advanced feature also allows secure sharing of
access with family members or trusted individuals through the s ...
Fuel Pump Unit Disassembly/Assembly [Mzr 2.0, Mzr 2.5]
WARNING:
Fuel is very flammable liquid. If fuel spills or leaks from the pressurized
fuel system, it will cause serious injury or death and facility breakage. Fuel
can also irritate skin and eyes. To prevent this, always complete the “Fuel
Line Safety Procedure”, while referring ...
Antenna Feeder No.3 Inspection
4SD (With Audio System (With Display))
1. Disconnect the negative battery cable..
2. Remove the rain sensor cover. (Vehicles with auto light/wiper system).
3. Disconnect the rain sensor connector. (Vehicles with auto light/wiper system)
4. Partially peel back the seaming welts.
5. Remove t ...
