Mazda 3 Service Manual: Starter Cut Relay Inspection [MTX]
Advanced Keyless Entry And Push Button Start System Only
1. Disconnect the negative battery cable.
2. Remove the following parts:
a. Front scuff plate (LH).
b. Front side trim (LH).
c. Side wall.
d. Console.
3. Set the bonnet release lever out of the way..
4. Remove the lower panel..
5. Remove the starter cut relay with the connector connected..
6. Connect the negative battery cable..
7. Measure the voltage at each terminal is as indicated in the terminal voltage tables.
-
If the voltage or continuity is not as specified in the terminal voltage table, inspect the parts under “Inspection item (s)”.
-
If the system does not work properly even though the parts or related wiring harnesses do not have any malfunction, replace the starter cut relay.
Terminal Voltage Table (Reference)

|
Terminal |
Signal name |
Connected to |
Measurement condition |
Voltage (V) |
Inspection item (s) |
||
|
A |
Power supply |
Starter relay |
Switch the ignitions to off |
Clutch pedal is not depressed |
Wave pattern 1 (See Pattern 1.) |
|
|
|
Clutch pedal is depressed |
Wave pattern 2 (See Pattern 2.) |
||||||
|
Switch the ignitions to ON |
Clutch pedal is not depressed |
B+ |
|||||
|
Clutch pedal is depressed |
1.0 or less |
|
|||||
|
D |
Starter cut relay output signal |
|
Switch the ignitions to off |
Clutch pedal is not depressed |
Wave pattern 2 (See Pattern 2.) |
|
|
|
Clutch pedal is depressed |
1.0 or less |
||||||
|
H |
Starter interlock switch |
Starter interlock switch |
Switch the ignitions to ON |
Clutch pedal is not depressed |
B+ |
|
|
|
Clutch pedal is depressed |
1.0 or less |
||||||
|
I |
IG 1 |
Stop 15 A fuse |
Switch the ignition to ON |
B+ |
|
||
|
Switch the ignition to off |
1.0 or less |
||||||
Generated pulse (reference)
Pattern 1
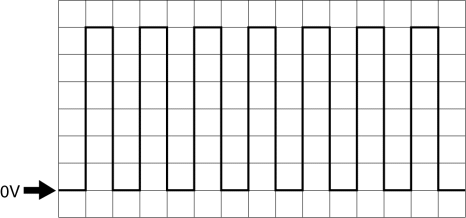
-
Terminal: A (+) ↔ body ground (-)
-
Oscilloscope setting: 2 V/DIV (Y), 100 ms/DIV (X), DC range
Pattern 2
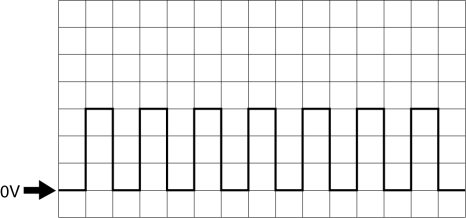
-
Terminal:
-
A (+) ↔ body ground (-)
-
D (+) ↔ body ground (-)
-
Oscilloscope setting: 2 V/DIV (Y), 100 ms/DIV (X), DC range
 Refrigerant Charging
CAUTION:
Do not exceed the specification when charging the system with refrigerant.
Doing so will decrease the efficiency of the air conditioner or damage the refrigeration
cycle parts.
...
 Starter Cut Relay Removal/Installation [MTX]
Advanced Keyless Entry And Push Button Start System Only
1. Disconnect the negative battery cable..
2. Remove the following parts:
Front scuff plate (LH).
Front side trim (LH).
...
Other materials:
Side Step Molding Installation
NOTE:
Double-sided adhesive tape has already been adhered to a new side step molding
for installation.
When a side step molding is to be reused, perform the following procedure:
1. Remove any grease or dirt from the affixing surface of the side step molding.
2. Affix double-si ...
Opening/closing the back door (vehicles without power back door)
■ Open
In the Subaru Solterra, the back door can be manually opened by lifting it upward
while pressing the back door opener switch. This action releases the latch and allows
smooth access to the luggage compartment.
■ Close
To close the Subaru Solterra back door, gently pull it dow ...
Cell Phones
WARNING
Please comply with the legal regulations concerning the use of
communication
equipment in vehicles in your country:
Use of any electrical devices such as cell phones, computers, portable
radios, vehicle
navigation or other devices by the driver while the vehicle is ...
