Mazda 3 Service Manual: Antenna Feeder No.2 Inspection
1. Disconnect the negative battery cable..
2. Remove the following parts:
a. A-pillar trim (RH).
b. Rear seat cushion (4SD).
c. Rear scuff plate (RH).
d. Tire house trim (RH).
e. Trunk side upper trim (5HB, RH).
f. Trunk side trim (5HB, RH).
g. C–pillar trim (RH).
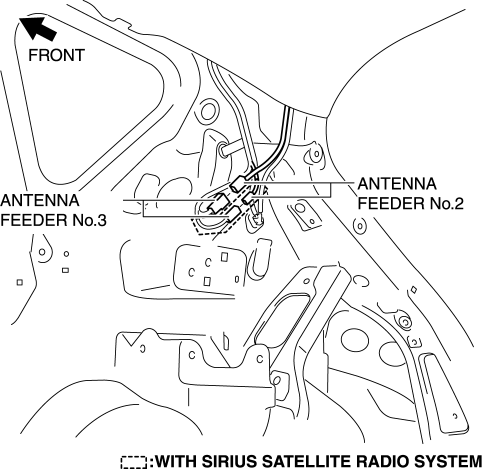
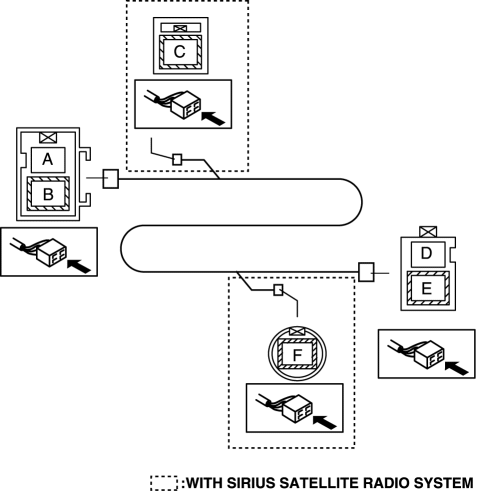
3. Disconnect the antenna feeder No.1.
4. Disconnect the antenna amplifier (4SD)/ antenna feeder No.3 (5HB).
4SD
5HB
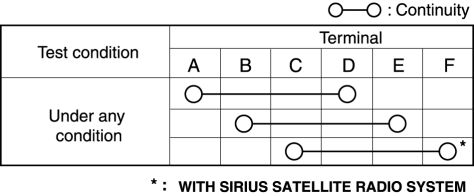
5. Verify that the continuity between antenna feeder No.2 terminals is as indicated in the table.
With audio unit (without display)
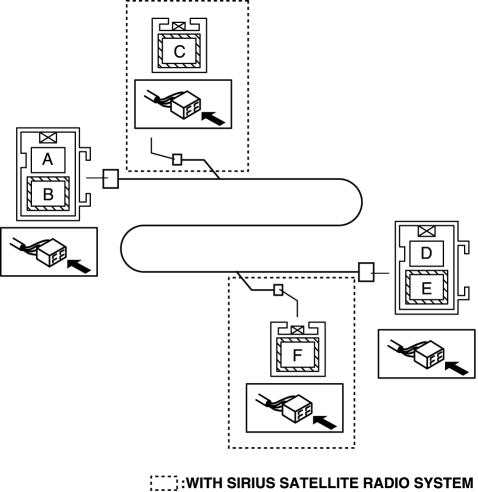
4SD (with audio unit (with display))
5HB (with audio unit (with display))

-
If not as indicated in the table, replace antenna feeder No.2.
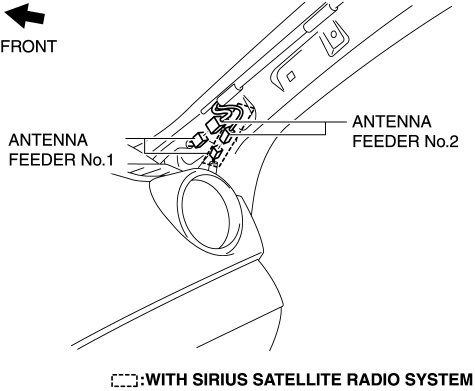
 Antenna Feeder No.1 Removal/Installation
1. Disconnect the negative battery cable..
2. Remove the following parts:
a. Front scuff plate.
b. Front side trim.
c. Upper panel.
d. Shift lever knob (MTX).
e. Selector lever knob (ATX). ...
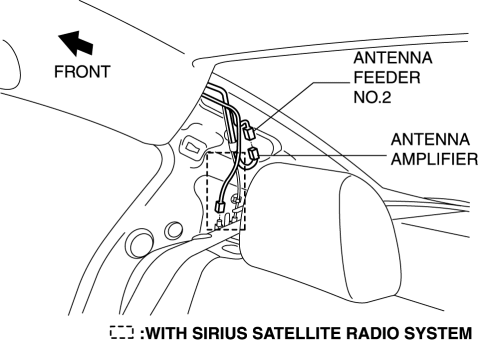
 Antenna Feeder No.2 Removal/Installation
1. Disconnect the negative battery cable..
2. Remove the rain sensor cover. (Vehicles with auto light/wiper system).
3. Disconnect the rain sensor connector. (Vehicles with auto light/wiper system ...
Other materials:
Bluetooth ® Preparation (Type A)
Bluetooth ® Hands-Free Preparation
Pairing code setting
The 4-digit pairing code setting for
registration of your cell phone (pairing)
can be set beforehand.
NOTE
The initial setting value is “0000”.
Press the pick-up button or talk button
with a short press.
Say: [Beep] “Setupâ ...
Before driving
Before operating your Subaru Solterra, carefully follow the recommendations
below to ensure maximum safety, proper vehicle control, and a confident driving
experience in all conditions.
Installing floor mats
Always use floor mats that are specifically engineered for the Subaru Solterra,
matc ...
Down Switch Inspection [Fw6 A EL]
Continuity Inspection
NOTE:
The down switch is built into the selector lever component.
1. Remove the battery cover..
2. Disconnect the negative battery cable..
3. Remove the console..
4. Disconnect the selector lever component connector.
5. Verify that the continuity betw ...
