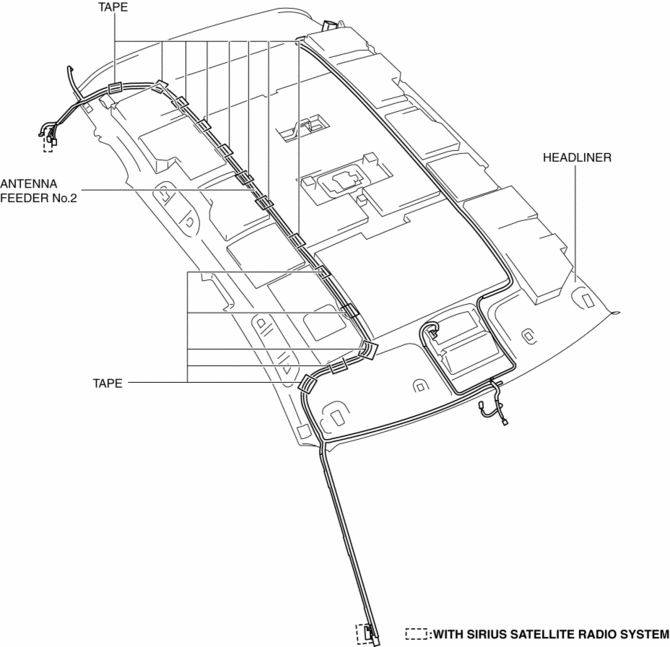
Mazda 3 Service Manual: Antenna Feeder No.2 Removal/Installation
1. Disconnect the negative battery cable..
2. Remove the rain sensor cover. (Vehicles with auto light/wiper system).
3. Disconnect the rain sensor connector. (Vehicles with auto light/wiper system)
4. Partially peel back the seaming welts.
5. Remove the following parts:
a. Sunroof seaming welt (vehicles with sunroof)
b. A-pillar trim.
c. Front scuff plate.
d. Rear scuff plate.
e. B-pillar lower trim.
f. Upper anchor of the front seat belt.
g. B-pillar upper trim.
h. Rear seat cushion.
i. Tire house trim.
j. Trunk side upper trim (5HB).
k. C-pillar trim.
l. Map light.
m. Sunvisor.
n. Assist handle.
o. Headliner.
6. Remove the antenna feeder No.2.
7. Install in the reverse order of removal.
Without sunroof
With sunroof

 Antenna Feeder No.2 Inspection
1. Disconnect the negative battery cable..
2. Remove the following parts:
a. A-pillar trim (RH).
b. Rear seat cushion (4SD).
c. Rear scuff plate (RH).
d. Tire house trim (RH).
e. Trunk sid ...
 Antenna Feeder No.3 Inspection
4SD (With Audio System (With Display))
1. Disconnect the negative battery cable..
2. Remove the rain sensor cover. (Vehicles with auto light/wiper system).
3. Disconnect the rain sensor connector ...
Other materials:
Canister Vent (Cv) Solenoid Valve Removal/Installation [Mzr 2.0, Mzr 2.5]
Except for Mexico
1. Remove the battery cover..
2. Disconnect the negative battery cable..
3. Remove in the order indicated in the table.
1
CV solenoid valve connector
2
Evaporative hose No.1
3
Evaporative hos ...
Joint Shaft Removal/Installation [Mzr 2.0, Mzr 2.3 Disi Turbo, Mzr 2.5]
CAUTION:
Performing the following procedures without first removing the ABS wheel-speed
sensor may possibly cause an open circuit in the wiring harness if it is pulled
by mistake. Before performing the following procedures, remove the ABS wheel-speed
sensor connector (axle side) and ...
Thermostat Removal/Installation [Mzr 2.0, Mzr 2.5]
WARNING:
Never remove the cooling system cap or loosen the radiator drain plug while
the engine is running, or when the engine and radiator are hot. Scalding engine
coolant and steam may shoot out and cause serious injury. It may also damage
the engine and cooling system.
Tu ...
