Mazda 3 Service Manual: Antenna Feeder No.3 Inspection
4SD (With Audio System (With Display))
1. Disconnect the negative battery cable..
2. Remove the rain sensor cover. (Vehicles with auto light/wiper system).
3. Disconnect the rain sensor connector. (Vehicles with auto light/wiper system)
4. Partially peel back the seaming welts.
5. Remove the following parts:
a. Sunroof seaming welt (vehicles with sunroof)
b. A-pillar trim.
c. Front scuff plate.
d. Rear scuff plate.
e. B-pillar lower trim.
f. Upper anchor of the front seat belt.
g. B-pillar upper trim.
h. Rear seat cushion.
i. Tire house trim.
j. C-pillar trim.
k. Map light.
l. Sunvisor.
m. Assist handle.
n. Headliner.
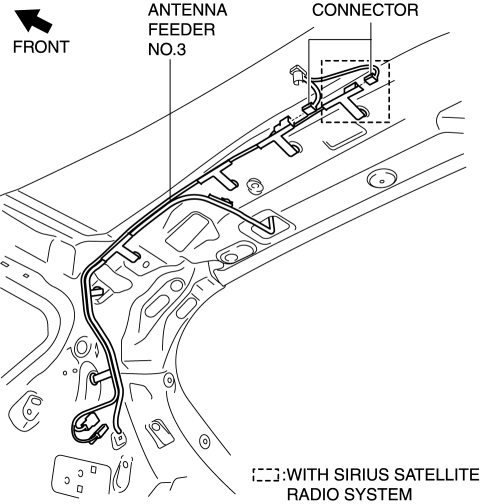
6. Disconnect the antenna feeder No.5 and connector..
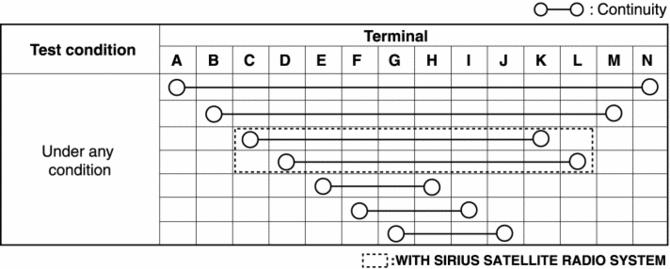
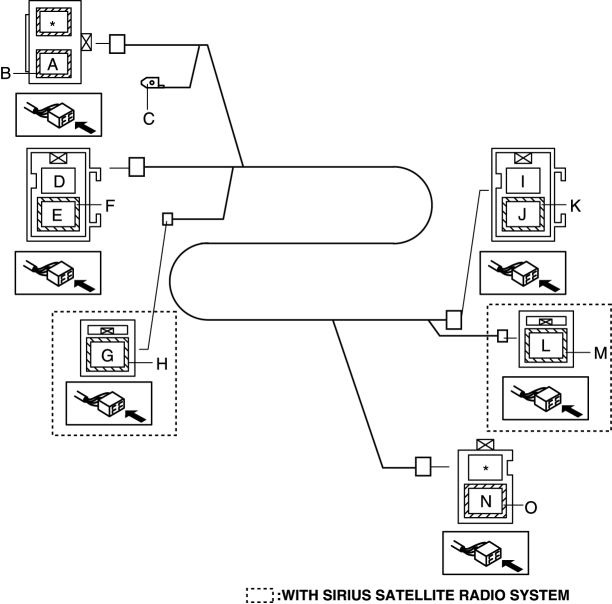
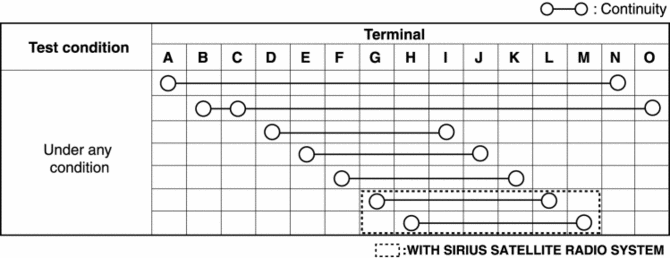
7. Verify that the continuity between antenna feeder No.3 terminals is as indicated in the table.

-
If not as indicated in the table, replace antenna feeder No.3.
5HB
With audio unit (without display)
1. Disconnect the negative battery cable..
2. Remove the rain sensor cover. (Vehicles with auto light/wiper system).
3. Disconnect the rain sensor connector. (Vehicles with auto light/wiper system)
4. Partially peel back the seaming welts.
5. Remove the following parts:
a. Sunroof seaming welt (vehicles with sunroof)
b. A-pillar trim.
c. Front scuff plate.
d. Rear scuff plate.
e. B-pillar lower trim.
f. Upper anchor of the front seat belt.
g. B-pillar upper trim.
h. Rear seat cushion.
i. Tire house trim.
j. Trunk side upper trim (5HB).
k. C-pillar trim.
l. Map light.
m. Sunvisor.
n. Assist handle.
o. Headliner.
6. Disconnect the connector.
7. Verify that the continuity between antenna feeder No.3 terminals is as indicated in the table.
-
If not as indicated in the table, replace antenna feeder No.3.
With audio unit (with display)
1. Disconnect the negative battery cable..
2. Remove the rain sensor cover. (Vehicles with auto light/wiper system).
3. Disconnect the rain sensor connector. (Vehicles with auto light/wiper system)
4. Partially peel back the seaming welts.
5. Remove the following parts:
a. Sunroof seaming welt (vehicles with sunroof)
b. A-pillar trim.
c. Front scuff plate.
d. Rear scuff plate.
e. B-pillar lower trim.
f. Upper anchor of the front seat belt.
g. B-pillar upper trim.
h. Rear seat cushion.
i. Tire house trim.
j. Trunk side upper trim (5HB).
k. C-pillar trim.
l. Map light.
m. Sunvisor.
n. Assist handle.
o. Headliner.
p. Liftgate upper trim.
6. Disconnect the antenna feeder No.5 and connector..
7. Disconnect the antenna feeder No.7..
8. Verify that the continuity between antenna feeder No.3 terminals is as indicated in the table.
-
If not as indicated in the table, replace antenna feeder No.3.
 Antenna Feeder No.2 Removal/Installation
1. Disconnect the negative battery cable..
2. Remove the rain sensor cover. (Vehicles with auto light/wiper system).
3. Disconnect the rain sensor connector. (Vehicles with auto light/wiper system ...
 Antenna Feeder No.3 Removal/Installation
4SD (With Audio Unit (With Display))
1. Disconnect the negative battery cable..
2. Remove the rain sensor cover. (Vehicles with auto light/wiper system).
3. Disconnect the rain sensor connector. ...
Other materials:
Spark Plug Inspection [Mzr 2.3 Disi Turbo]
Specification
Spark plug type
L3BD-18110, L3YD-18110
Plug Gap Inspection
CAUTION:
To avoid possible damage to the tip, do not adjust the plug gap.
To prevent damaging the tip, use a wire type plug gap gauge when inspecting
the plug gap.
1. Measure the spark p ...
Control Switches
Temperature control dial
This dial controls temperature. Turn it
clockwise for hot and counterclockwise
for cold.
Fan control dial
The fan has seven speeds.
AUTO position
The amount of airflow will be
automatically controlled in accordance
with the set temperature.
Except AUTO position
Th ...
Recording of Vehicle Data
This vehicle is equipped with a computer which records the following main
vehicle data
related to vehicle controls, operation, and other driving conditions.
Recorded data
Vehicle conditions such as engine speed and vehicle speed
Driving operation conditions such as accelerator and brake pe ...
