Mazda 3 Owners Manual: Interior Equipment (View A)
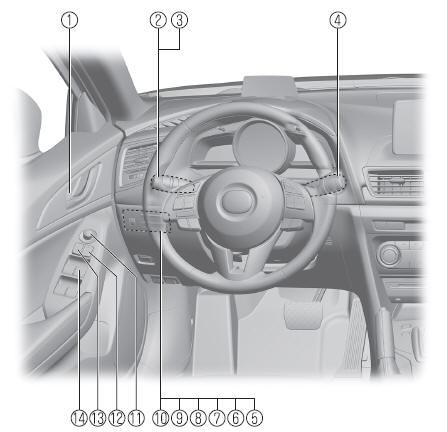
- Door-lock knob
- Turn and lane-change signal
- Lighting control
- Wiper and washer lever
- DSC OFF switch
- Tire pressure monitoring system set switch
- LDWS switch
- AFS OFF switch
- BSM OFF switch
- Headlight leveling switch
- Outside mirror switch
- Door-lock switch
- Power window lock switch
- Power window switches
- Audio control switches
- Instrument cluster
- Dashboard illumination knob
- Cruise control switches
- Hazard warning flasher switch
- Seat warmer switches
- Drive selection switch
- Push button start
- Steering shift switches
- Lock release lever
- Hood release handle
- Remote fuel-filller lid release
- Trunk release button

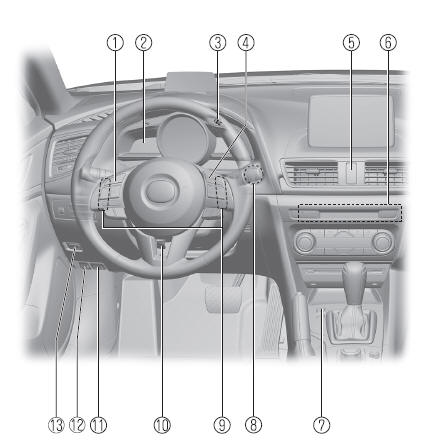
 Interior Equipment (View B)
SRS air bags
Active driving display
Climate control system
Rear window defogger switch
Audio system
CD player
Accessory sockets
External input terminal
Commander switch
Shift ...
Other materials:
Wheel Hub, Steering Knuckle Disassembly/Assembly
1. Disassemble in the order indicated in the table.
1
Dust Cover
2
Wheel hub component
.
3
Retaining clip
4
Wheel bearing
(See Wheel Bearing Removal Note.)
(See Wheel Bearing In ...
Restraints SST [Standard Deployment Control System]
49 H066 002
Deployment tool
49 D066 002
Adapter harness
49 L066 002
Adapter harness
49 B066 004
Adapter harness
49 N088 0A0
Fuel and Therm ...
Engine SST [Mzr 2.3 Disi Turbo]
1: Mazda SST number
2: Global SST number
Example
1:49 UN30 3328
2:303–328
Rear oil seal replacer
1:–
2:303–507
Crankshaft TDC timing pin
1:49 UN30 310610
2:303–1061
Camshaft
alignment timi ...
