Mazda 3 Service Manual: Radiator Removal/Installation [Mzr 2.0, Mzr 2.5]
WARNING:
-
Never remove the cooling system cap or loosen the radiator drain plug while the engine is running, or when the engine and radiator are hot. Scalding engine coolant and steam may shoot out and cause serious injury. It may also damage the engine and cooling system.
-
Turn off the engine and wait until it is cool. Even then, be very careful when removing the cap. Wrap a thick cloth around it and slowly turn it counterclockwise 2.5 turns. Step back while the pressure escapes.
-
When you are sure all the pressure is gone, turn the cap using the cloth, and remove it.
1. Remove the battery cover..
2. Disconnect the negative battery cable..
3. Remove the plug hole plate..
4. Remove the air cleaner component and fresh air duct (No.1, No.2)..
5. Remove the aerodynamic under cover No.2..
6. Drain the engine coolant..
7. Remove the cooling fan component..
8. Remove in the order indicated in the table.
9. Install in the reverse order of removal.
10. Refill the engine coolant..
11. Inspect for engine coolant leakage..
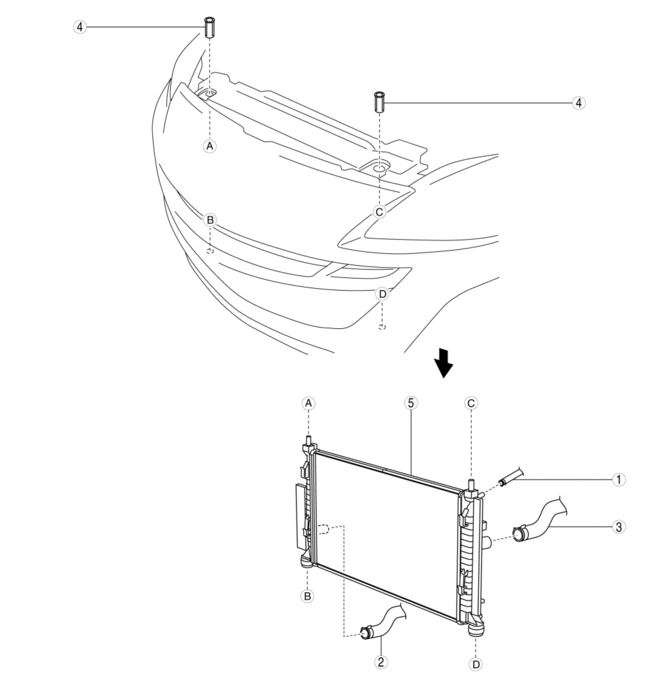
|
1 |
Coolant reserve tank hose |
|
2 |
Lower radiator hose |
|
3 |
Upper radiator hose |
|
4 |
Radiator mount (See Radiator Mount Removal Note.) (See Radiator Mount Installation Note.) |
|
5 |
Radiator (See Radiator Removal Note.) |
Radiator Mount Removal Note
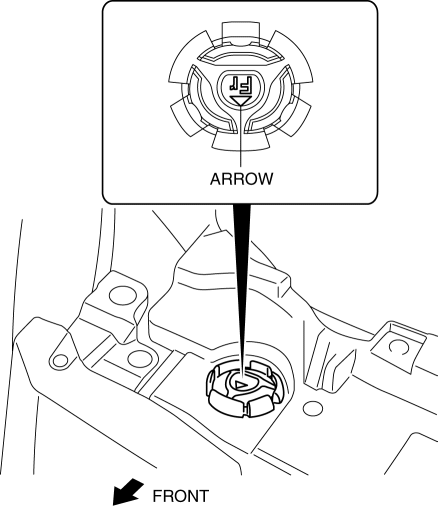
1. While pressing the radiator mount tab in the direction of the arrow shown in the figure, lift the radiator mount.
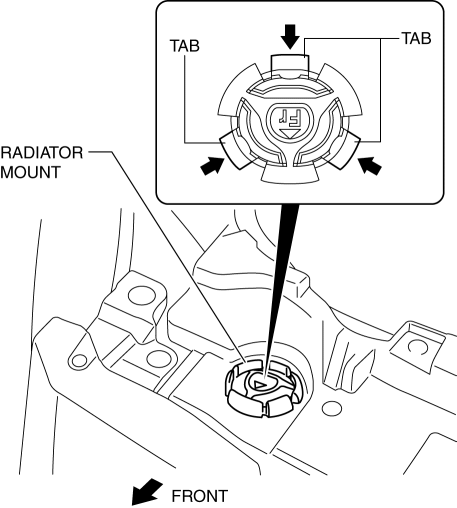
2. Remove the radiator mount.
Radiator Removal Note
1. Lift the radiator and remove it from the radiator installation holes on the shroud panel.
2. Move the radiator and condenser to the engine side.
3. Release the left and right tabs on the lower side of the radiator by pressing them in the direction shown in the figure.
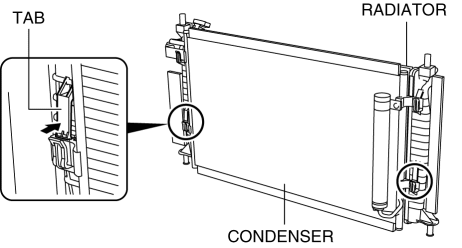
4. Lift the condenser to remove it from the left and right insertion areas on the upper side of the radiator.
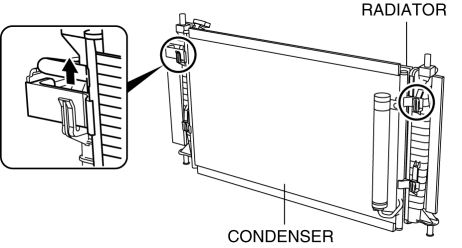
5. Set the condenser apart from the radiator.
6. Remove the radiator from below the engine compartment.
Radiator Mount Installation Note
1. Install the radiator mount so that the arrow on it is pointed toward the front of the vehicle.
 Radiator Drain Plug Replacement [Mzr 2.0, Mzr 2.5]
WARNING:
Never remove the cooling system cap or loosen the radiator drain plug while
the engine is running, or when the engine and radiator are hot. Scalding engine
coolant and steam may ...
 Shroud Panel Removal/Installation
CAUTION:
Because the shroud panel is installed to the bumper reinforcement, support
the shroud panel using a jack before removing the bumper reinforcement so as
not to apply excessive fo ...
Other materials:
Fan Switch Inspection [Manual Air Conditioner]
1. Disconnect the negative battery cable..
2. Remove the following parts:
a. Upper panel.
b. Shift lever knob (MTX).
c. Selector lever knob (ATX).
d. Shift panel.
e. Side wall.
f. Console.
g. Front scuff plate.
h. Front side trim.
i. Dashboard under cover.
j. Glove compartment. ...
Outside the United States/
Canada
Government regulations in the United States/Canada require that automobiles
meet specific
emission regulations and safety standards. Therefore, vehicles built for use in
the United
States/Canada may differ from those sold in other countries.
The differences may make it difficult or even imp ...
General Procedures (Front And Rear Axles)
Wheel and Tire Installation
1. When installing the wheels and tires, tighten the wheel nuts in a criss-cross
pattern to the following tightening torque.
Tightening torque
88—118 N·m {9.0—12 kgf·m, 65—87 ft·lbf}
Connector Disconnection
1. Disconnect the negative batte ...
