Mazda 3 Service Manual: Starter Interlock Switch Removal/Installation [C66 M R]
1. Remove the battery cover..
2. Disconnect the negative battery cable..
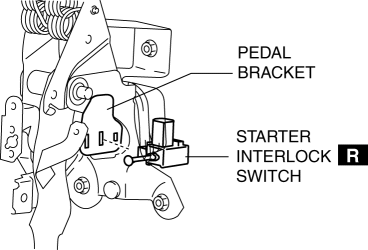
3. Disconnect the starter interlock switch connector.
4. Remove the starter interlock switch from the pedal bracket.
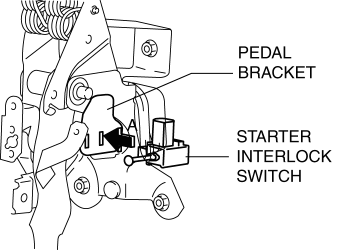
5. Insert a new starter interlock switch into the pedal bracket hole in the direction indicated by arrow A.
6. Slide the starter interlock switch pressing it in the direction indicated by arrow B until it is locked.
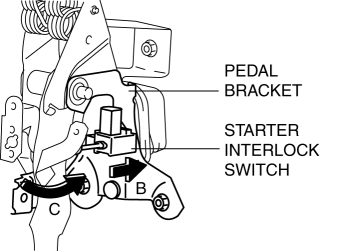
7. Fully depress the clutch pedal in the direction of arrow C, and verify that a click sound from the starter interlock switch is heard.
8. Install in the reverse order of removal.
9. Fully depress the clutch pedal, and verify that the engine starts.
 Starter Interlock Switch Inspection [Mzr 2.0, Mzr 2.5]
CAUTION:
Do not reuse the starter interlock switch if it is removed from the vehicle
even once. Replace with a new starter interlock switch when installing.
1. Remove the battery cove ...
 Starter Removal/Installation [Mzr 2.0, Mzr 2.5]
WARNING:
Remove and install all parts when the engine is cold, otherwise they can
cause severe burns or serious injury.
When the battery cables are connected, touching the vehic ...
Other materials:
Magnetic Clutch Adjustment [Full Auto Air Conditioner]
1. Measure the clearance around the entire circumference between the pressure
plate and A/C compressor pulley using a thickness gauge.
2. Verify the clearance.
If not within the specification, remove the pressure plate and adjust the
clearance by changing the shim (0.2 mm {0.008 i ...
Advanced Park cancelation/ suspension
■ Assistance will be canceled when
Under the following conditions, the Subaru Solterra Advanced Park system will
automatically terminate its operation. When this occurs, immediately take control
by firmly holding the steering wheel and pressing the brake pedal to safely stop
the Subaru Solt ...
Clutch Pedal Position (CPP) Switch Inspection [Mzr 2.0, Mzr 2.5]
Continuity Inspection
1. Verify that the CPP switch is installed properly..
2. Remove the battery cover..
3. Disconnect the negative battery cable..
4. Disconnect the CPP switch connector..
5. Verify that the continuity between CPP switch terminals A and B when the clutch
pedal is depress ...
