Mazda 3 Service Manual: Towing
-
Proper lifting and towing are necessary to prevent damage to the vehicle. Government and local laws must be followed.
-
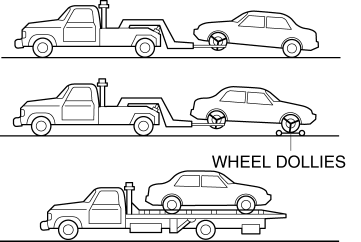
A towed vehicle usually should have its drive wheel (front wheels) off the ground. If excessive damage or other conditions prevent this, use wheel dollies.
-
When towing with the rear wheels on the ground, release the parking brake.
CAUTION:
-
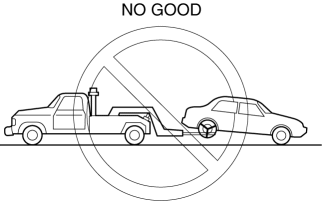
Do not tow the vehicle pointed backward with driving wheels on the ground. This may cause internal damage to the transaxle.
CAUTION:
-
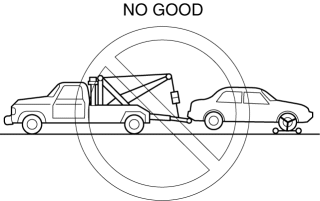
Do not tow with sling–type equipment. This could damage your vehicle. Use wheel–lift or flatbed equipment.
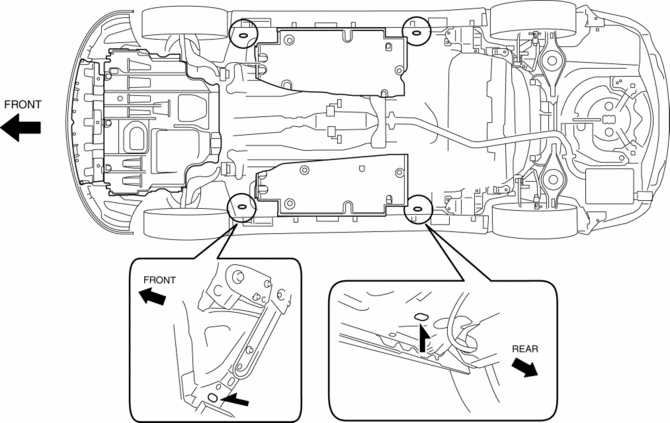
Vehicle Securing Position
-
When transporting the vehicle by flat bed tow truck or trailer, secure the vehicle to the trailer using the holes and left tiedown loop shown in the figure.
CAUTION:
-
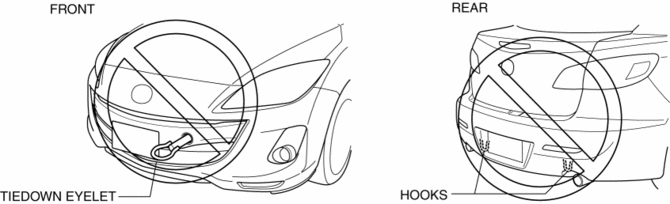
To prevent damage to the vehicle, do not use the tiedown eyelet (front) and the left/right tiedown loops (rear) for towing the vehicle using another vehicle.
-
Do not use the tie-down eyelet and rear hook for tying down the vehicle onto a trailer and flatbed tow truck. It may cause damage to the vehicle.
NOTE:
-
The tiedown eyelet (front) and the tiedown loops (rear) are used only when the vehicle is transported by ship.
 Trailer
...
 Body
Body
...
Other materials:
Fuel Gauge Sender Unit Removal/Installation
MZR 2.0, MZR 2.5
NOTE:
Fuel pump unit cannot be disassembled.
1. Remove the fuel gauge sender unit..
MZR 2.3 DISI Turbo
NOTE:
Fuel pump unit cannot be disassembled.
1. Remove the fuel gauge sender unit..
SKYACTIV-G 2.0
NOTE:
Fuel pump unit cannot be disasse ...
Starter Cut Relay Removal/Installation [MTX]
Advanced Keyless Entry And Push Button Start System Only
1. Disconnect the negative battery cable..
2. Remove the following parts:
Front scuff plate (LH).
Front side trim (LH).
Side wall.
Console.
3. Set the hood release lever out of the way..
4. Remove the ...
Side Step Molding Installation
NOTE:
Double-sided adhesive tape has already been adhered to a new side step molding
for installation.
When a side step molding is to be reused, perform the following procedure:
1. Remove any grease or dirt from the affixing surface of the side step molding.
2. Affix double-si ...
