
Mazda 3 Owners Manual: Turn and Lane-Change Signals
The ignition must be switched ON to use the turn and lane-change signals.
Turn Signals
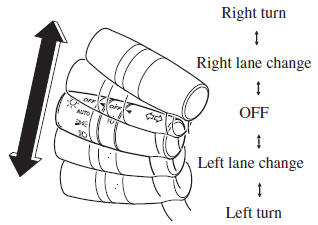
Move the signal lever down (for a left turn) or up (for a right turn) to the stop position. The signal will self-cancel after the turn is completed.
If the indicator light continues to flash after a turn, manually return the lever to its original position.
The turn signal indicators (green) in the instrument cluster flash according to the operation of the turn signal lever to show which signal is working.

NOTE
- If an indicator light stays on without ashing or if it flashes abnormally, one of the turn signal bulbs may be burned out.
- A personalized function is available to
change the turn indicator sound volume.
Lane-Change Signals
Move the lever halfway toward the direction of the lane change—until the indicator flashes— and hold it there. It will return to the off position when released.
Three-Flash Turn Signal
After releasing the turn signal lever, the turn signal indicator flashes three times.
The operation can be cancelled by moving the lever in the direction opposite to which it was operated.
NOTE The three-flash turn signal function can be switched to operable/inoperable using the personalization function.
Refer to Personalization Features on .
 Fog Lights
Use this switch to turn on the fog lights.
The fog lights will improve visibility at
night and during foggy conditions.
To turn the fog lights on, rotate the fog
light switch to the position. ...
 Windshield Wipers and Washer
The ignition must be switched ON to use
the wipers.
WARNING
Use only windshield washer fl uid or
plain water in the reservoir:
Using radiator antifreeze as washer
fl uid is danger ...
Other materials:
Front Door Key Cylinder Switch Inspection
1. To access the glass installation bolt, position the front door glass so that
the distance from the top of the front door glass to the upper part of the front
beltline molding is approx. 80 mm {3.1 in}.
2. Disconnect the negative battery cable..
3. Remove the following parts:
a. Inne ...
Underbody Maintenance
Road chemicals and salt used for ice and
snow removal and solvents used for dust
control may collect on the underbody. If
not removed, they will speed up rusting
and deterioration of such underbody parts
as fuel lines, frame, floor pan, and exhaust
system, even though these parts may be
coate ...
Discharge Headlight Service Warnings
Discharge Headlight Service Warnings
To prevent electrical shock when replacing the discharge headlight bulb,
always perform the servicing with dry hands and in an area where it does not
get wet.
Never probe the discharge headlight bulb connector directly with a finger
o ...
