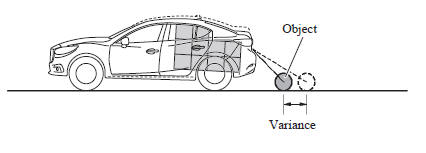
Mazda 3 Owners Manual: Variance Between Actual Road Conditions and Displayed Image
Some variance occurs between the actual road and the displayed road. Such variance in distance perspective could lead to an accident. Note the following conditions that may cause a variance in distance perspective.
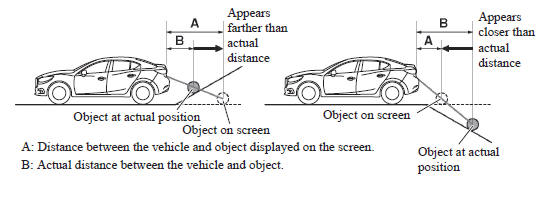
When the vehicle is tilted due to the weight of passengers and load
When the vehicle rear is lowered, the object displayed on the screen appears farther than the actual distance.
When there is a steep grade behind the vehicle
When there is a steep upgrade (downgrade) behind the vehicle, the object displayed on the screen appears farther (downgrade: closer) than the actual distance
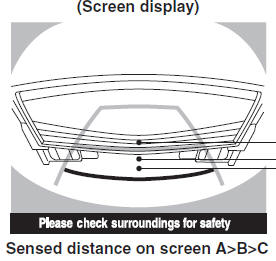
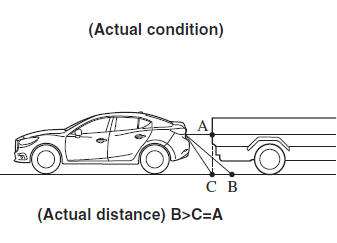
Three-dimensional object on vehicle rear
Because the distance guide lines are displayed based on a flat surface, the distance to the three-dimensional object displayed on the screen is different from the actual distance.
 Rear View Monitor Operation
The operation of the rear view monitor when reversing the vehicle varies
depending on
the traffic, road, and vehicle conditions. The amount of steering and the
timing also varies
depending on co ...
 Picture Quality Adjustment
WARNING
Always adjust the picture quality of the rear view monitor while the
vehicle is stopped:
Do not adjust the picture quality of the rear view monitor while driving
the vehic ...
Other materials:
Rear Spoiler Removal/Installation
4SD
1. Remove the trunk lid trim..
2. Remove the nuts.
3. While cutting the double-sided adhesive tape using a flathead screwdriver
or a razor, separate the rear spoiler from the trunk lid.
WARNING:
Using a razor with bare hands can cause injury. Always wear gloves when usin ...
Torque Converter Clutch (TCC) Non Operation [Fw6 A EL]
TROUBLESHOOTING ITEM
Torque converter clutch (TCC) non-operation
DESCRIPTION
TCC does not operate when vehicle reaches TCC operation range.
POSSIBLE CAUSE
Signal malfunction
...
Front Stabilizer Control Link Inspection
1. Remove the front stabilizer control link from the vehicle.. (See FRONT STABILIZER
REMOVAL/INSTALLATION [MZR 2.3 DISI Turbo]
2. Inspect for bending or damage. If there is any malfunction, replace the stabilizer
control link.
3. Rotate the ball joint stud 10 times and shake it side to side ...
