Mazda 3 Owners Manual: Volume/Display/Sound Controls
Volume adjustment
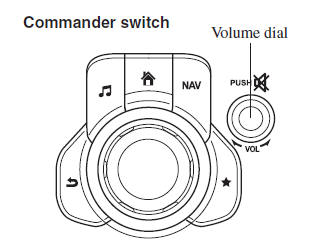
Turn the commander switch volume dial.
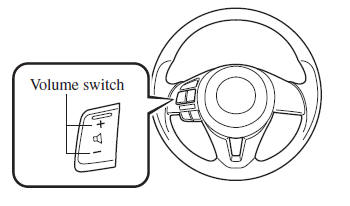
The volume switch on the steering switch can also be pressed.
Display setting
Select the icon on the home
screen to
display the Settings screen.
Select the  tab to select the item
you
would like to change.
Display OFF/Clock
The center display can be turned off.
Select  to turn the display off.
When  is
is
selected the center display turns off and
the clock is displayed.
The center display can be turned back on as follows:
- Touch the center display.
- Operate the commander switch.
Audio control switch
Daytime/nighttime (System) screen setting
The daytime or nighttime screen can be selected.
 : Switches screen automatically
according to headlight illumination
condition *1
 : Daytime screen setting
 : Nighttime screen setting
*1 The display is constantly on daytime screen when the illumination dimmer is cancelled.
Brightness adjustment
Adjust the center display brightness using the slider.
Contrast adjustment
Adjust the center display contrast using the slider.
Display setting reset
All of the screen setting values can be reset to their initial settings.
- Select
 .
. - Select
 .
.
Audio sound adjustment
Select the icon on the home screen to display the Settings screen.
Select the tab to select the item you would like to change.
|
Indication |
Setting value |
| Bass (Low pitch sound) | + Side: Low pitch
enhancement - Side: Low pitch reduction |
| Treble (Treble sound) | + Side: Treble
enhancement - Side: Treble reduction |
| Fade (Front/Rear volume balance) | Front: Front speaker volume enhancement Rear: Rear speaker volume enhancement |
| Balance (Left/right volume balance) | Right: Right speaker volume enhancement Left: Left speaker volume enhancement |
| ALC *1 (Automatic volume adjustment) | Off—Adjustment at seven levels |
| Bose ® Centerpoint *2 (Automatic surround level adjustment) | On/Off |
| Bose ® AudioPilot *2 (Automatic volume adjustment) | On/Off |
| Beep (Audio operation sound) | On/Off |
*1 Standard audio
*2 Bose ® Sound System
ALC (Automatic volume adjustment)
The automatic level control (ALC) is a feature that automatically adjusts audio volume and sound quality according to the vehicle speed. The volume increases in accordance with the increase in vehicle speed, and decreases as vehicle speed decreases.
Bose ® Centerpoint (Automatic surround level adjustment)
Centerpoint ® *3 lets vehicle owners enjoy a Bose ® surround sound experience from their existing CDs, MP3s and satellite radio.
Specifically engineered to meet the unique demands of reproducing surround sound in a vehicle.
Converts stereo signals to multiple channels allowing greater precision when reproducing the sound.
An enhanced algorithm to simultaneously create a wider, more spacious sound field.
*3 Centerpoint ® is a registered trademark of Bose Corporation.
Bose ® AudioPilot (Automatic volume adjustment)
When driving, background noise can interfere with enjoying music.
AudioPilot ® *4 noise compensation technology continuously adjusts the music to compensate for background noise and vehicle speed.
It reacts only to sustained noise sources and not intermittent ones, such as speed bumps.
An enhanced DSP algorithm allows faster and more effective compensation for unusual situations, such as driving on a very rough road or at high speeds.
*4 AudioPilot ® is a registered trademark of Bose Corporation.
 Home screen
Icon
Function
Applications
Information such as average fuel economy, maintenance, and warnings can
be verified.
Depending on the grade and specification, t ...
 Operating the Radio
Radio ON
Select the icon on the home
screen to display the Entertainment screen. When selecting
the desired radio, the following icons are indicated in the lower part of the
center display.
AM ...
Other materials:
Antenna (5-Door)
AM/FM Radio Antenna *
The AM/FM radio antenna receives both
AM and FM signals.
(Type A)
To remove the antenna, turn it
counterclockwise.
To install the antenna, turn it clockwise.
Make sure the antenna is securely
installed.
CAUTION
To prevent damage to the antenna,
r ...
Lane Departure Warning System (LDWS)
The LDWS notifies the driver that the vehicle may be deviating from its
lane.
The system detects the white or yellow lines on the traffic lane using the
Forward Sensing
Camera (FSC). If it determines that the vehicle may be deviating from its lane,
it notifies
the driver by flashing the L ...
Liftgate Side Trim Removal/Installation
1. Remove the liftgate upper trim..
2. Pull the point A of the strap hanger as shown in the figure.
3. Remove the strap hanger.
4. Remove the fastener.
5. Pull the liftgate side trim in the direction of arrow then remove clip A.
6. Detach tab B and C while pulling the liftgate sid ...
