Mazda 3 Service Manual: Starter Interlock Switch Inspection [Mzr 2.3 Disi Turbo]
CAUTION:
-
Do not reuse the starter interlock switch if it is removed from the vehicle even once. Replace with a new starter interlock switch when installing.
1. Remove the battery cover..
2. Disconnect the negative battery cable..
3. Disconnect the starter interlock switch connector.
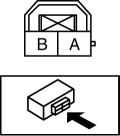
4. Verify that the continuity is as indicated in the table using a tester.

-
If the continuity is not as indicated in the table, replace the starter interlock switch.
.
 Starter Interlock Switch Inspection [Mzr 2.0, Mzr 2.5]
CAUTION:
Do not reuse the starter interlock switch if it is removed from the vehicle
even once. Replace with a new starter interlock switch when installing.
1. Remove the battery cove ...
 Starter Interlock Switch Inspection [Skyactiv G 2.0]
CAUTION:
Do not reuse the starter interlock switch if it is removed from the vehicle
even once. Replace with a new starter interlock switch when installing.
1. Remove the battery cove ...
Other materials:
Head Restraints
Your vehicle is equipped with head
restraints on all outboard seats and the
rear center seat * . The head restraints
are intended to help protect you and the
passengers from neck injury.
WARNING
Always drive with the head restraints
installed when seats are being used and
make s ...
Split/One-piece Folding the
Seatback
By lowering the rear seatback(s) the
luggage compartment space can be
expanded.
WARNING
Do not drive the vehicle with occupants
on folded down seatback(s) or in the
luggage compartment.
Putting occupants in the luggage
compartment is dangerous because
seat belts cannot be ...
Steering Switch Inspection
Without Bluetooth System
WARNING:
Handling the air bag module improperly can accidentally deploy the air bag
module, which may seriously injure you. Read the air bag system service warnings
and cautions before handling the air bag module..
1. Disconnect the negative battery cabl ...
