
Mazda 3 Owners Manual: Windshield Wipers
Turn the wipers on by pressing the lever up or down.
With intermittent wiper
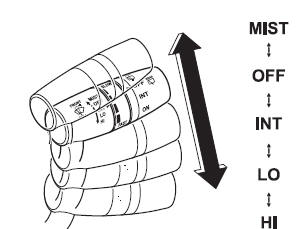
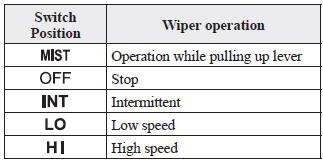
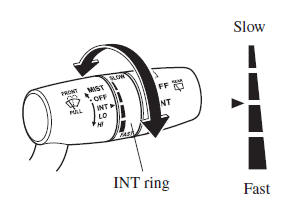
Variable-speed intermittent wipers
Set the lever to the intermittent position and choose the interval timing by rotating the ring.
With auto-wiper control
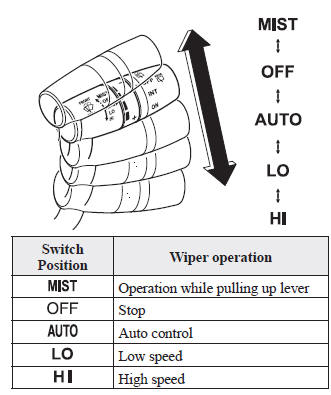
Auto-wiper control
When the wiper lever is in the 
position, the rain sensor senses the amount
of rainfall on the windshield and turns the
wipers on or off automatically (off—
intermittent—low speed—high speed).
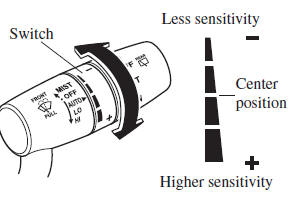
The sensitivity of the rain sensor can be adjusted by turning the switch on the wiper lever.
From the center position (normal), rotate the switch downward for higher sensitivity (faster response) or rotate it upward for less sensitivity (slower response).
CAUTION
|
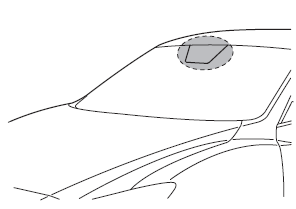

 position and the
NOTE
- Switching the auto-wiper lever from the
 to the
 position while driving
activates the windshield wipers once, after which they operate according to the rainfall amount. - The auto-wiper control may not operate when the rain sensor temperature is about -10 °C (14 °F) or lower, or about 85 °C (185 °F) or higher.
- If the windshield is coated with water repellent, the rain sensor may not be able to sense the amount of rainfall correctly and the auto-wiper control may not operate properly.
- If dirt or foreign matter (such as ice or
matter containing salt water) adheres
to the windshield above the rain sensor,
or if the windshield is iced, it could
cause the wipers to move automatically.
However, if the wipers cannot remove this ice, dirt or foreign matter, the autowiper control will stop operation. In this case, set the wiper lever to the low speed position or high speed position for manual operation, or remove the ice, dirt or foreign matter by hand to restore the auto-wiper operation.
- If the auto-wiper lever is left in the

position, the wipers could operate automatically from the effect of strong light sources, electromagnetic waves, or infrared light because the rain sensor uses an optical sensor. It is recommended that the auto-wiper lever be switched to the position
other than when driving the vehicle under rainy conditions. - The auto-wiper control functions can be turned off. Refer to Personalization Features on .
 Windshield Wipers and Washer
The ignition must be switched ON to use
the wipers.
WARNING
Use only windshield washer fl uid or
plain water in the reservoir:
Using radiator antifreeze as washer
fl uid is danger ...
 Windshield Washer
Pull the lever toward you and hold it to
spray washer fluid.
NOTE
With the wiper lever in the or
intermittent position/ position, the
wipers will operate continuously until the
lever is rele ...
Other materials:
Drive Belt Removal/Installation [Mzr 2.0, Mzr 2.5]
MZR 2.0
A/C drive belt removal
1. Remove the aerodynamic under cover No.2 and splash shield as a single unit..
2. Remove the nut shown in the figure and set the power steering pipe component
out of the way.
3. Set the SST as shown in the figure.
NOTE:
Hold the SST by hand unti ...
Steering Switch Removal/Installation
WARNING:
Handling the air bag module improperly can accidentally deploy the air bag
module, which may seriously injure you. Read the air bag system service warnings
and cautions before handling the air bag module..
1. Disconnect the negative battery cable and wait for 1 min or mo ...
Windshield Washer Nozzle Removal/Installation
1. Remove the following parts:
a. Windshield wiper arm and blade.
b. Front fender molding.
c. Cowl grille.
2. Remove the windshield washer hose from the windshield washer nozzle.
3. Squeeze the tabs of the windshield washer nozzle.
4. Pull the windshield washer nozzle out to remove it.
...
