Mazda 3 Owners Manual: Anchor Bracket
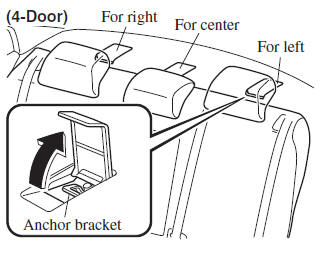
Anchor brackets for securing childrestraint systems are equipped in the vehicle. Locate each anchor position using the illustration.
To install a child-restraint system, always follow the instruction manual accompanying the child-restraint system.
Anchor bracket location
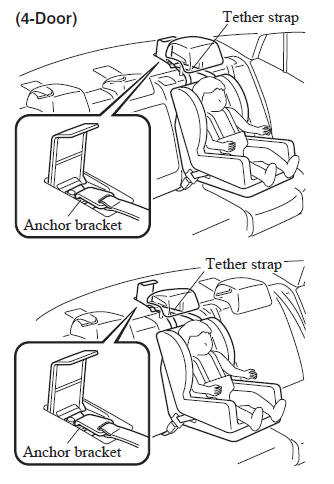
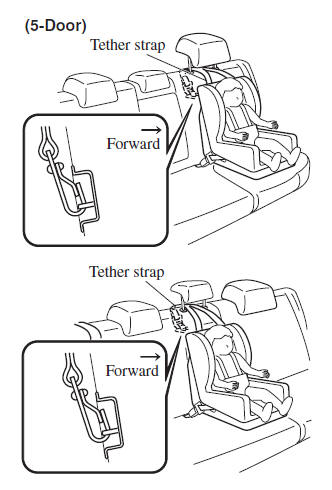
Use the indicated anchor bracket locations when installing a child-restraint system equipped with a tether.

| WARNING
Always attach the tether strap to the
correct tether anchor position:
Attaching the tether strap to the
incorrect tether anchor position is
dangerous. In a collision, the tether
strap could come off and loosen the
child-restraint system. If the childrestraint
system moves it could result
in death or injury to the child.
Always route the tether strap between the head restraint and the seatback: Routing the tether strap on top of the head restraint is dangerous. In a collision the tether strap could slide off the head restraint and loosen the childrestraint system. The child-restraint system could move which may result in death or injury to the child. |
 Installing Child-Restraint Systems
Accident statistics reveal that a child is
safer in the rear seat. The front passenger's
seat is clearly the worst choice for any
child under 12, and with rear-facing childrestraint
systems it is ...
 Using Automatic Locking Mode
Follow these instructions when using a child-restraint system, unless you are
attaching a LATCH-equipped childrestraint system to the rear LATCH lower
anchors. Refer to “Using LATCH Lower Anchor ...
Other materials:
Drive Belt Removal/Installation [Skyactiv G 2.0]
WARNING:
A hot engine can cause severe burns. Turn off the engine and wait until it
is cool before servicing.
NOTE:
Remove/install the drive belt from the underside of the vehicle.
Generator Drive Belt Removal/Installation
CAUTION:
To prevent damage to the dri ...
i-ACTIVSENSE
i-ACTIVSENSE is a collective term covering a series of advanced safety and
driver support
systems which make use of a Forward Sensing Camera (FSC) and radar sensors.
These
systems consist of active safety and pre-crash safety systems.
These systems are designed to assist the driver in safer ...
Non Return Valve Inspection [Mzr 2.3 Disi Turbo]
WARNING:
Fuel is very flammable liquid. If fuel spills or leaks from the pressurized
fuel system, it will cause serious injury or death and facility breakage. Fuel
can also irritate skin and eyes. To prevent this, always complete the “Fuel
Line Safety Procedure”, while referring ...
