Mazda 3 Service Manual: Caliper (Front) Disassembly/Assembly [Mzr 2.0, Skyactiv G 2.0, Mzr 2.5]
1. Disassemble in the order indicated in the table.
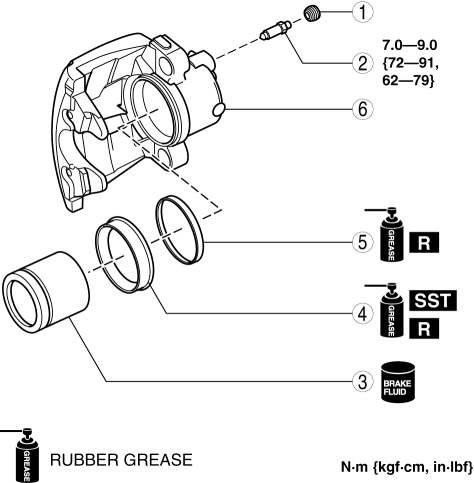
|
1 |
Bleeder cap |
|
2 |
Bleeder screw |
|
3 |
Piston (See Piston Disassembly Note.) (See Piston Assembly Note.) |
|
4 |
Dust seal (See Dust Seal Assembly Note.) |
|
5 |
Piston seal |
|
6 |
Caliper body |
2. Assemble in the reverse order of disassembly.
Piston Disassembly Note
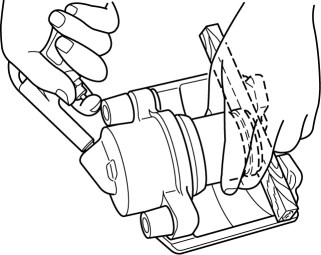
1. Insert a piece of wood in the caliper as shown in the figure and blow compressed air through the bleeder screw installation hole to remove the piston from the caliper body.
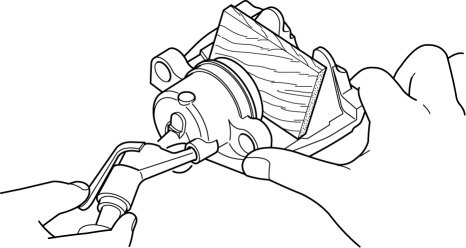
WARNING:
-
When compressed air is blown into the caliper body, injury to a finger or other part from pinching could result from the piston springing up. When blowing in compressed air, do not place your fingers between the piston and caliper body when performing the work.
CAUTION:
-
The piston could be damaged if blown out with great force. Blow the compressed air slowly to prevent the piston from suddenly popping out.
Dust Seal Assembly Note
1. Assemble a new dust seal to the caliper using the SSTs
and a press with a press-in force of 834 N {85 kgf, 187 in·lbf}
.
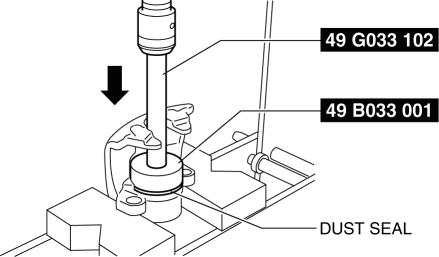
2. Verify that there is no gap between the dust seal and caliper body.
Piston Assembly Note
1. Press the piston into the dust seal opening as shown in the figure.
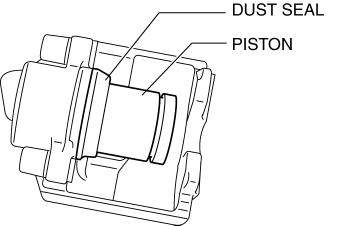
2. Insert a piece of wood between the caliper body and the piston, and while supporting the piston by hand, blow compressed air through the brake hose installation hole.
WARNING:
-
When blowing compressed air into the caliper body, the piston may pop out and cause injury if not supported at the correct point. Securely support the piston friction surface by hand when blowing compressed air.
NOTE:
-
By blowing compressed air, the dust seal expands due to air pressure and covers the piston end.
3. Verify that the dust seal lip covers the piston end as shown in the figure.

4. Press the piston into the caliper body completely.
 Disc Brakes
...
 Caliper (Front) Disassembly/Assembly [Mzr 2.3 Disi Turbo]
1. Disassemble in the order indicated in the table.
1
Bleeder cap
2
Bleeder screw
3
Piston
(See Piston Disassem ...
Other materials:
i-ACTIVSENSE
i-ACTIVSENSE is a collective term covering a series of advanced safety and
driver support
systems which make use of a Forward Sensing Camera (FSC) and radar sensors.
These
systems consist of active safety and pre-crash safety systems.
These systems are designed to assist the driver in safer ...
Front Side Marker/Front Turn Light Bulb Removal/Installation
1. Disconnect the negative battery cable..
2. Slightly bend back the front mudguard..
3. Rotate the front side marker/front turn light socket in the direction of the
arrow shown in the figure.
4. Remove the front side marker/front turn light bulb.
5. Install in the reverse order of ...
Floor Mat
WARNING
Make sure the fl oor mats are hooked on
the retention pins to prevent them from
bunching up under the foot pedals:
Using a fl oor mat that is not secured is
dangerous as it will interfere with the
accelerator and brake pedal operation,
which could result in an acc ...
