Mazda 3 Service Manual: Coupler Component Removal/Installation [Fw6 A EL]
WARNING:
-
A hot transaxle and ATF can cause severe burns. Turn off the engine and wait until they are cool.
-
Always wear protective eye wear when using the air compressor. If the air compressor is used, any particles of dirt or soiling could spatter and get into the eyes.
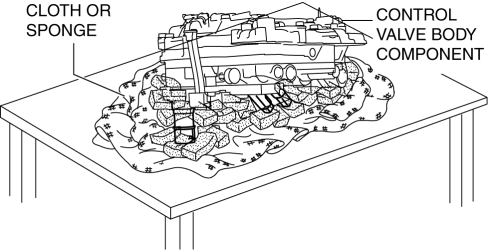
CAUTION:
-
Do not place the control valve body connector pointed downward as the control valve body connector part and sensor could be damaged. If the servicing can only be performed by pointing the control valve body connector downward, spread a large quantity of cloth or sponges on a table and place the control valve body connector part and sensor on the table so that they do not directly contact the table.
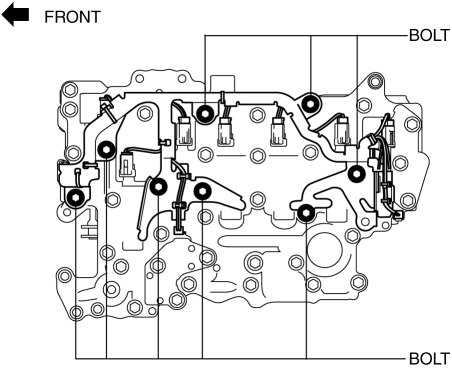
1. Select the selector lever to P position.
2. Remove the battery cover..
3. Disconnect the negative battery cable..
4. Remove the aerodynamic under cover No.2..
5. Clean the transaxle exterior throughout with a steam cleaner or cleaning solvents.
6. Remove the air cleaner component..
7. Remove the control valve body..
8. Remove the oil seal (control valve body)..
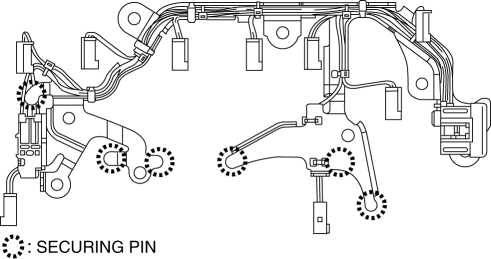
9. Disconnect the coupler component connectors.
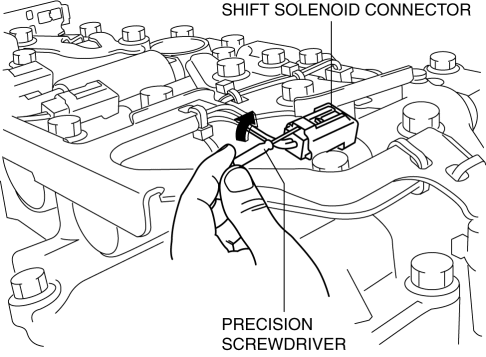
CAUTION:
-
Do not scratch the shift solenoid, shift solenoid connector, oil pressure switch, and oil pressure switch connector with the precision screwdriver or screwdriver.
-
When disconnecting connectors, grasp the connectors, not the wiring harnesses. Otherwise, the wiring harnesses may be pulled out of the connector causing poor contact.
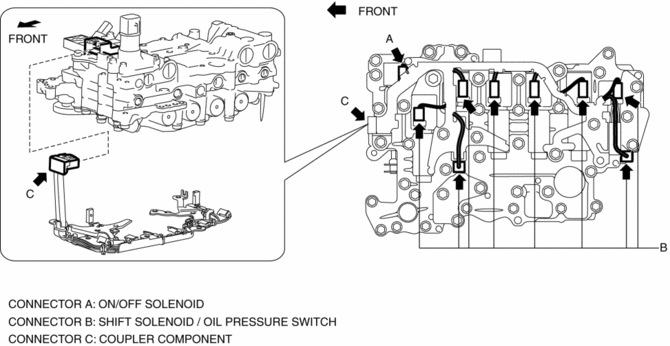
a. Disconnect connector A by pressing the connector tab with your fingers.
b. Insert a precision screwdriver and move it in the direction of the arrow to disconnect connector B as shown in the figure.
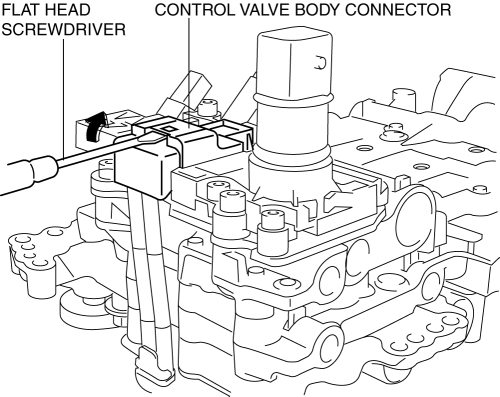
c. Insert a screwdriver and move it in the direction of the arrow to disconnect connector C as shown in the figure.
CAUTION:
-
If connector C is disconnected using a precision screwdriver, the precision screwdriver could be damaged. Use a flathead screwdriver.
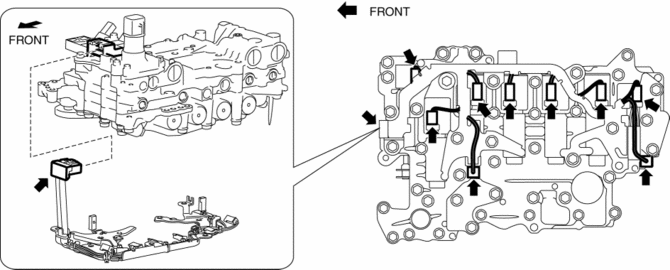
10. Remove the coupler component.
CAUTION:
-
Each solenoid valve has a securing pin which is used to prevent the solenoid valve from falling off the wiring harness bracket. Be careful not to drop and lose the securing pin when removing the wiring harness bracket.
11. Temporarily install the coupler component so that the oil strainer installation bolt hole does not deviate.
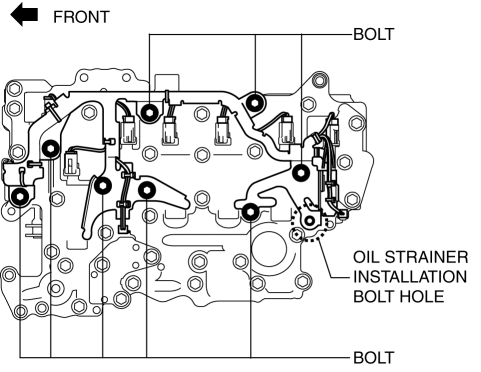
12. After verifying that the oil strainer installation bolt hole is not deviated, install the coupler component.
-
Tightening torque
-
9—10 N·m {92—101 kgf·cm, 80—88 in·lbf}
13. Connect the coupler component connectors.
14. Install the oil seal (control valve body)..
15. Install the control valve body..
16. Install the aerodynamic under cover No.2..
17. Install the hose clamp..
18. Connect the control valve body connector..
19. Add the ATF..
20. Install the air cleaner component..
21. Connect the negative battery cable..
22. Install the battery cover..
23. Perform the “Mechanical System Test”..
 Control Valve Body Removal/Installation [Fw6 A EL]
On-Vehicle Removal
WARNING:
A hot transaxle and ATF can cause severe burns. Turn off the engine and wait
until they are cool.
Using compressed air can cause dirt and other particle ...
 Down Switch Inspection [FS5 A EL]
1. Perform the following procedures.
a. Remove the battery cover..
b. Disconnect the negative battery cable.
c. Remove the console..
d. Disconnect the selector lever component connector.
...
Other materials:
Vanity Mirror Illumination Inspection
1. Disconnect the negative battery cable..
2. Remove the sunvisor..
3. Verify that the continuity between the vanity mirror illumination terminals
is as indicated in the table.
If not as indicated in the table, inspect the bulb. If there is no malfunction,
replace the sunvisor.
...
Rear Seat Back Frame Removal/Installation
1. Remove the rear seat cushion..
2. Remove the rear buckle installation bolt..
3. Remove the rear seat back..
4. Remove the headrest.
5. Open the fasteners.
6. Detach the hooks.
7. Remove the child-restraint seat anchor covers in the order of (1), (2) as
shown in the figure. (5H ...
Basic Operation Method
TOUCH & TAP
Touch or tap on the item indicated on the screen.
The operation is launched and the next item is displayed.
SLIDE
Touch the setting item displaying a slider bar.
Touch the slider with your finger and move to the desired level.
SWIPE
Touch the screen with ...
