Mazda 3 Service Manual: Door Lock Switch Removal/Installation
1. Disconnect the negative battery cable..
2. Remove the inner garnish..
3. Remove the front door trim..
4. Remove the front inner handle..
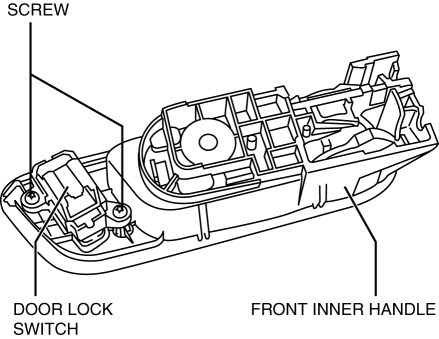
5. Remove the screws, then remove the door lock switch.
6. Install in the reverse order of removal.
 Door Lock Switch Inspection
1. Disconnect the negative battery cable..
2. Remove the inner garnish..
3. Remove the front door trim..
4. Remove the front inner handle..
5. Inspect for continuity between the door lock swit ...
 Keyless Antenna Removal/Installation
Interior, Front
1. Disconnect the negative battery cable..
2. Remove the following parts:
a. Upper panel.
b. Shift knob (MTX).
c. Selector lever knob (ATX).
d. Shift panel.
e. Side wall. ...
Other materials:
TCM Inspection [FS5 A EL]
NOTE:
The TCM terminal voltage can vary with conditions when measuring and changes
due to age deterioration on the vehicle, causing false diagnosis. Therefore
a comprehensive inspection of the input and output systems, and the TCM is necessary
to determine where the malfunction occu ...
General Procedures (Steering)
Wheel and Tire Installation
1. When installing the wheels and tires, tighten the wheel nuts in a criss-cross
pattern to the following tightening torque.
Tightening torque
88—118 N·m {9.0—12 kgf·m, 65—87 ft·lbf}
Connector Disconnection
1. Disconnect the negative batte ...
Steering Gear And Linkage Inspection
Steering Rack Inspection
1. Inspect for cracking, damage, and tooth wear.
If there is any malfunction, replace the steering rack.
2. Measure the steering rack warp.
If it exceeds the maximum specification, replace the steering rack.
Steering rack runout
Large ...
