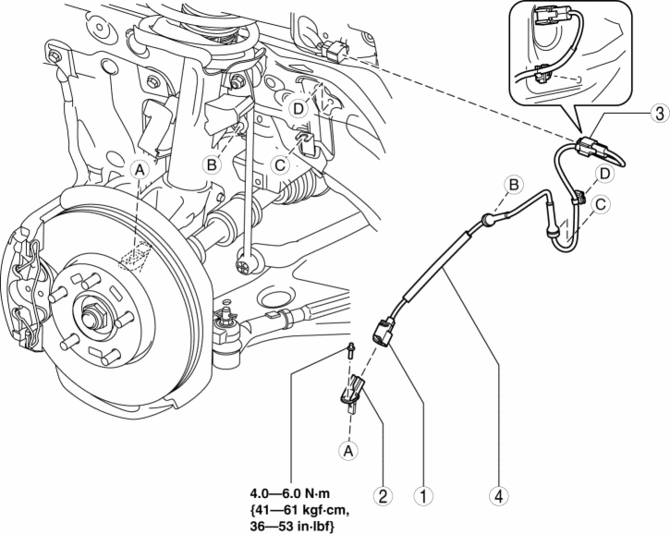
Mazda 3 Service Manual: Front ABS Wheel Speed Sensor Removal/Installation
1. Remove in the order indicated in the table.
2. Install in the reverse order of removal.
3. After installation, verify that there is no twisting in the front ABS wheel-speed sensor.
|
1 |
Connector |
|
2 |
Front ABS wheel-speed sensor |
|
3 |
Connector (See Connector Removal Note.) |
|
4 |
Front ABS wheel-speed sensor wiring harness |
Connector Removal Note
1. Pull aside the mudguard and disconnect the connector.
 Front ABS Wheel Speed Sensor Inspection
Sensor Output Value Inspection
CAUTION:
Resistance inspection using other testers may cause damage to the ABS wheel-speed
sensor internal circuit. Be sure to use the M-MDS to inspect the A ...
 Precaution [ABS]
1. Any one or a combination of the ABS warning and brake system warning lights
illuminates even when the system is normal.
Warning lights that may illuminate and/or flash
...
Other materials:
Jack
To remove the jack
(4–Door)
Push the tabs and remove the cover.
(5–Door)
Turn the knob and remove the cover.
Turn the wing bolt and jack screw
counterclockwise.
To secure the jack
Insert the wing bolt into the jack with
the jack screw pointing to the down
a ...
Head Restraints
Your vehicle is equipped with head
restraints on all outboard seats and the
rear center seat * . The head restraints
are intended to help protect you and the
passengers from neck injury.
WARNING
Always drive with the head restraints
installed when seats are being used and
make s ...
Shift Panel Removal/Installation
ATX
1. Remove the upper panel..
2. Remove the selector lever knob..
3. Pull the shift panel in the direction of the arrow shown in the figure and
remove it while detaching the clips A, hook B and guides C.
4. Pull the shift panel in the direction of the arrow (1), (2), (3) while remove ...
