Mazda 3 Service Manual: Front Door Removal/Installation
WARNING:
-
Removing the front door without supporting it could cause the front door to fall and cause serious injury. Always perform the procedure with at least another person to prevent the front door from falling.
1. Disconnect the negative battery cable..
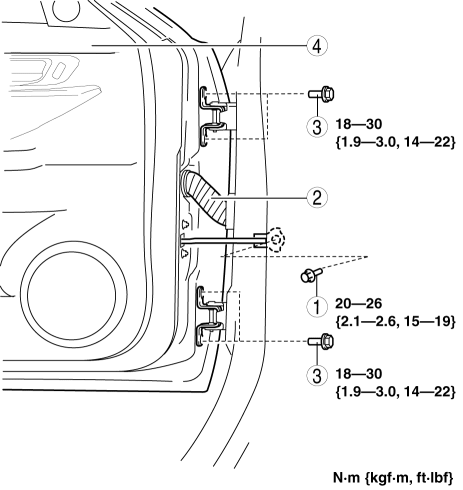
2. Remove in the order indicated in the table.
|
1 |
Bolt A |
|
2 |
Connector (See Connector Removal Note.) |
|
3 |
Bolt B |
|
4 |
Front door |
3. Install in the reverse order of removal.
4. Adjust the front door..
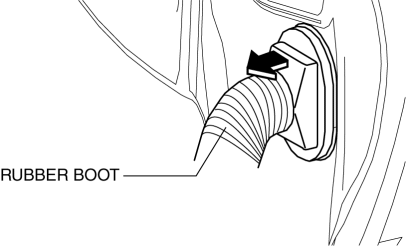
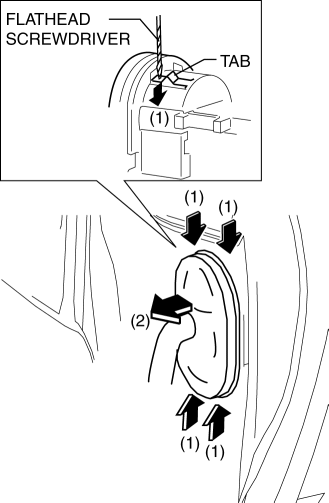
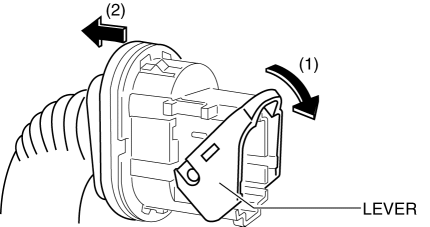
Connector Removal Note
1. Pull the rubber boot outward.
2. Press the tab in the direction of arrow (1) shown in the figure using a tape-wrapped flathead screwdriver, and remove the connector from the body in the direction of arrow (2) shown in the figure.
3. Lower the lever in the direction of arrow (1), and disconnect the connector in the direction of arrow (2).
 Front Door Module Panel Removal/Installation
1. To access the glass installation bolt, position the front door glass so that
the distance from the top of the front door glass to the upper part of the front
beltline molding is approx. 80 mm { ...
 Front Outer Handle Removal/Installation
1. To access the glass installation bolt, position the front door glass so that
the distance from the top of the front door glass to the upper part of the front
beltline molding is approx. 80 mm { ...
Other materials:
Console Removal/Installation
1. Disconnect the negative battery cable..
2. Remove the following parts:
a. Upper panel.
b. Shift knob (MTX).
c. Selector lever knob (ATX).
d. Shift panel.
e. Side wall.
3. Remove the bolts.
4. Remove the screws.
5. Pull the console in the direction of the arrow shown in t ...
Washer Fluid Level Sensor Inspection
1. Disconnect the negative battery cable..
2. Remove the front bumper..
3. Verify that continuity between the washer fluid-level sensor terminals is
as indicated in the table.
If not as specified, replace the washer fluid-level sensor.
...
Cylinder Head Gasket Replacement [Mzr 2.0, Mzr 2.5]
WARNING:
Fuel vapor is hazardous. It can very easily ignite, causing serious injury
and damage. Always keep sparks and flames away from fuel.
Fuel line spills and leakage are dangerous. Fuel can ignite and cause serious
injuries or death and damage. Fuel can also irritate skin ...
