Mazda 3 Service Manual: Front Stabilizer Removal/Installation [Mzr 2.0, Skyactiv G 2.0, Mzr 2.5]
1. Remove the joint cover..
2. Disconnect the steering shaft from the steering gear and linkage..
3. Remove the front crossmember component..
4. Remove in the order indicated in the table.
5. Install in the reverse order of removal.
6. Inspect the wheel alignment and adjust it if necessary..
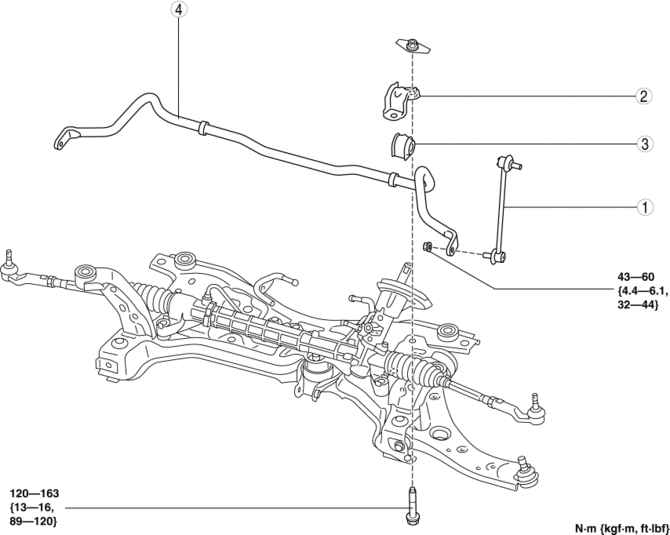
|
1 |
Front stabilizer control link |
|
2 |
Front stabilizer bracket (SeeFront Stabilizer Bracket Removal Note.) (See Front Stabilizer, Front Stabilizer Bushing and Front Stabilizer Bracket Installation Note.) |
|
3 |
Front stabilizer bushing (SeeFront Stabilizer, Front Stabilizer Bushing and Front Stabilizer Bracket Installation Note.) |
|
4 |
Front stabilizer (See Front Stabilizer, Front Stabilizer Bushing and Front Stabilizer Bracket Installation Note.) |
Front Stabilizer Bracket Removal Note
1. Secure the front stabilizer bracket flange using a vise.
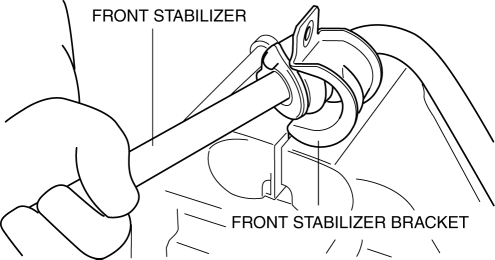
2. Remove the front stabilizer.
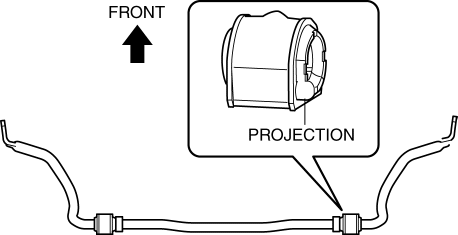
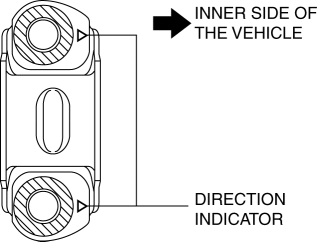
Front Stabilizer, Front Stabilizer Bushing and Front Stabilizer Bracket Installation Note
1. Install the front stabilizer bushing so that the projection points to the right side of the vehicle.
2. Point the direction indicator on the stabilizer bracket inward and install front stabilizer bracket using a vise.
3. Temporarily install the front stabilizer component.
4. Tighten the bolts following order.
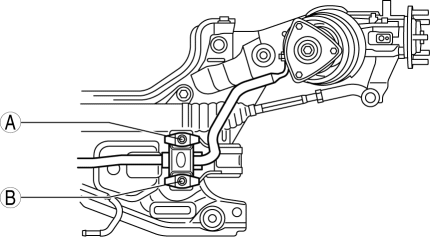
a. Temporarily tighten bolts A and B shown in the figure.
b. Tighten bolt A.
c. Tighten bolt B.
d. Tighten bolt A.
 Front Stabilizer Control Link Inspection
1. Remove the front stabilizer control link from the vehicle.. (See FRONT STABILIZER
REMOVAL/INSTALLATION [MZR 2.3 DISI Turbo]
2. Inspect for bending or damage. If there is any malfunction, replac ...
 Front Stabilizer Removal/Installation [Mzr 2.3 Disi Turbo]
1. Remove the joint cover..
2. Disconnect the steering shaft from the steering gear and linkage..
3. Remove the front crossmember component..
4. Remove in the order indicated in the table.
5. ...
Other materials:
Pre-programming the HomeLink
System
NOTE
It is recommended that a new battery be
placed in the hand-held transmitter of the
device being programmed to HomeLink
for quicker training and accurate
transmission of the radio-frequency signal.
Verify that there is a remote control
transmitter available for the device you
would ...
Air Bag Module And Pre Tensioner Seat Belt Deployment Procedures [Two Step Deployment
Control System]
WARNING:
A live (undeployed) air bag module or pre-tensioner seat belt may accidentally
operate (deploy) when it is disposed of and cause serious injury. Do not dispose
of a live (undeployed) air bag module and pre-tensioner seat belt. If the SSTs
(Deployment tool and Adapter harn ...
Precaution
Intermittent Concern Troubleshooting
Vibration method
If a malfunction occurs or becomes worse while driving on a rough road or
when the engine is vibrating, perform the following steps.
NOTE:
There are several reasons why vehicle or engine vibration could cause an
electr ...
