Mazda 3 Service Manual: Fuel Filler Cap Inspection [Mzr 2.0, Mzr 2.5]
Leakage Inspection
1. Perform the following SST
(Evaporative Emission System Tester 134-01049A) self-test:
NOTE:
-
If the tester does not work correctly during self-test, refer to the tester operators manual for more detailed procedures.
a. Verify that the gas cylinder valve is closed and the control valve located on the tester is in the TEST position. All tester displays should be off at this time.
b. Connect the long hose (part of SST
) to the tester.

c. Connect the manifold assembly (part of SST
) to the long hose as shown.
d. Open the gas cylinder valve and verify the gas cylinder regulator left gauge reads 69—82 kPa {0.71—0.83 kgf/cm2, 10—12 psi}
(preset at factory).
-
If not, refer to the tester operators manual to contact tester manufacturer.
e. Press the ON/OFF switch to turn on the SST
and make sure the left display reads 0.0
.
f. Turn the control valve on the tester to the FILL position.
g. Verify the left display reading is within 13.9
to 14.0
in of water.
-
If not, adjust the pressure using the regulator knob located on the right side of the tester.
h. Turn the control valve to TEST position and press the START switch.
i. After the 2-min
countdown (left display) is completed, the right display shows the total pressure loss for that period. A 0.5
in of water loss is acceptable on the self-test.
-
If the loss is more than 0.5
in of water, do one or more self-test. If the failed test repeats, check for leak using the ultrasonic leak detector (part of SST
).
2. Press the RESET switch to set the left display reading to 0.0.
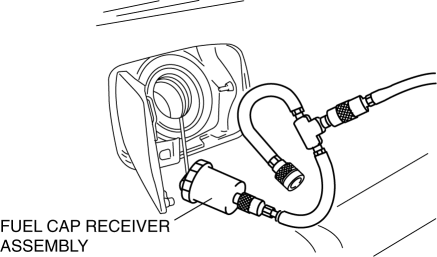
3. Connect the fuel cap receiver assembly (part of SST
) to the manifold assembly and fuel-filler cap from the vehicle.
-
If the fuel-filler cap is not a genuine part, replace it.
4. Turn the control valve to the FILL position.
5. Wait (maximum 20 s
) until the left display reads 13.9
to 14.0
in of water.
-
If the reading is slightly below the specification, adjust it using the regulator knob.
-
If the reading is far below, the fuel-filler cap has a leak. Replace it.
6. Turn the control valve to the TEST position and press the START switch.
7. After the 2-min
countdown (left display) is completed, check the test result (the failed/passed light on the tester).
-
If the green light turns on, the fuel-filler cap is normal.
-
If the red light turns on, the fuel-filler cap has a leak. Replace it.
8. Close the gas cylinder valve.
9. Turn the control valve to the FILL position.
10. Press the ON/OFF switch to turn off the tester.
 Before Service Precaution [Mzr 2.0, Mzr 2.5]
WARNING:
Fuel vapor is hazardous. It can very easily ignite, causing serious injury
and damage. Always keep sparks and flames away from fuel.
Fuel line spills and leakage from the p ...
 Fuel Filler Lid Adjustment
1. Measure the gap and height difference between the fuel-filler lid and the
body.
2. Loosen the fuel-filler lid installation bolts, and adjust the fuel-filler
lid.
Standard clearance
...
Other materials:
Front Door Key Cylinder Switch Inspection
1. To access the glass installation bolt, position the front door glass so that
the distance from the top of the front door glass to the upper part of the front
beltline molding is approx. 80 mm {3.1 in}.
2. Disconnect the negative battery cable..
3. Remove the following parts:
a. Inne ...
Passenger Compartment Temperature Sensor Removal/Installation [Full Auto Air
Conditioner]
1. Disconnect the negative battery cable..
2. Remove the following parts:
a. Front scuff plate.
b. Front side trim.
c. Dashboard under cover.
d. Upper panel.
e. Shift lever knob (MTX).
f. Selector lever knob (ATX).
g. Shift panel.
h. Side wall.
i. Console.
j. Hood release lever ...
Variable Intake Air Shutter Valve Actuator Inspection [Mzr 2.0, Mzr 2.5]
Operation Inspection
1. Remove the air hose..
2. Disconnect the vacuum hose from the variable intake air shutter valve actuator.
3. Connect a vacuum pump to the variable intake air shutter valve actuator.
NOTE:
Covered with a hood, the rod of the variable intake air shutter valv ...
