Mazda 3 Service Manual: Generator Removal/Installation [Mzr 2.0, Mzr 2.5]
WARNING:
-
Remove and install all parts when the engine is cold, otherwise they can cause severe burns or serious injury.
-
When the battery cables are connected, touching the vehicle body with generator terminal B will generate sparks. This can cause personal injury, fire, and damage to the electrical components. Always disconnect the negative battery cable before performing the following operation.
CAUTION:
-
The generator can be damaged by the heat from the exhaust manifold. Make sure the generator duct is installed securely (MZR 2.5).
1. Remove the battery cover..
2. Disconnect the negative battery cable..
3. Remove the aerodynamic under cover No.2 and splash shield as a single unit..
4. Remove the generator drive belt with the A/C drive belt still installed and set it out of the way. (MZR 2.0).
5. Remove the drive belt. (MZR 2.5).
6. Remove in the order indicated in the table.
7. Install in the reverse order of removal.
MZR 2.0
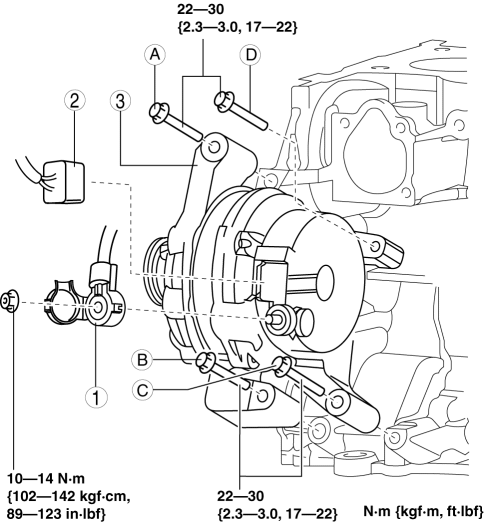
|
1 |
Terminal B cable |
|
2 |
Generator connector |
|
3 |
Generator (See Generator Installation Note (MZR 2.0).) |
MZR 2.5
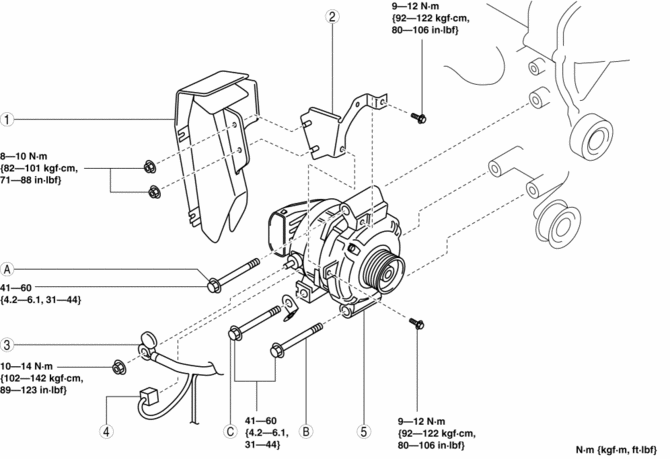
|
1 |
Generator duct (See Generator Duct Removal Note (MZR 2.5).) (See Generator Duct Installation Note (MZR 2.5).) |
|
2 |
Generator duct bracket |
|
3 |
Terminal B cable |
|
4 |
Generator connector |
|
5 |
Generator (See Generator Removal Note (MZR 2.5).) (See Generator Installation Note (MZR 2.5).) |
Generator Installation Note (MZR 2.0)
1. Align the generator fixing hole with the engine side hole, then temporarily tighten the generator installation bolts in the order of A, B, C, and D.
2. Securely tighten the generator installation bolts in the order of A, B, C, and D.
Generator Duct Removal Note (MZR 2.5)
1. Remove the generator duct from above the engine compartment.
Generator Removal Note (MZR 2.5)
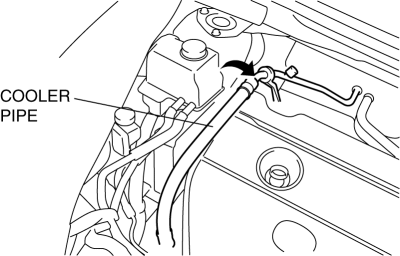
1. Set the cooler pipe out of the way..
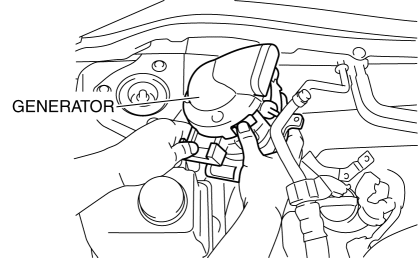
2. Remove the generator from above the engine compartment.
Generator Installation Note (MZR 2.5)
1. Tighten bolt A temporarily.
2. Tighten bolt B, C to the specified tightening torque.
3. Tighten bolt A to the specified tightening torque.
Generator Duct Installation Note (MZR 2.5)
1. Install the generator duct to the generator duct bracket and tighten nuts temporarily.
2. Tighten nuts to the specified tightening torque.
 Generator Inspection [Mzr 2.0, Mzr 2.5]
CAUTION:
Do not apply direct battery positive voltage to generator terminal D, otherwise
it could cause damage to the internal parts (power transistor) of the generator.
Generator War ...
 Refrigerant Charging
CAUTION:
Do not exceed the specification when charging the system with refrigerant.
Doing so will decrease the efficiency of the air conditioner or damage the refrigeration
cycle parts.
...
Other materials:
Liftgate Removal/Installation
WARNING:
When removing the stay damper, serious injury may occur if the stay damper
is removed without supporting the liftgate. Always perform the procedure with
at least another person.
1. Disconnect the negative battery cable..
2. Remove the following parts:
a. Rear scuff p ...
Input/Turbine Speed Sensor Inspection [FS5 A EL]
CAUTION:
Water or foreign objects entering the connector can cause a poor connection
or corrosion. Be sure not to drop water or foreign objects on the connector
when disconnecting it.
On-Vehicle Inspection
1. Perform the following procedures.
a. Remove the battery cover..
b. ...
Front ABS Wheel Speed Sensor Inspection
Sensor Output Value Inspection
CAUTION:
Resistance inspection using other testers may cause damage to the ABS wheel-speed
sensor internal circuit. Be sure to use the M-MDS to inspect the ABS wheel-speed
sensor.
1. Switch the ignition to off.
2. Connect the M-MDS to the DLC-2. ...
