Mazda 3 Owners Manual: Schedule 1
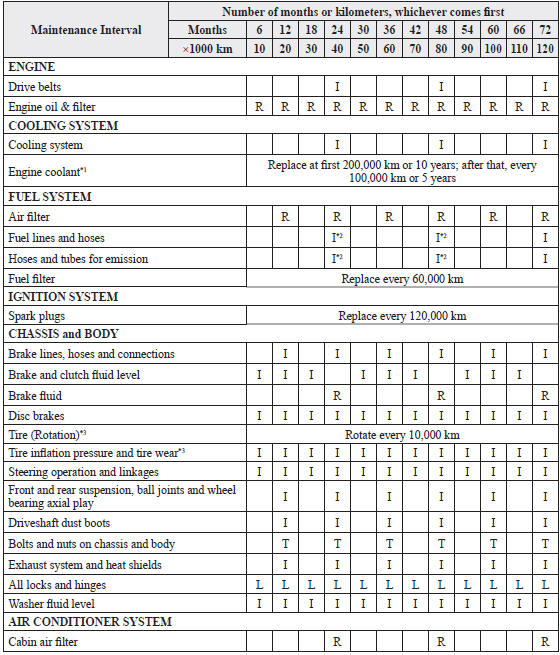
Chart symbols:
I: Inspect: Inspect and clean, repair, adjust, fill up, or replace if
necessary.
R: Replace
L : Lubricate
T: Tighten
Remarks:
*1 Use of FL-22 is recommended when replacing engine coolant. Using engine
coolant other than FL-22 may
cause serious damage to the engine and cooling system.
*2 According to state/provincial and federal regulations, failure to perform maintenance on these items will not void your emissions warranties. However, Mazda recommends that all maintenance services be performed at the recommended time or kilometer period to ensure long-term reliability.
*3 The Tire Pressure Monitoring System (TPMS) initialization must be performed so that the system operates normally (if equipped).
 Scheduled Maintenance (Mexico)
Follow Schedule 1 if the vehicle is operated mainly where none of the
following conditions
(severe driving conditions) apply.
Repeated short-distance driving
Driving in dusty conditions
Dri ...
 Schedule 2
Chart symbols:
I: Inspect: Inspect and clean, repair, adjust, fill up, or replace if
necessary.
R: Replace
L : Lubricate
C: Clean
T: Tighten
Remarks:
*1 Use of FL-22 is recommended when r ...
Other materials:
Outside rear view mirrors
In the Subaru Solterra, the outside rear view mirrors can be precisely
adjusted to provide a clear and comprehensive view of the surrounding traffic, significantly
improving driving awareness and safety.
■ When using the outside rear view mirrors in a cold weather
During cold weather conditi ...
Transaxle Oil Replacement [A26 M R]
1. Park the vehicle on level ground.
2. Remove the aerodynamic under cover No.2..
3. Remove the drain plug and gasket.
4. Drain the oil into a suitable container.
5. Install a new gasket and the drain plug.
Tightening torque
28—51 N·m {2.9—5.2 kgf·m, 21—37 ft·lbf}
...
Blind Spot Monitoring (BSM) System
The Blind Spot Monitoring (BSM) system is designed to assist the driver in
checking the
area to the rear of the vehicle on both sides during lane changes by alerting
the driver to the
presence of vehicles approaching from the rear in an adjacent lane.
The Blind Spot Monitoring (BSM) system ...
