Mazda 3 Service Manual: Liftgate Removal/Installation
WARNING:
-
When removing the stay damper, serious injury may occur if the stay damper is removed without supporting the liftgate. Always perform the procedure with at least another person.
1. Disconnect the negative battery cable..
2. Remove the following parts:
a. Rear scuff plate.
b. Rear seat cushion.
c. Rear seat back.
d. Lower anchor installation bolts on the rear seat belt.
e. Tire house trim.
f. Trunk end trim.
g. Trunk side trim.
h. Trunk side upper trim.
i. C-pillar trim.
j. Rear assist handle.
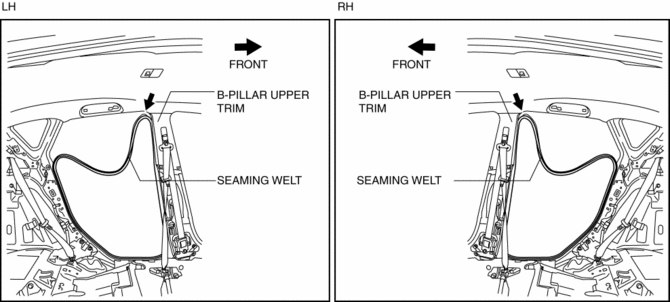
3. Peel back the seaming welt to the point indicated by the arrow in the figure.
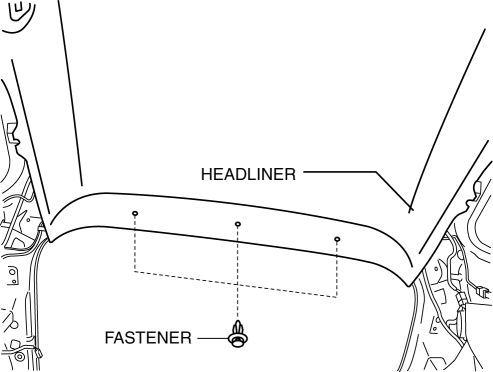
4. Remove the fasteners.
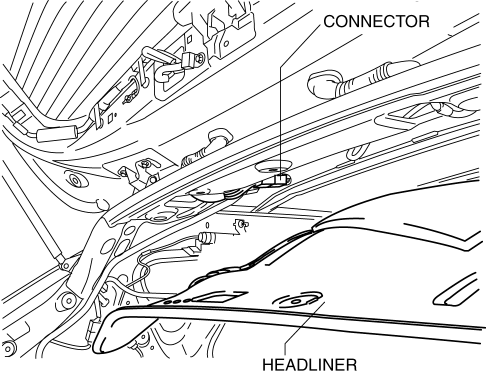
5. Disconnect the connector while partially peeling back the headliner.
NOTE:
-
Be careful not to leave a fold-seam.
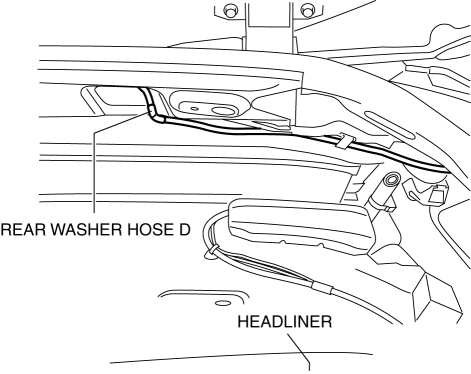
6. Disconnect the rear washer hose D while partially peeling back the headliner.
NOTE:
-
Be careful not to leave a fold-seam.
7. Remove the stay damper band using a tape-wrapped flathead screwdriver.
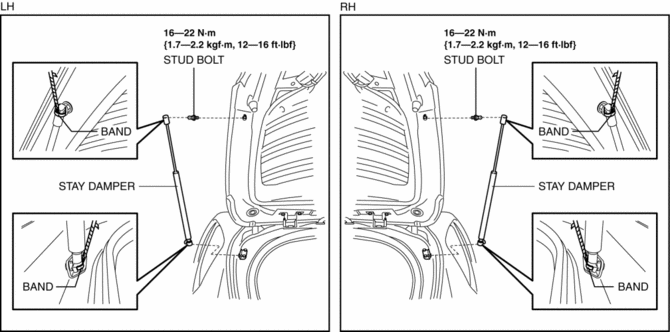
8. Remove the stay damper.
9. Remove the stud bolts.
10. Remove the bolts A.
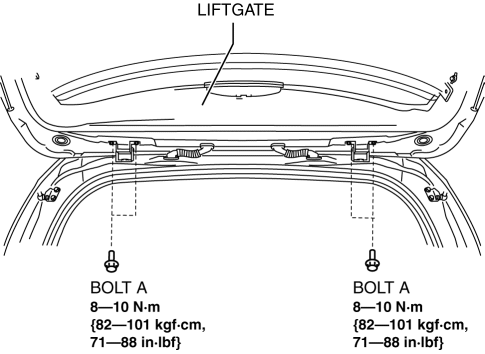
11. Remove the liftgate.
12. Remove the bolts B.
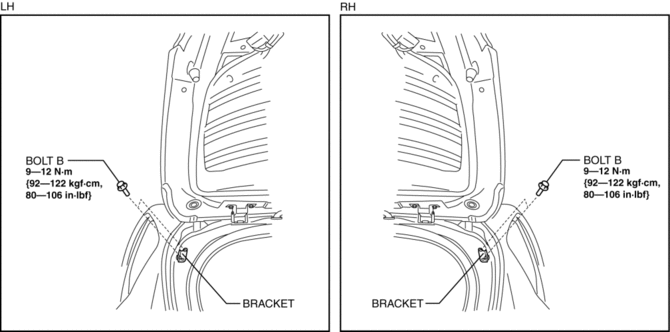
13. Remove the bracket.
14. Install in the reverse order of removal.
15. Adjust the liftgate..
 Liftgate Opener Switch Removal/Installation
1. Disconnect the negative battery cable..
2. Remove the following parts:
a. Liftgate upper trim.
b. Liftgate side trim.
c. Liftgate lower trim.
d. Liftgate latch and lock actuator.
3. Dis ...
 Liftgate Side Trim Removal/Installation
1. Remove the liftgate upper trim..
2. Pull the point A of the strap hanger as shown in the figure.
3. Remove the strap hanger.
4. Remove the fastener.
5. Pull the liftgate side trim in th ...
Other materials:
EGR Valve Removal/Installation [Mzr 2.0, Mzr 2.5]
1. Remove the battery cover..
2. Disconnect the negative battery cable..
3. Drain the engine coolant from the radiator..
4. Remove the air cleaner and the air hose as a single unit..
5. Remove the radiator hose (upper, engine side)..
6. Disconnect the EGR valve connector.
7. Remove in th ...
Up Switch Inspection [Fw6 A EL]
Continuity Inspection
NOTE:
The up switch is built into the selector lever component.
1. Remove the battery cover..
2. Disconnect the negative battery cable..
3. Remove the console..
4. Disconnect the selector lever component connector.
5. Verify that the continuity betwee ...
Antenna Feeder No.4 Inspection
1. Disconnect the negative battery cable..
2. Remove the following parts:
a. Upper column cover.
b. Instrument cluster.
c. Center panel.
d. Audio unit (Vehicles with audio unit).
e. Center cover.
f. Dashboard upper panel.
g. Front scuff plate (RH).
h. Front side trim (RH).
3. Dis ...
