Mazda 3 Service Manual: Neutral Switch Removal/Installation [A26 M R]
1. Disconnect the negative battery cable.
2. Disconnect the neutral switch connector.
3. Remove the aerodynamic under cover No.2..
4. Remove the neutral switch with the gasket.
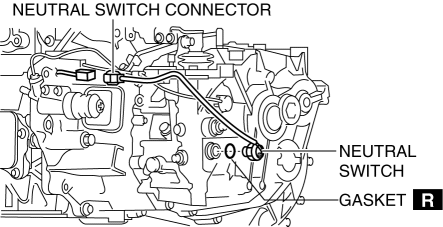
5. Install a new gasket and the neutral switch to the transaxle case.
-
Tightening torque
-
29—39 N·m {3.0—3.9 kgf·m, 22—28 ft·lbf}
6. Install the aerodynamic under cover No.2..
7. Connect the neutral switch connector.
8. Connect the negative battery cable.
 Manual Transaxle Shift Mechanism Removal/Installation [G66 M R]
1. Remove the battery cover..
2. Disconnect the negative battery cable.
3. Remove the battery component. (ex: battery, battery tray and PCM component).
4. Remove the air cleaner component..
5 ...
 Neutral Switch Removal/Installation [C66 M R]
1. Remove the battery cover..
2. Disconnect the negative battery cable..
3. Remove the aerodynamic under cover No.2..
4. Install in the reverse order of removal.
5. Remove in the order indicat ...
Other materials:
Hazard Warning Flasher
The hazard warning lights should always
be used when you stop on or near a
roadway in an emergency.
The hazard warning lights warn other
drivers that your vehicle is a traffic hazard
and that they must take extreme caution
when near it.
Depress the hazard warning flasher and
all the tu ...
Checking tires
Regular inspection of the tires on your Subaru Solterra is essential for maintaining
safety, efficiency, and optimal driving performance. Begin by checking whether the
treadwear indicators are visible, as these serve as a clear signal of tire wear.
Additionally, carefully examine each tire for ...
Vacuum Pump Removal/Installation [Skyactiv G 2.0]
1. Remove the plug hole plate..
2. Remove the battery and battery tray..
3. Pinch open the clamp using pliers and disconnect the vacuum hose from the
vacuum pump.
4. Remove in the order shown in the table.
5. Install in the reverse order of removal.
1
Vacu ...
