Mazda 3 Service Manual: Parking Brake Cable Removal/Installation
1. Remove the following parts:
a. Upper panel.
b. Shift knob (MTX).
c. Selector lever knob (ATX).
d. Shift panel.
e. Side wall.
f. Console.
2. Remove the under cover..
3. Remove the tunnel member (rear). (MZR 2.0, MZR 2.5, MZR 2.3 DISI Turbo).
4. Remove the brace bar. (SKYACTIV-G 2.0).
5. Remove the TWC. (MZR 2.0, MZR 2.5, SKYACTIV-G 2.0).
6. Remove the presilencer. (MZR 2.3 DISI Turbo).
7. Remove the insulator (middle No.1) and the insulator (middle No.2)..
8. Remove in the order indicated in the table.
9. Install in the reverse order of removal.
10. After installation, inspect the parking brake stroke and adjust if necessary..
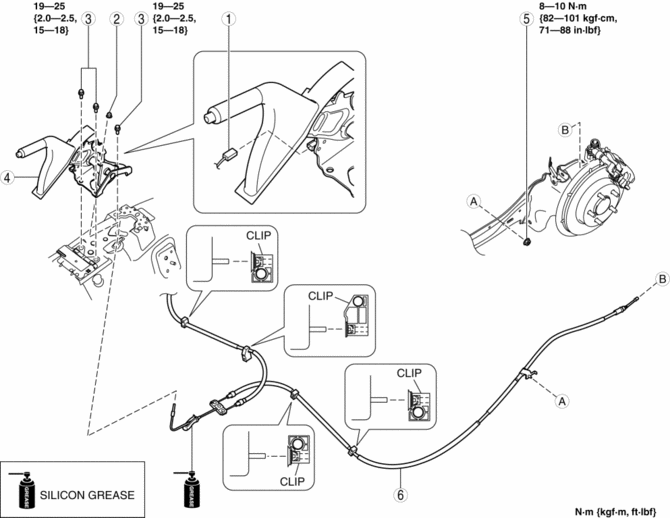
|
1 |
Parking brake switch connector |
|
2 |
Adjusting nut |
|
3 |
Bolt |
|
4 |
Parking brake lever |
|
5 |
Nut |
|
6 |
Parking brake cable (See Parking Brake Cable Installation Note.) |
Parking Brake Cable Installation Note
1. Pass the parking brake cable inside the rear ABS wheel-speed sensor wiring harness as shown in the figure.
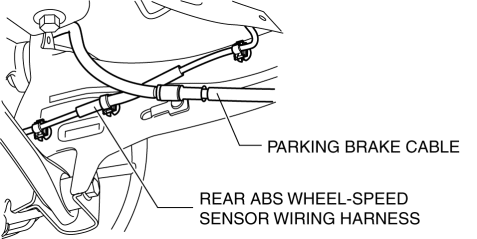
2. Install the rear parking brake cable.
3. Verify that the end of the parking brake cable outer end is out of the caliper as shown in the figure.

 Parking Brake
...
 Parking Brake Lever Adjustment
1. Pump the brake pedal a few times.
2. Remove the upper panel..
3. Turn the adjusting nut and adjust the parking brake lever.
4. After adjustment, pull the parking brake lever one notch and ...
Other materials:
Front Stabilizer Removal/Installation [Mzr 2.3 Disi Turbo]
1. Remove the joint cover..
2. Disconnect the steering shaft from the steering gear and linkage..
3. Remove the front crossmember component..
4. Remove in the order indicated in the table.
5. Install in the reverse order of removal.
6. Inspect the wheel alignment and adjust it if necessary ...
Sirius Satellite Radio Antenna Feeder Inspection
SIRIUS Satellite Radio Antenna Feeder No.1
NOTE:
SIRIUS satellite radio antenna feeder No.1 is integrated with the dashboard
wiring harness.
1. Disconnect the negative battery cable..
2. Remove the following parts:
a. Passenger-side front scuff plate.
b. Passenger-side front ...
Steering Shaft Inspection
1. Inspect the column bearing for excessive play and damage.
2. Verify that the measurement of the steering shaft indicated in the figure
is as specified.
If not within the specification replace the steering shaft component.
Steering shaft length
315—320 mm {12.41—12.59 ...
