
Mazda 3 Service Manual: Passenger Compartment Temperature Sensor Removal/Installation [Full Auto Air Conditioner]
1. Disconnect the negative battery cable..
2. Remove the following parts:
a. Front scuff plate.
b. Front side trim.
c. Dashboard under cover.
d. Upper panel.
e. Shift lever knob (MTX).
f. Selector lever knob (ATX).
g. Shift panel.
h. Side wall.
i. Console.
j. Hood release lever.
k. Lower panel (driver-side).
3. Disconnect the passenger compartment temperature sensor connector.
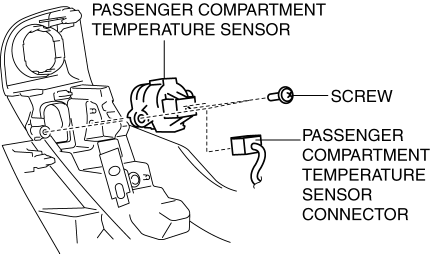
4. Remove the screw.
5. Remove the passenger compartment temperature sensor.
6. Install in the reverse order of removal.
 Passenger Compartment Temperature Sensor Inspection [Full Auto Air Conditioner]
1. Measure the temperature around the passenger compartment temperature sensor
and measure the resistance between passenger compartment temperature sensor terminals
B and D.
If the cha ...
 Restraints
...
Other materials:
Torque Converter Clutch (TCC) Non Operation [Fw6 A EL]
TROUBLESHOOTING ITEM
Torque converter clutch (TCC) non-operation
DESCRIPTION
TCC does not operate when vehicle reaches TCC operation range.
POSSIBLE CAUSE
Signal malfunction
...
Troubleshooting
Mazda Bluetooth ® Hands-Free Customer Service
If you have any problems with Bluetooth ® , contact our toll-free customer
service center.
U.S.A.
Canada
Mexico
Bluetooth ® Device pairing, connection problems
*1 Setting which detects the existence of a device external to the Bluet ...
Winter driving tips
When operating the Subaru Solterra in winter conditions, it is essential
to carry out thorough preparation and regular inspections before driving. Always
adapt your driving style to current weather and road conditions to ensure maximum
safety, efficiency, and vehicle performance.
Pre-winter p ...
