Mazda 3 Service Manual: Rear Door Glass Removal/Installation
1. Fully lower the rear door glass.
2. Disconnect the negative battery cable..
3. Remove the rear door trim..
4. Remove the rear door speaker..
5. Remove the rear power window motor..
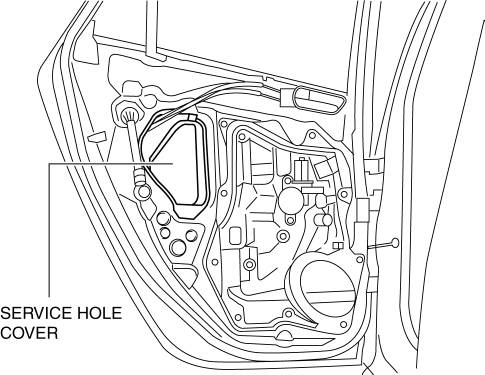
6. Remove the service hole cover.
7. Remove the rear door glass guide..
8. Remove the rear door quarter glass..
9. Remove the hole plug and bolt.
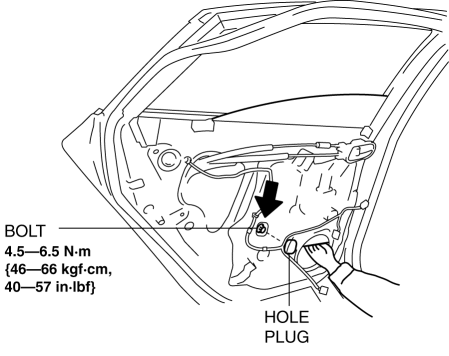
CAUTION:
-
If the bolts are removed without supporting the rear door glass, the rear door glass may fall off and be damaged. Remove the bolts while inserting your hand into the rear door speaker installation hole to support the rear door glass.
10. Lift the rear door glass up and remove while tilting it.

11. Install in the reverse order of removal.
CAUTION:
-
If the bolts are installed without supporting the rear door glass, the rear door glass may fall off and be damaged. When installing the rear door glass, align the glass edge with the rear door glass guide by hand through the speaker installation hole, and then install the bolts.
 Quarter Window Glass Removal
1. Remove the following parts:
a. Rear seat cushion.
b. Rear scuff plate.
c. Tire house trim.
d. Trunk side upper trim.
e. C-pillar trim.
2. Apply protective tape along the edge of the bod ...
 Rear Door Quarter Glass Removal/Installation
1. Fully lower the rear door glass.
2. Disconnect the negative battery cable..
3. Remove the rear door trim..
4. Remove the service hole cover.
5. Remove the hole plug.
6. Remove the ...
Other materials:
Engine Coolant Level Inspection [Mzr 2.0, Mzr 2.5]
WARNING:
Never remove the cooling system cap or loosen the radiator drain plug while
the engine is running, or when the engine and radiator are hot. Scalding engine
coolant and steam may shoot out and cause serious injury. It may also damage
the engine and cooling system.
Tu ...
Information on Passenger Vehicle Tires
Please refer to the sample below.
TIN: U.S. DOT tire identification number
Passenger car tire
Nominal width of tire in millimeters
Ratio of height to width (aspect ratio)
Radial
Run-flat tire
Rim diameter code
Load index & speed symbol
Severe snow conditions
Tire ply co ...
Transaxle Oil Replacement [G35 M R]
1. Park the vehicle on level ground.
2. Remove the aerodynamic under cover No.2..
3. Remove the drain plug and washer.
4. Drain the oil into a suitable container.
5. Install a new washer and the drain plug.
Tightening torque
39—59 N·m {4.0—6.0 kgf·m, 29—43 ft·lbf}
...
