
Mazda 3 Service Manual: Rear Seat Cushion Removal/Installation
1. Detach the hooks from the grommets by pulling the rear seat cushion in the order of (1), (2) in the direction of the arrow shown in the figure, while remove the wire.
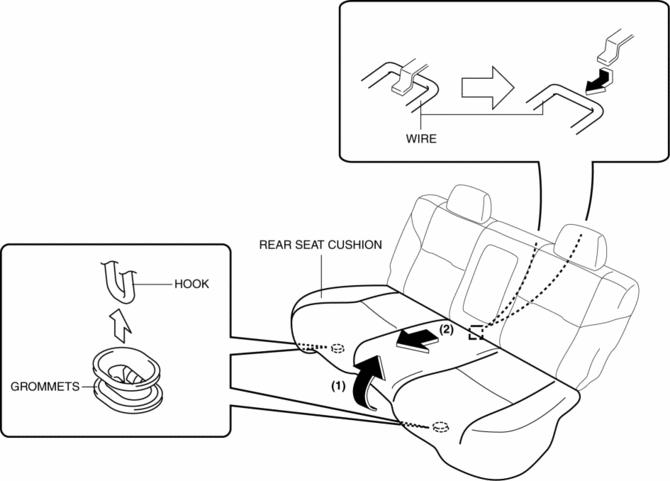
2. Install in the reverse order of removal.
 Rear Seat Back Trim Removal/Installation
1. Remove the rear seat back frame..
2. Remove rings C, then remove the seat back trim from the seat back pad.
3. Install in the reverse order of removal. ...
 Rear Seat Cushion Trim Removal/Installation
1. Remove the rear seat cushion..
2. Remove rings C, then remove the seat cushion trim from the seat cushion pad.
3. Install in the reverse order of removal. ...
Other materials:
How to use AUX mode (Type A)
Switch the ignition to ACC or ON.
Press the power/volume dial to turn the
audio system on.
Press the media button ( )
of the
audio unit to change to the AUX mode.
NOTE
When the device is not connected to the
auxiliary jack, the mode does not switch
to the AUX mode.
Adj ...
Suspension SST
49 T034 1A0
Coil spring compressor set
49 0180 510B
Preload measuring attachment
49 B034 001
Guide
49 B034 002
Guide
49 T028 3A0
Ball joint puller set
...
Automatic Transaxle Shift Mechanism Removal/Installation
Selector Lever Removal/Installation
1. Remove the battery cover..
2. Disconnect the negative battery cable..
3. Remove in the order indicated in the table.
4. Install in the reverse order of removal.
1
Upper panel
(See UPPER PANEL REMOVAL/INSTALLATION.)
...
