
Mazda 3 Service Manual: Rear Seat Back Trim Removal/Installation
1. Remove the rear seat back frame..
2. Remove rings C, then remove the seat back trim from the seat back pad.
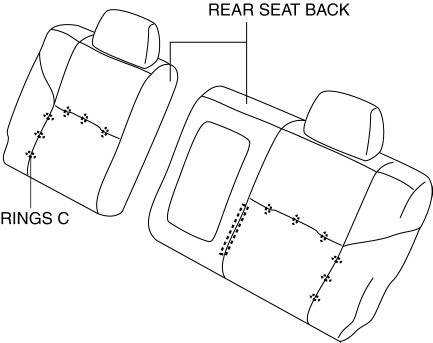
3. Install in the reverse order of removal.
 Rear Seat Back Removal/Installation
1. Remove the rear seat cushion..
2. Remove the rear buckle installation bolt..
3. Fold the rear seat back.
4. Remove the bolts.
5. Remove the rear seat back from the rear seat back br ...
 Rear Seat Cushion Removal/Installation
1. Detach the hooks from the grommets by pulling the rear seat cushion in the
order of (1), (2) in the direction of the arrow shown in the figure, while remove
the wire.
2. Install in the re ...
Other materials:
Safety Practices
The way you drive has a great deal to do with your tire mileage and safety.
So cultivate good
driving habits for your own benefit.
Observe posted speed limits and drive at speeds that are safe for
the existing weather
conditions
Avoid fast starts, stops and turns
Avoid potholes and o ...
Seat Warmer Unit Removal/Installation
Removal
WARNING:
Handling a front seat (with built-in side air bag) improperly can accidentally
operate (deploy) the air bag, which may seriously injure you. Read the service
warnings before handling a front seat (with built-in side air bag)..
CAUTION:
After removing a f ...
Timing Chain Removal/Installation [Skyactiv G 2.0]
WARNING:
A hot engine can cause severe burns. Turn off the engine and wait until it
is cool before servicing.
CAUTION:
If the camshaft is rotated with the timing chain removed and the piston at
the top dead center position, the valve may contact the piston and the engine ...
