Mazda 3 Service Manual: Rear Window Glass Removal
4SD
1. Disconnect the negative battery cable.
2. Remove the following parts:
a. Rear seat cushion.
b. Rear scuff plate.
c. Rear side seat back.
d. C–pillar trims.
e. Rear package trim.
f. Tire house trims.
3. Remove the fasteners.
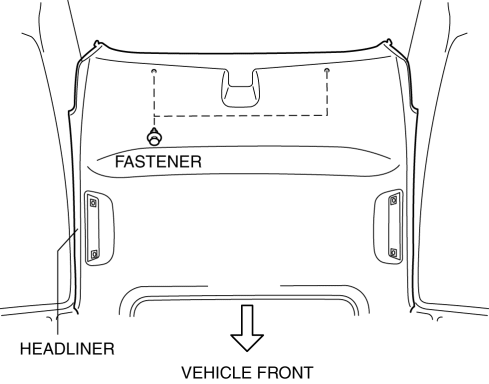
4. Set the headliner out of the way.
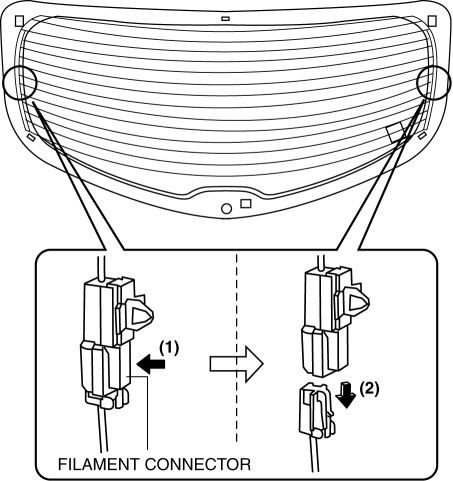
5. Disconnect the filament connector.

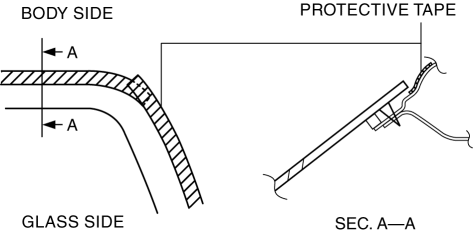
6. Apply protective tape along the edge of the body.
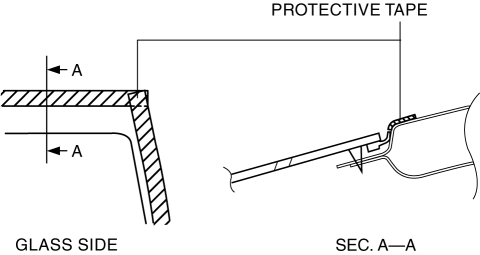
NOTE:
-
Overlap and adhere the protective tape to the corners to prevent damage.
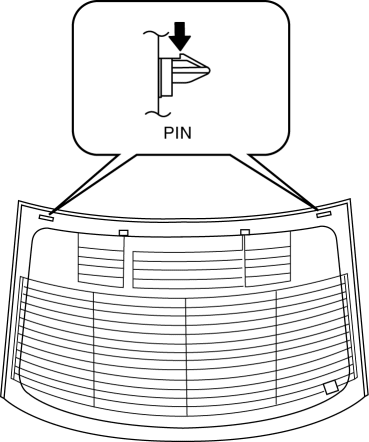
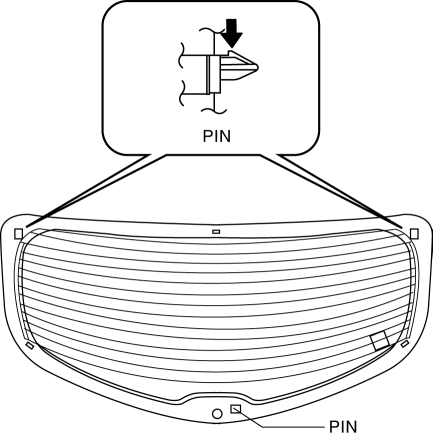
7. Avoiding the pin on the inside of the vehicle, insert piano wire which has been cut to sufficient length.
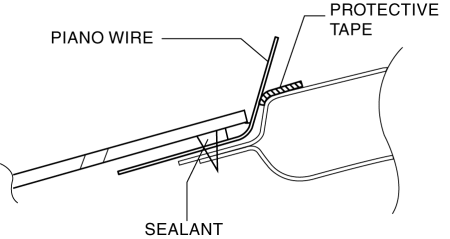
WARNING:
-
Using piano wire with bare hands can cause injury. Always wear gloves when using piano wire.
NOTE:
-
Before removing the rear window glass from the body, mark the position of the glass by affixing tape to the glass and body panel.
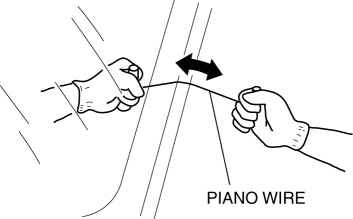
8. Wind each end of piano wire around a bar.
NOTE:
-
Use a long sawing action to spread the work over the whole length of piano wire to prevent it from breaking due to localized heating.
9. Secure one end of piano wire, and while pulling the other end, cut the sealant around the rear window glass.
10. Pinch the pin from the inside of the vehicle and detach it.
11. Remove the rear window glass.
5HB
1. Disconnect the negative battery cable.
2. Remove the following parts:
a. Liftgate upper trim.
b. High-mount brake light.
c. Liftgate side trim.
d. Liftgate lower trim.
e. Rear spoiler.
f. Rear wiper arm and blade.
3. Disconnect the filament connector.
4. Apply protective tape along the edge of the body.
NOTE:
-
Overlap and adhere the protective tape to the corners to prevent damage.
5. Avoiding the pin on the inside of the vehicle, insert piano wire which has been cut to sufficient length.
WARNING:
-
Using piano wire with bare hands can cause injury. Always wear gloves when using piano wire.
NOTE:
-
Before removing the rear window glass from the body, mark the position of the glass by affixing tape to the glass and body panel.
6. Wind each end of piano wire around a bar.
NOTE:
-
Use a long sawing action to spread the work over the whole length of piano wire to prevent it from breaking due to localized heating.
7. Secure one end of piano wire, and while pulling the other end, cut the sealant around the rear window glass.
8. Pinch the pin from the inside of the vehicle and detach it.
9. Remove the rear window glass.
 Rear Window Glass Installation
WARNING:
Using a utility knife with bare hands can cause injury. Always wear gloves
when using a utility knife.
CAUTION:
Proper installation of the glass may be difficult if s ...
 Windshield Installation
WARNING:
Using a utility knife with bare hands can cause injury. Always wear gloves
when using a utility knife.
CAUTION:
If a door is opened or closed when all the window glas ...
Other materials:
Auxiliary Jack/Usb Port Removal/Installation
1. Disconnect the negative battery cable..
2. Remove the following parts:
a. Upper panel.
b. Shift lever knob (MTX).
c. Selector lever knob (ATX).
d. Shift panel.
e. Side wall.
f. Console.
3. Remove the auxiliary jack/USB port in the direction of the arrow (2) shown
in the figure w ...
Vacuum Pump Inspection [Skyactiv G 2.0]
1. Pinch open the clamp using pliers and disconnect the vacuum hose from the
vacuum pump.
2. Install the vacuum gauge as shown in the figure, then check the vacuum.
3. Warn up the engine.
If the pressure is less than the specification, inspect for the following.
M ...
Quarter Window Glass Installation
WARNING:
Using a razor with bare hands can cause injury. Always wear gloves when using
a razor.
CAUTION:
If a door is opened or closed when all the window glass is closed, the resulting
change in air pressure could cause the sealant to crack preventing the proper
insta ...
