Mazda 3 Service Manual: Side Air Bag Sensor No. 1 Removal/Installation [Two Step Deployment Control System]
WARNING:
-
Handling the side air bag sensor improperly can accidentally operate (deploy) the air bag module, which may seriously injure you. Read the air bag system service warnings and cautions before handling the side air bag sensor..
1. Switch the ignition to off.
2. Disconnect the negative battery cable and wait for 1 min or more
..
3. Remove the front scuff plate..
4. Remove the rear scuff plate..
5. Remove the B-pillar lower trim..
6. Remove the nut.
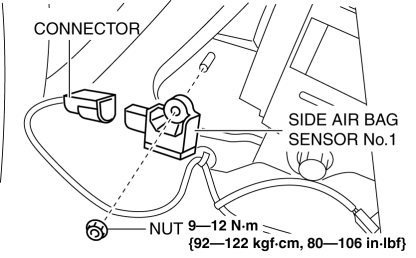
7. Remove the side air bag sensor No.1.
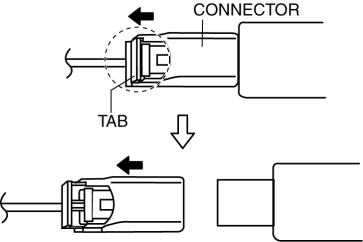
8. Disconnect the connector from the side air bag sensor No.1 by pressing the connector tab in the direction of the arrow.
9. Install in the reverse order of removal.
10. Switch the ignition to ON.
11. Verify that the air bag system warning light illuminates for approx. 6 s
and goes out.
-
If the air bag system warning light does not operate normally, refer to the on-board diagnostic system (air bag system) and perform inspection of the system..
 Seat Weight Sensor Removal/Installation [Two Step Deployment Control System]
CAUTION:
When the seat weight sensor is replaced with a new one, perform the seat
weight sensor calibration using the M–MDS..
When replacing the seat weight sensor, replace it t ...
 Side Air Bag Sensor No. 2 Removal/Installation [Two Step Deployment Control
System]
Side Air Bag Sensor No. 2 Removal/Installation [Two Step Deployment Control
System]
WARNING:
Handling the side air bag sensor improperly can accidentally operate (deploy)
the air bag module, which may seriously injure you. Read the air bag system
service warnings and ca ...
Other materials:
Base Removal
1. Remove the rearview mirror..
2. Wind each end of a wire around a bar.
WARNING:
Using the piano wire with bare hands can cause injury. Always wear gloves
when using the piano wire.
NOTE:
Use a long sawing action to spread the work over the whole length of the
pi ...
Cooling System Cap Inspection [Mzr 2.0, Mzr 2.5]
WARNING:
Never remove the cooling system cap or loosen the radiator drain plug while
the engine is running, or when the engine and radiator are hot. Scalding engine
coolant and steam may shoot out and cause serious injury. It may also damage
the engine and cooling system.
Tu ...
Relay Block Removal/Installation [With Advanced Keyless Entry And Push Button
Start System]
1. Disconnect the negative battery cable..
2. Remove the following parts:
a. Driver-side front scuff plate.
b. Driver-side front side trim.
c. Hood release lever.
d. Upper panel.
e. Shift knob (MTX)(See MANUAL TRANSAXLE SHIFT MECHANISM REMOVAL/INSTALLATION
[G66M-R].)(See MANUAL TRANSAX ...
