Mazda 3 Service Manual: Sirius Satellite Radio Unit Removal/Installation
1. Disconnect the negative battery cable..
2. Remove the following parts:
a. Passenger-side front scuff plate.
b. Passenger-side front side trim.
c. Dashboard under cover.
d. Grove compartment.
e. Passenger-side lower panel.
3. Remove in the order indicated in the table.
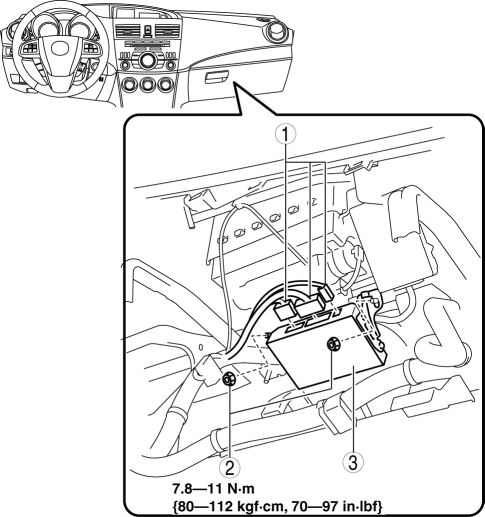
|
1 |
Connector |
|
2 |
Nut |
|
3 |
SIRIUS satellite radio unit |
4. Install in the reverse order of removal.
 Sirius Satellite Radio Antenna Feeder Removal/Installation
SIRIUS Satellite Radio Antenna Feeder No.1
NOTE:
SIRIUS satellite radio antenna feeder No.1 is integrated with the dashboard
wiring harness.
1. Refer to DASHBOARD DISASSEMBLY/ASSEMBL ...
 Supplier Identification Procedure [Audio]
Identification Using the Label or Inscribed Lettering
1. Disconnect the negative battery cable..
2. Remove the center panel..
3. Remove the audio unit..
4. Verify the supplier by referring to t ...
Other materials:
Brake Fluid Pressure Sensor Inspection
1. Switch the ignition to off.
2. Install the SSTs to the master cylinder (secondary side) as shown in
the figure.
NOTE:
When installing the SST (49 D043 0A0) to the master cylinder, use
a commercially available flare nut wrench (flare nut across flat 12 mm {0.47
in}).
...
Maintenance Monitor (Type A audio)
“Oil Change” with a flexible setting *1 is available. Consult your
Authorized Mazda Dealer
when you want to change the setting *2 . Once the system turns on, the wrench
indicator light
in the instrument cluster will be illuminated when remaining oil life becomes
less than 500
km (300 mi ...
Air Fuel Ratio (A/F) Sensor Inspection [Mzr 2.0, Mzr 2.5]
A/F Sensor Inspection
1. Connect the M-MDS to the DLC-2.
2. Switch the ignition to ON.
3. Warm up the engine to normal operating temperature.
4. Access the following PIDs using the M-MDS..
VSS (Vehicle speed)
RPM (Engine speed)
O2S11 (A/F sensor output current)
...
