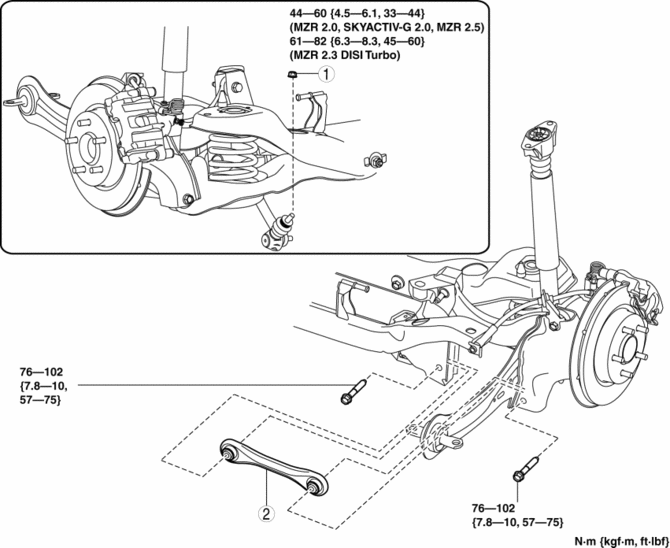
Mazda 3 Service Manual: Rear Lateral Link Removal/Installation
1. Remove in the order indicated in the table.
2. Install in the reverse order of removal.
3. Inspect the wheel alignment and adjust it if necessary..
|
1 |
Rear stabilizer control link upper nut |
|
2 |
Rear lateral link (See Rear Lateral Link Removal Note.) (See Rear Lateral Link Installation Note.) |
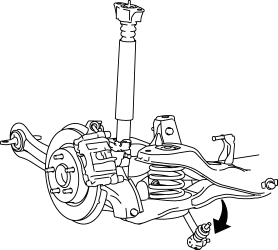
Rear Lateral Link Removal Note
1. Rotate the rear stabilizer component downwards as shown in the figure.
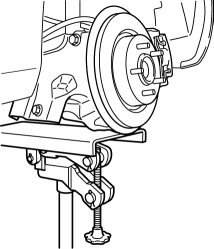
2. Jack up the vehicle to the unloaded condition, and support the trailing link using a jack.
3. Remove the rear lateral link.
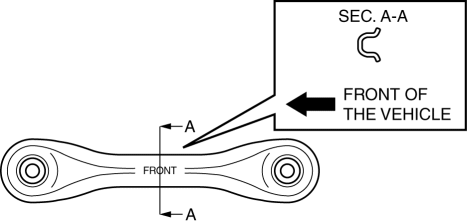
Rear Lateral Link Installation Note
1. Jack up the vehicle to the unloaded condition, and support the trailing link using a jack.
2. Install the rear lateral link so that the rib is facing toward the front of the vehicle.
 Rear Coil Spring Removal/Installation
1. Disconnect the auto leveling sensor lower side. (Vehicles with AFS).
2. Remove in the order indicated in the table.
3. Install in the reverse order of removal.
4. Inspect the wheel alignment ...
 Rear Lower Arm Removal/Installation
1. Disconnect the auto leveling sensor link lower side. (Vehicles with AFS).
2. Remove in the order indicated in the table.
3. Install in the reverse order of removal.
4. Inspect the wheel alig ...
Other materials:
Power Brake Unit Removal/Installation [Mzr 2.3 Disi Turbo]
CAUTION:
Once the brake switch clearance has automatically been adjusted, it cannot
be adjusted again. Therefore, replace the switch with a new one when replacing
the power brake unit or performing any procedure that changes the pedal stroke.
Secure the steering wheel using tap ...
Front Door Glass Removal/Installation
1. To access the glass installation bolt, position the front door glass so that
the distance from the top of the front door glass to the upper part of the front
beltline molding is approx. 80 mm {3.1 in}.
2. Disconnect the negative battery cable..
3. Remove the inner garnish..
4. Remov ...
Glossary of Terms
Tire Placard: A label indicating the OE tire sizes, recommended inflation
pressure, and the
maximum weight the vehicle can carry.
Tire Identification Number (TIN): A number on the sidewall of each tire
providing
information about the tire brand and manufacturing plant, tire size, and date o ...
