Mazda 3 Service Manual: Timing Chain Removal/Installation [Mzr 2.0, Mzr 2.5]
1. Remove the battery cover..
2. Disconnect the negative battery cable..
3. Remove the plug hole plate..
4. Disconnect the wiring harness.
5. Remove the ignition coils..
6. Remove the spark plugs..
7. Remove the ventilation hose.
8. Remove the coolant reserve tank with the hose still connected and set it out of the way..
9. Remove the front wheel and tire. (RH).
10. Remove the aerodynamic under cover No.2 and splash shield as a single unit..
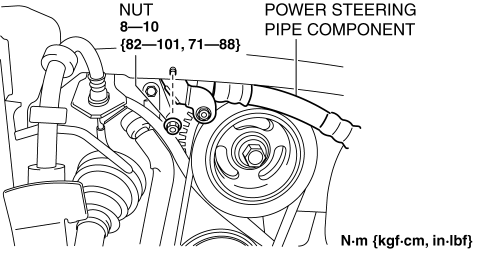
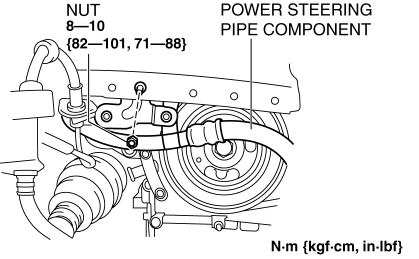
11. Remove the nut shown in the figure and set the power steering pipe component out of the way.
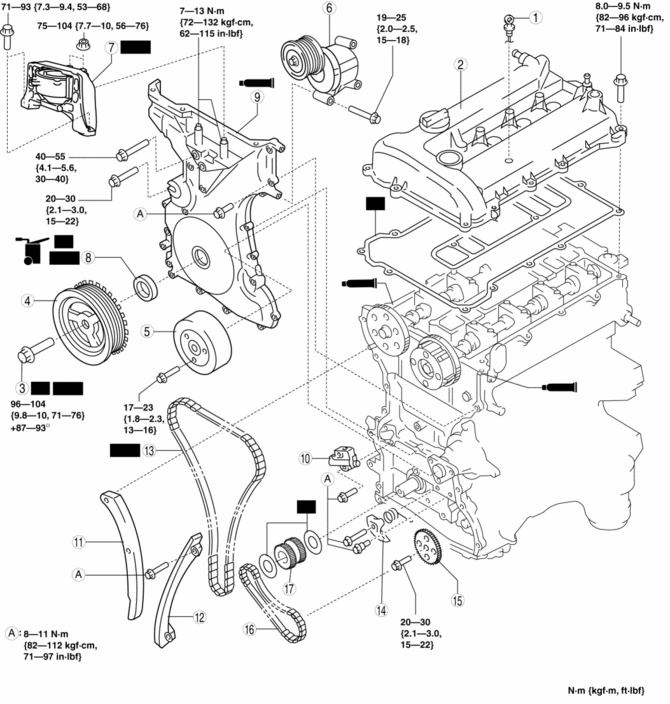
MZR 2.0
MZR 2.5
12. Remove the drive belt..
13. Remove the crankshaft position (CKP) sensor..
14. Remove the A/C compressor with the cooler hose still connected and secure it using wire or rope so that it is out of the way. (MZR 2.0).
15. Disconnect the drive shaft (RH) from joint shaft, set the drive shaft (RH) out of the way. (MTX).
16. Remove in the order indicated in the table.
17. Install in the reverse order of removal.
18. Start the engine, and inspect and adjust the following:
-
Leakage of engine oil..
-
Runout and contact of pulley and belt.
-
Ignition timing, idle speed and idle mixture..
MZR 2.0
|
1 |
Dipstick |
|
2 |
Cylinder head cover (See Cylinder Head Cover Removal Note.) (See Cylinder Head Cover Installation Note.) |
|
3 |
Crankshaft pulley lock bolt (See Crankshaft Pulley Lock Bolt Removal Note.) (See Crankshaft Pulley Lock Bolt Installation Note.) |
|
4 |
Crankshaft pulley |
|
5 |
Water pump pulley |
|
6 |
Drive belt auto tensioner |
|
7 |
No.3 engine mount (See No.3 Engine Mount Removal Note.) (See No.3 Engine Mount Installation Note.) |
|
8 |
Front oil seal (See FRONT OIL SEAL REPLACEMENT [MZR 2.0, MZR 2.5].) |
|
9 |
Engine front cover (See Engine Front Cover Installation Note.) |
|
10 |
Chain tensioner (See Chain Tensioner Removal Note.) |
|
11 |
Tensioner arm |
|
12 |
Chain guide |
|
13 |
Timing chain (See Timing Chain Installation Note.) |
|
14 |
Oil pump chain tensioner |
|
15 |
Oil pump sprocket (See Oil Pump Sprocket Removal/Installation Note.) |
|
16 |
Oil pump chain |
|
17 |
Crankshaft sprocket |
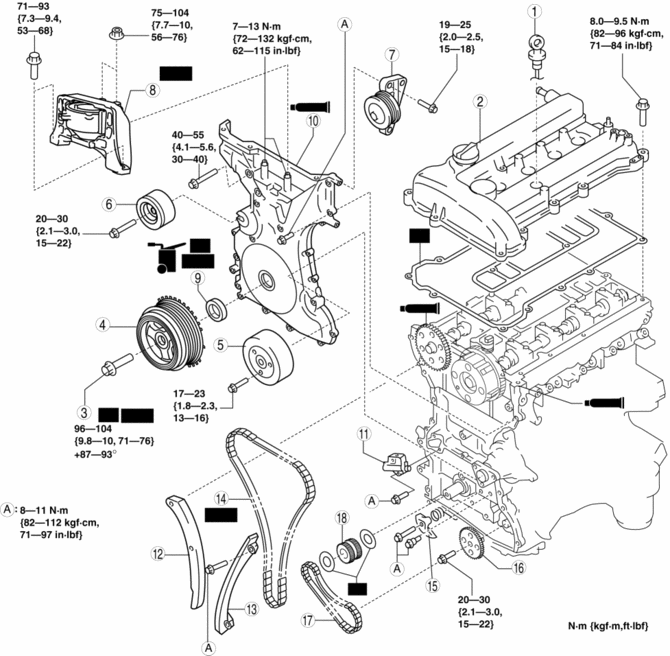
MZR 2.5
|
1 |
Dipstick |
|
2 |
Cylinder head cover (See Cylinder Head Cover Removal Note.) (See Cylinder Head Cover Installation Note.) |
|
3 |
Crankshaft pulley lock bolt (See Crankshaft Pulley Lock Bolt Removal Note.) (See Crankshaft Pulley Lock Bolt Installation Note.) |
|
4 |
Crankshaft pulley |
|
5 |
Water pump pulley |
|
6 |
Idler pulley |
|
7 |
Idler pulley |
|
8 |
No.3 engine mount (See No.3 Engine Mount Removal Note.) (See No.3 Engine Mount Installation Note.) |
|
9 |
Front oil seal (See FRONT OIL SEAL REPLACEMENT [MZR 2.0, MZR 2.5].) |
|
10 |
Engine front cover (See Engine Front Cover Installation Note.) |
|
11 |
Chain tensioner (See Chain Tensioner Removal Note.) |
|
12 |
Tensioner arm |
|
13 |
Chain guide |
|
14 |
Timing chain (See Timing Chain Installation Note.) |
|
15 |
Oil pump chain tensioner |
|
16 |
Oil pump sprocket (See Oil Pump Sprocket Removal/Installation Note.) |
|
17 |
Oil pump chain |
|
18 |
Crankshaft sprocket |
Cylinder Head Cover Removal Note
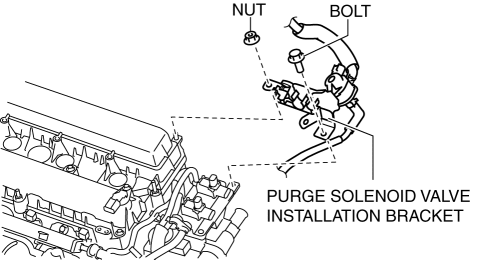
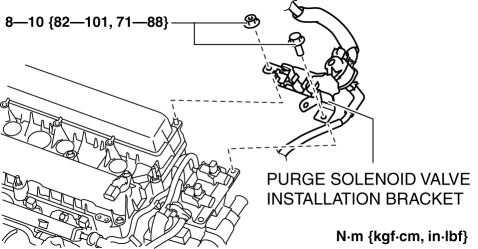
1. Remove the purge solenoid valve installation bracket with the evaporative hose still connected and set it out of the way.
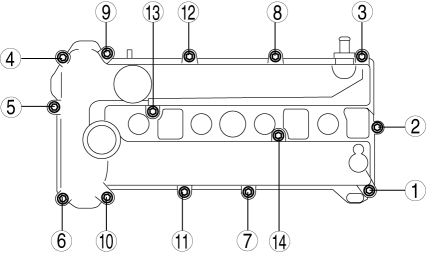
2. Loosen the cylinder head cover bolts in the order shown in the figure.
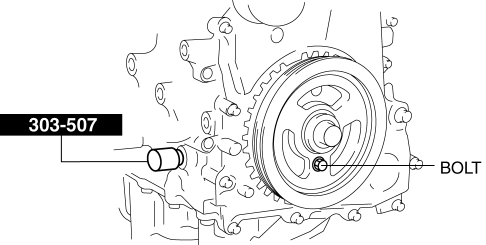
Crankshaft Pulley Lock Bolt Removal Note
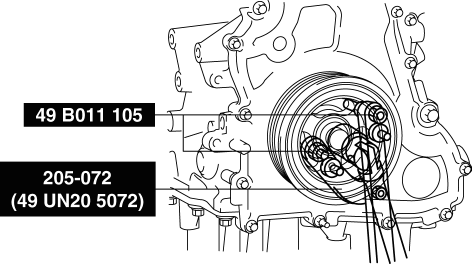
1. Rotate the crankshaft in the direction of the engine rotation and remove the cylinder block lower blind plug when the No. 1 cylinder is at the point prior to top dead center (TDC) of compression, then install the SST
.
2. Rotate the crankshaft in the direction of the engine rotation so that the No.1 piston is at TDC of the compression stroke. (Until the counterweight contacts SST
and stops.)
3. Hold the crankshaft pulley by using the SSTs
.
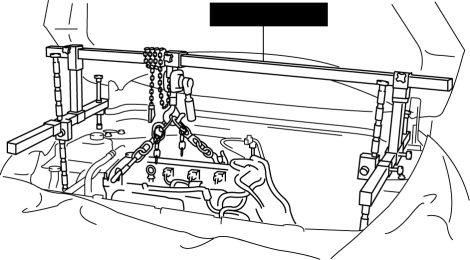
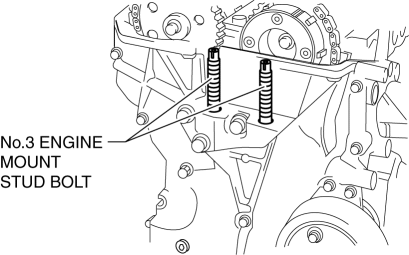
No.3 Engine Mount Removal Note
1. Remove the air cleaner..
2. Install the SST
using the following procedures.
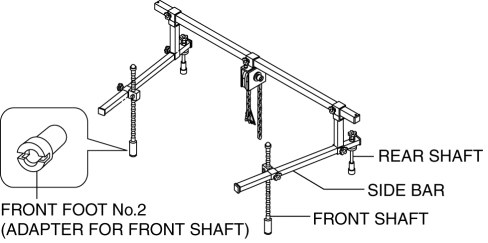
CAUTION:
-
Refer to the SST instruction manual for the basic handing procedure.
a. Remove the installation bolt for the bracket securing the lower radiator hose.
b. Set the bracket securing the lower radiator hose aside to prevent it from interfering with the front shaft of the SST
(right side).
c. As shown in the figure, set the rear shafts of the SST
to the left and right shock absorber bolts.
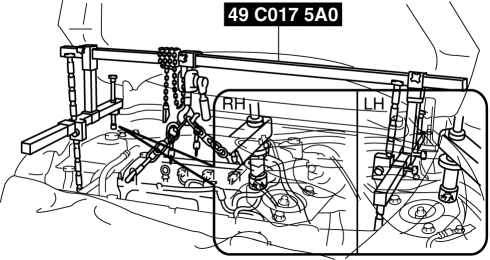
d. Install front foot No.2 to the left/right front shaft of the SST
, then align the groove of the front shaft of the SST
with the folded up part of the vehicle as shown in the figure.
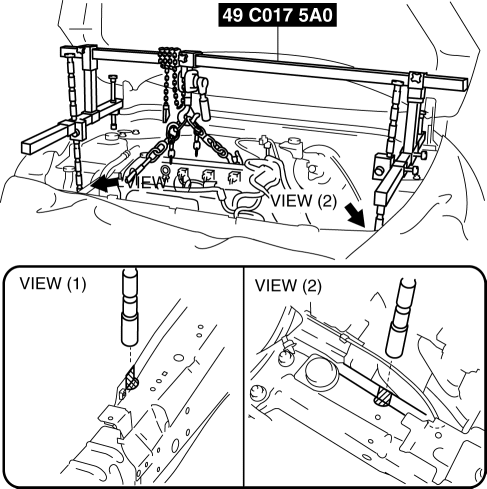
e. Adjust the positions of the SST
side bars so that they are the same height (left and right) and horizontal. Make sure each joint is securely tightened.
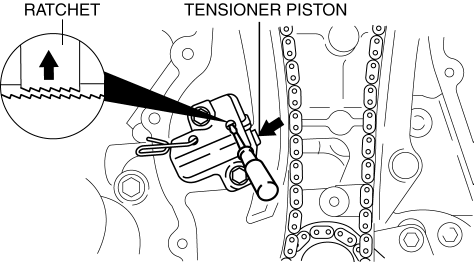
Chain Tensioner Removal Note
1. Using a thin screwdriver, hold the chain tensioner ratchet lock mechanism away from the ratchet stem.
2. Slowly compress the tensioner piston.
3. Hold the tensioner piston using a 1.5 mm {0.059 in}
wire or paper clip.
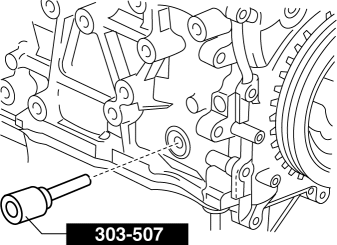
Oil Pump Sprocket Removal/Installation Note
1. Temporarily install the crankshaft pulley and crankshaft pulley lock bolt to the crankshaft, and lock the oil pump against rotation as shown in figure.

2. Remove/install the oil pump sprocket, and then remove the crankshaft pulley and crankshaft pulley lock bolt.
-
Tightening torque
-
20—30 N·m {2.1—3.0 kgf·m, 15—22 ft·lbf}
Timing Chain Installation Note
1. Install the SST
to the camshaft as shown.
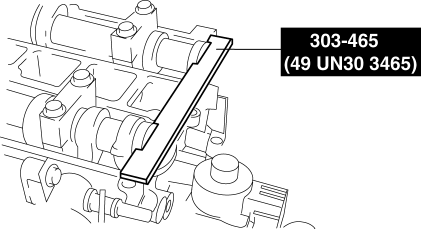
2. Install the timing chain.
3. Remove the retaining wire or paper clip from the auto tensioner to apply tension to the timing chain.
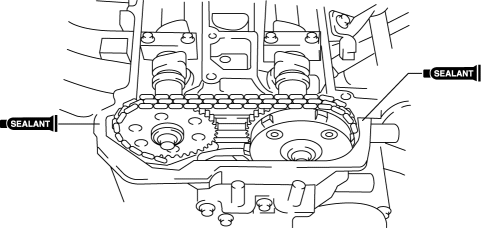
Engine Front Cover Installation Note
1. Apply silicone sealant to the engine front cover as shown.
CAUTION:
-
Install the engine front cover before the applied silicone sealant starts to harden.
-
Completely remove any oil, dirt, sealant, or other foreign matter adhering to the engine front cover and engine front cover installation surface. If any oil, dirt, sealant, or other foreign matter is not removed from the space between the engine front cover and engine front cover installation surface, it may cause a sealing malfunction.
MZR 2.0
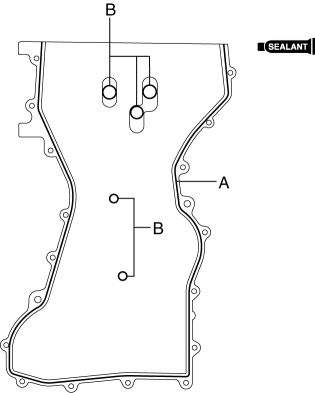
-
Thickness
-
A: 2.2—3.2 mm {0.087—0.125 in}
-
B: 1.5—2.5 mm {0.059—0.098 in}
MZR 2.5
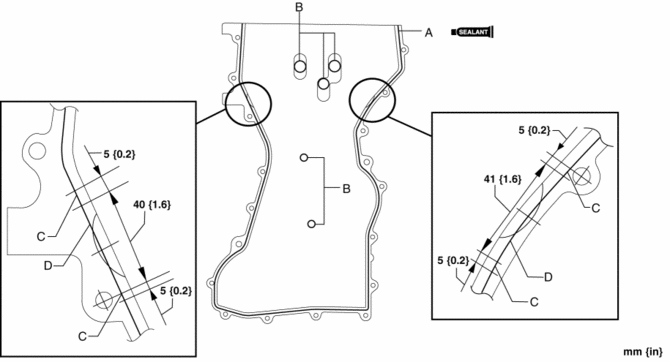
-
Thickness
-
A: 2.2—3.2 mm {0.09—0.12 in}
-
B: 1.5—2.5 mm {0.06—0.098 in}
-
C: 2.2—4.3 mm {0.09—0.16 in}
-
D: 3.3—4.3 mm {0.13—0.16 in}
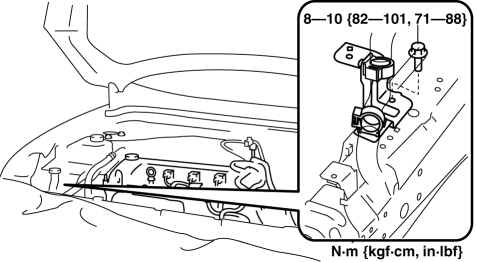
2. Install the engine front cover bolts in the order as shown.
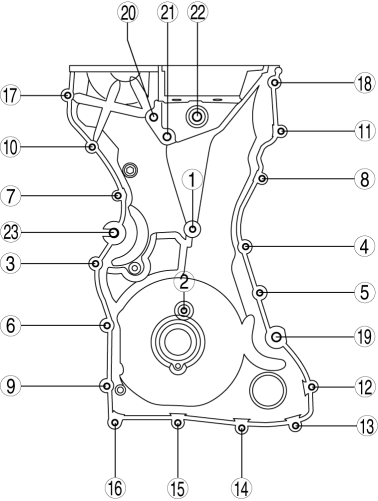
|
No. |
Tightening torque |
|
1―18 |
8—11 N·m {82—112 kgf·cm, 71—97 in·lbf} |
|
19―22 |
40—55 N·m {4.1—5.6 kgf·m, 30—40 ft·lbf} |
|
23 (MZR 2.0) |
20—30 N·m {2.1—3.0 kgf·m, 15—22 ft·lbf} |
No.3 Engine Mount Installation Note
NOTE:
-
If the No.3 engine mount bracket and the engine are removed, retighten the No.3 engine mount stud bolts.
1. Tighten the No.3 engine mount stud bolts.
-
Tightening torque
-
7—13 N·m {72—132 kgf·cm, 62—115 in·lbf}
2. Temporarily tighten the No.3 engine mount installation bolts and nuts.
3. Tighten the No.3 engine mount installation bolts and nuts in the order shown in the figure.
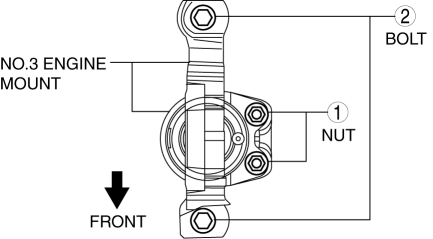
|
No. |
Tightening torque |
|
1 |
75—104 N·m {7.7—10 kgf·m, 56—76 ft·lbf} |
|
2 |
71—93 N·m {7.3—9.4 kgf·m, 53—68 ft·lbf} |
Crankshaft Pulley Lock Bolt Installation Note
1. Install the SST
to the camshaft as shown.
2. Verify that No.1 cylinder is at TDC of the compression stroke. (Position counterweight contacts SST
.)
3. To position the crankshaft pulley, temporarily tighten it and, using a suitable bolt (M6 X 1.0)
, fix the crankshaft pulley to the engine front cover.
4. Hold the crankshaft pulley using the SSTs
.
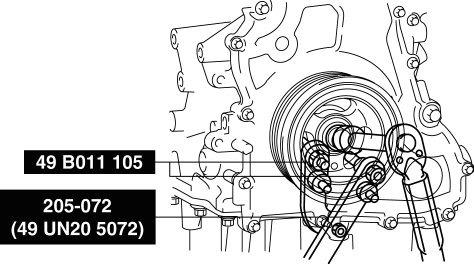
5. Tighten the crankshaft pulley lock bolt in the order shown in the following two steps using the SST
(49 D032 316).
-
Tightening procedure
-
Step 1: 96—104 N·m {9.8—10 kgf·m, 71—76 ft·lbf}
-
Step 2: 87—93°
6. Remove the bolt (M6 X 1.0)
installed to the crankshaft pulley.
7. Remove the SST
from the camshaft.
8. Remove the SST
from the cylinder block lower blind plug hole.
9. Rotate the crankshaft clockwise two turns and inspect the valve timing.
-
If not aligned, loosen the crankshaft pulley lock bolt and repeat from Step 1.
10. Install the cylinder block lower blind plug.
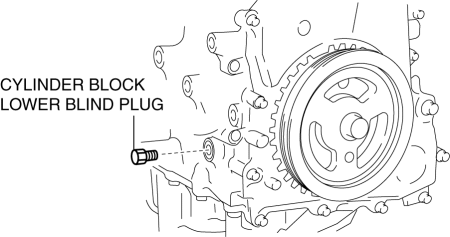
-
Tightening torque
-
18—22 N·m {1.9—2.2 kgf·m, 14—16 ft·lbf}
Cylinder Head Cover Installation Note
1. Apply silicone sealant to the mating faces as shown.
CAUTION:
-
Install the cylinder head cover before the applied silicone sealant starts to harden.
-
Thickness
-
4.0—7.0 mm {0.16—0.27 in}
2. Install the cylinder head cover with a new gasket.
3. Tighten the bolts in the order shown.

-
Tightening torque
-
8.0—9.5 N·m {82—96 kgf·cm, 71—84 in·lbf}
4. Install the purge solenoid valve installation bracket.
 Rear Center Seat Belt Removal/Installation
CAUTION:
The ELR (emergency locking retractor) has a spring that will unwind if the
retractor cover is removed. The spring cannot be rewound by hand. If this occurs,
the ELR will not wor ...
 Timing Chain Removal/Installation [Mzr 2.3 Disi Turbo]
WARNING:
Fuel vapor is hazardous. It can very easily ignite, causing serious injury
and damage. Always keep sparks and flames away from fuel.
Fuel line spills and leakage are danger ...
Other materials:
Cowl Panel Removal/Installation
1. Disconnect th negative battery cable..
2. Remove the windshield wiper arm and blade..
3. Remove the front fender molding..
4. Remove the cowl grille..
5. Remove the washer hose grommet from the cowl panel and disconnect the front
washer hose.
6. Remove the windshield wiper motor..
7 ...
Oil Pump Removal/Installation [Mzr 2.0, Mzr 2.5]
WARNING:
Hot engines and engine oil can cause severe burns. Turn off the engine and
wait until it and the engine oil have cooled.
A vehicle that is lifted but not securely supported on safety stands is dangerous.
It can slip or fall, causing death or serious injury. Never work ...
Removing a Flat Tire
If your vehicle is equipped with a
wheel cover, pry off the wheel cover
with the beveled end of the jack lever.
NOTE
Force the end of the jack lever firmly
between wheel and cover, or removal will
be difficult.
CAUTION
Align the notch on the wheel cover
with the valve ...
