Mazda 3 Service Manual: Vacuum Pump Inspection [Skyactiv G 2.0]
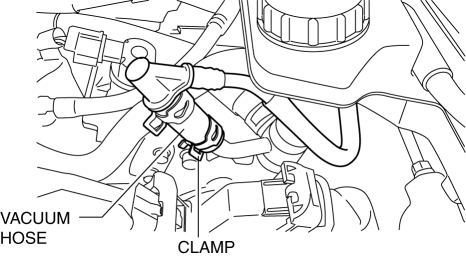
1. Pinch open the clamp using pliers and disconnect the vacuum hose from the vacuum pump.
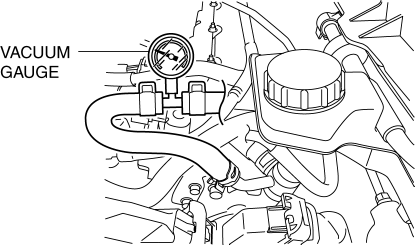
2. Install the vacuum gauge as shown in the figure, then check the vacuum.
3. Warn up the engine.
-
If the pressure is less than the specification, inspect for the following.
-
Malfunction of the vacuum pump
-
Shortage of the lubrication oil pressure
|
Measurement condition |
Specification |
|
|
Engine speed |
Change in vacuum amount |
Period of time change in vacuum amount condition met |
|
While idling (520—700 rpm (reference value)) |
From 60 kPa {450 mmHg, 18 inHg} to 67 kPa {503 mmHg, 20 inHg} |
8 s or less |
Vacuum pump maximum vacuum specification (reference value) (SKYACTIV-G 2.0)
|
Measurement condition |
Specification |
|
While idling (no time designation) |
93.3 kPa {700 mmHg, 27.6 inHg} or more |
4. Install in the reverse order of the removal.
 Vacuum Line Inspection
MZR 2.0, MZR 2.5, MZR 2.3 DISI Turbo
1. Remove the vacuum hose..
2. Verify that air can be blown from the power brake unit side of the vacuum
hose towards the intake manifold side, and that air c ...
 Vacuum Pump Removal/Installation [Skyactiv G 2.0]
1. Remove the plug hole plate..
2. Remove the battery and battery tray..
3. Pinch open the clamp using pliers and disconnect the vacuum hose from the
vacuum pump.
4. Remove in the order sh ...
Other materials:
Starter Interlock Switch Inspection [Mzr 2.3 Disi Turbo]
CAUTION:
Do not reuse the starter interlock switch if it is removed from the vehicle
even once. Replace with a new starter interlock switch when installing.
1. Remove the battery cover..
2. Disconnect the negative battery cable..
3. Disconnect the starter interlock switch connec ...
Oil Control Valve (OCV) Inspection [Mzr 2.3 Disi Turbo]
Coil Resistance Inspection
1. Remove the battery cover..
2. Disconnect the negative battery cable..
3. Disconnect the OCV connector.
4. Measure the coil resistance between terminals A and B using a tester.
If not as specified, replace the OCV..
OCV coil resistance
6. ...
Selecting the Airflow Mode
Dashboard Vents
Defroster and Floor Vents
Dashboard and Floor Vents
Defroster Vents
Floor Vents
...
