Mazda 3 Owners Manual: Active Driving Display
| WARNING Always adjust the display brightness and position with the vehicle stopped: Adjusting the display brightness and position while driving the vehicle is dangerous as doing so could distract your attention from the road ahead and lead to an accident. |
CAUTION
|
NOTE
- It may be difficult to view the display when wearing sunglasses. Take off your sunglasses or adjust the luminosity.
- If the battery has been removed and re-installed or the battery voltage is low, the adjusted position may deviate.
- The display may be difficult to view or temporarily affected by weather conditions such as rain, snow, light, and temperature.
- If the audio system is removed, the active driving display cannot be operated.
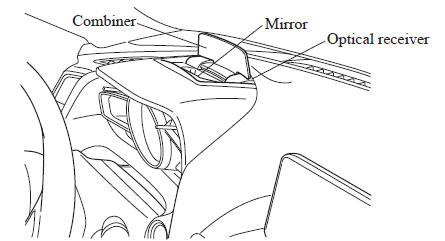
The active driving display indicates the following information:
- Mazda Radar Cruise Control (MRCC) Operation Conditions and Warnings Refer to Mazda Radar Cruise Control (MRCC) on .
- Lane Departure Warning System (LDWS) Operation Conditions and Warnings Refer to Lane Departure Warning System (LDWS) on .
- Smart City Brake Support (SCBS) Operation Conditions and Warnings Refer to Smart City Brake Support (SCBS) on .
- Forward Obstruction Warning (FOW) Operation Conditions and Warnings Refer to Forward Obstruction Warning (FOW) on .
- Vehicle Speed Setting Using Cruise Control Refer to Cruise Control on .
- Turn-by-Turn (TBT) (Direction and Distance) and Lane Guidance
- Vehicle Speed
Each setting/adjustment for the active driving display can be performed on the center display (Type B audio).
- Select the (
 ) icon on
the home screen and display the Settings screen. - Select the AD-Disp tab.
- Select the desired item and perform the setting/adjustment.
- Height : Active driving display position
- Brightness Control : Method for adjusting screen brightness (Automatically/Manually)
- Calibration : Brightness initialization setting (when selecting automatic adjustment)
- Brightness : Brightness adjustment (when selecting manual adjustment)
- Navigation : On/Off
- Active Driving Display : On/Off
- Reset
 Cruise Control Set Vehicle Speed Display
The vehicle speed preset using the cruise
control is displayed.
Trip Computer and INFO Switch
The following information can be selected
by pressing the up or down
part of the
INFO switch w ...
 Warning/Indicator Lights
Instrument Cluster varies depending on model and specifications.
Warning/Indicator lights will appear in any of the highlighted areas ...
Other materials:
Antilock Brake System (ABS)
The ABS control unit continuously
monitors the speed of each wheel. If
one wheel is about to lock up, the ABS
responds by automatically releasing and
reapplying that wheel's brake.
The driver will feel a slight vibration in
the brake pedal and may hear a chattering
noise from the brake syst ...
Steering wheel
Adjustment procedure
1. Firmly hold the Subaru Solterra steering wheel and push the adjustment lever
downward to release the lock.
2. Move the steering wheel vertically and horizontally to achieve the most comfortable
driving position.
Once the desired position is reached, pull the leve ...
Emergency Driving Stop System
In the Subaru Solterra, the Emergency Driving Stop System is engineered
to automatically slow down and bring the vehicle to a controlled stop within its
lane if the driver becomes unable to continue driving, such as in the case of a
sudden medical emergency or loss of responsiveness.
While ...
