Subaru Solterra 2023-2026 Owner's Manual: Air conditioning filter
To ensure optimal performance of the climate control system in your Subaru Solterra, the air conditioning filter must be inspected and replaced at regular intervals.
A clean air conditioning filter in the Subaru Solterra not only improves airflow efficiency but also enhances cabin air quality by trapping dust, pollen, and other airborne particles.
Removal method
1. Turn the power switch of the Subaru Solterra completely off.
Confirm that the charging connector is disconnected. Additionally, do not activate the Remote Air Conditioning System during this procedure to avoid unintended system operation.
2. Open the front passenger door of the Subaru Solterra.
Keeping the door open helps prevent accidental activation of the Remote Air Conditioning System while working.
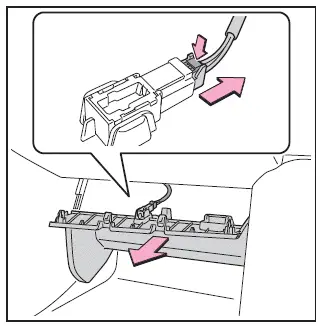
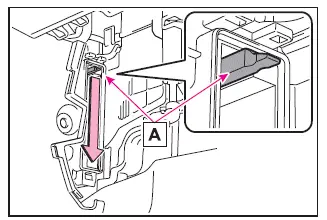
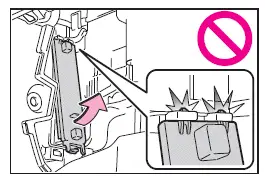
3. While pressing the retaining claw, hold handle A firmly and carefully remove the panel.
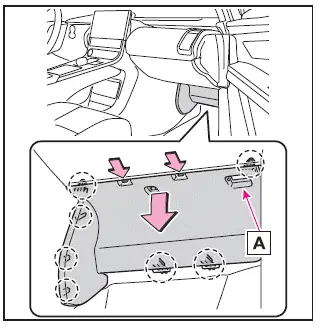
4. Vehicles equipped with footwell illumination: disconnect the electrical connector before proceeding.
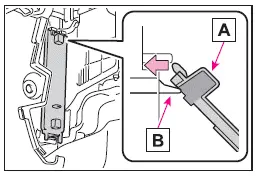
5. Release the filter cover by unlocking section (A), then gently pull the cover out of the retaining claws (B) and remove it.
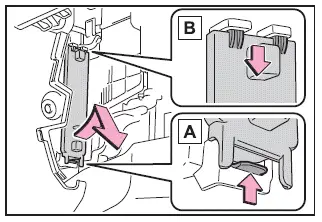
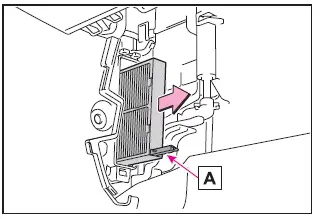
6. Hold filter case A and remove the lower filter case from the Subaru Solterra housing.
7. Grasp filter case A and pull down the upper filter case to disengage it.
8. Remove the upper filter case completely.
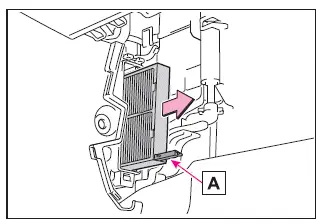
At this stage, debris such as dust, leaves, or dirt may have accumulated in the lower section of the air conditioning unit. Carefully clean this area using a vacuum cleaner to maintain proper airflow in your Subaru Solterra.
9. Remove the air conditioning filter from both the upper and lower filter cases and replace it with a new filter designed for the Subaru Solterra.
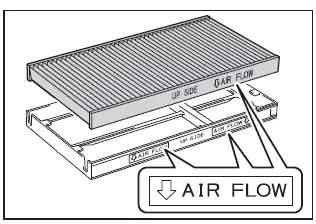
Ensure that the airflow direction arrow printed on the filter is oriented toward the rear of the Subaru Solterra during installation.
10. Reassemble all components by reversing the removal steps in the correct order.
■ When installing the filter cover
Align the recessed portion A of the filter cover with the upper surface of the upper filter case B as shown, then slide and secure it into place by lifting it toward the mounting slot.
■ Checking interval
Inspect and replace the air conditioning filter in your Subaru Solterra according to the recommended maintenance schedule. In environments with high dust levels or heavy traffic pollution, more frequent replacement may be required.
Refer to the official SUBARU Warranty and Maintenance documentation for detailed service intervals.
■ If air flow from the vents decreases dramatically
If airflow from the vents of the Subaru Solterra becomes noticeably weak, the filter may be clogged. Inspect the filter and replace it if necessary to restore proper ventilation.
■ Air conditioning filter with deodorizing function
If air fresheners or fragrances are frequently used inside the Subaru Solterra, the deodorizing capability of the filter may degrade more quickly.
If unpleasant odors persist even during operation, replacing the air conditioning filter is recommended.
WARNING
■ When replacing the air conditioning filter
Follow all safety precautions carefully when servicing the Subaru Solterra air conditioning system.
Failure to do so may result in unintended system activation and possible injury.
- Ensure the charging connector is completely disconnected.
- Do not activate the Remote Air Conditioning System during maintenance.
NOTICE
■ When using the air conditioning system
- Always ensure that an air conditioning filter is installed in your Subaru Solterra. Operating the system without a filter may lead to contamination and potential damage.
- The filter is designed for replacement only. Do not attempt to clean it using water or compressed air, as this may damage the filter structure.
■ To prevent damage to the filter cover
When releasing the filter cover by moving it in the indicated direction, handle the retaining claws carefully and avoid applying excessive force. Improper handling may damage the clips and affect proper installation in the Subaru Solterra.
 Wheels
For the Subaru Solterra, any wheel that shows signs of bending, cracking,
or severe corrosion must be replaced immediately. Continuing to use a damaged wheel
can lead to tire separation or a serio ...
 Electronic key battery
If the electronic key battery of your Subaru Solterra becomes depleted,
it should be replaced promptly to ensure uninterrupted operation of all key functions.
■ If the key battery is depleted
Wh ...
Other materials:
Filament Repair
1. Clean the filament using isopropyl alcohol.
2. Attach tape to both sides of the filament.
3. Using a small brush or marking pen, apply silver paint.
4. After 2—3 min, carefully remove the tape without damaging the applied
area.
CAUTION:
Do not operate the rear window defro ...
Back Up Light Switch Removal/Installation [C66 M R]
1. Remove the battery cover..
2. Disconnect the negative battery cable..
3. Remove the aerodynamic under cover No.2..
4. Remove in the order indicated in the table.
5. Install in the reverse order of removal.
1
Back-up light switch connector
2
...
Oil Pump Removal/Installation [Mzr 2.0, Mzr 2.5]
WARNING:
Hot engines and engine oil can cause severe burns. Turn off the engine and
wait until it and the engine oil have cooled.
A vehicle that is lifted but not securely supported on safety stands is dangerous.
It can slip or fall, causing death or serious injury. Never work ...
