Subaru Solterra 2023-2026 Owner's Manual: Electronic key battery
If the electronic key battery of your Subaru Solterra becomes depleted, it should be replaced promptly to ensure uninterrupted operation of all key functions.
■ If the key battery is depleted
When the battery inside the Subaru Solterra electronic key weakens or fully discharges, you may notice the following signs:
- The smart key system and wireless remote functions may respond inconsistently or stop working entirely.
- The effective operating range of the key will become noticeably shorter.
Items to prepare
Before replacing the battery in your Subaru Solterra key, prepare the following tools and materials:
- Flathead screwdriver
- Small flathead screwdriver
- Lithium battery CR2450
■ Use a CR2450 lithium battery
- Replacement batteries for the Subaru Solterra key can be purchased from a SUBARU dealer, electronics retailers, or camera shops.
- Always replace the battery with the same type or an equivalent recommended by the manufacturer to ensure proper functionality.
- Dispose of used batteries responsibly, following local environmental regulations.
Replacing the battery
1. Unlock the electronic key and remove the mechanical key from the Subaru Solterra key fob.
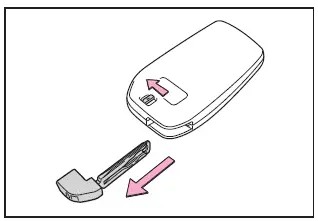
2. Carefully remove the key cover.
Use an appropriately sized flathead screwdriver. Avoid applying excessive force, as this may damage the casing of the Subaru Solterra key.
To protect the surface, wrap the tip of the screwdriver with tape before inserting it into the opening slot.
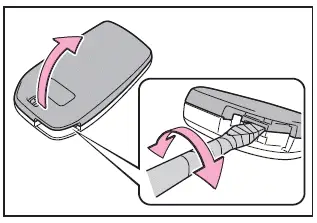
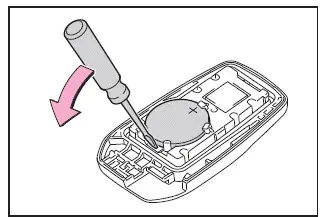
3. Remove the depleted battery using a small flathead screwdriver.
In some cases, the internal electronic module of the Subaru Solterra key may adhere to the cover, making the battery less visible. If this occurs, carefully remove the module to access the battery compartment.
Insert the new battery with the positive (+) terminal facing upward to ensure correct polarity.
4. Reassemble the electronic key by reversing steps 2 and 1, ensuring that all components are securely fitted.
WARNING
■ Battery precautions
Strictly observe the following safety measures when handling the Subaru Solterra key battery.
Failure to comply may result in serious injury or life-threatening situations.
- Never swallow the battery.
Ingestion may cause severe chemical burns and internal injury.
- The Subaru Solterra electronic key uses a coin-type lithium battery. If swallowed, it can cause critical burns within as little as 2 hours.
- Keep both new and used batteries out of reach of children at all times.
- If the key cover cannot be securely closed after battery replacement, discontinue use and store the key safely away from children, then contact your SUBARU dealer.
- If a battery is accidentally swallowed or inserted into the body, seek emergency medical attention immediately.
■ To prevent battery explosion or leakage of flammable liquid or gas
- Always replace the battery with the correct type specified for the Subaru Solterra. Using an incorrect battery type may result in explosion.
- Do not expose batteries to extreme environmental conditions, such as high temperatures or low-pressure environments at high altitudes.
- Never attempt to burn, crush, or cut a battery.
NOTICE
■ When replacing the battery
Use a properly sized flathead screwdriver when servicing the Subaru Solterra key. Applying excessive force may deform or damage the housing.
■ For normal operation after replacing the battery
To ensure reliable operation of the Subaru Solterra electronic key after battery replacement, follow these guidelines:
- Handle all components with dry hands.
Moisture may lead to corrosion or reduced battery performance.
- Avoid touching or disturbing internal electronic components unnecessarily.
- Do not bend or deform the battery terminals, as this may cause poor contact or malfunction.
 Air conditioning filter
To ensure optimal performance of the climate control system in your
Subaru Solterra, the air conditioning filter must be inspected and replaced at regular
intervals.
A clean air conditioning filt ...
 Checking and replacing fuses
If any electrical system in your Subaru Solterra stops functioning,
it may be caused by a blown fuse. In such cases, inspect the fuse and replace it
if necessary to restore proper operation.
Chec ...
Other materials:
Instrumentation/Driver Info. Personalization Features Setting Procedure
Instrument Cluster
1. Connect the M-MDS (IDS) to the DLC–2.
2. After the vehicle is identified, select the following items from the initial
screen of the M-MDS.
Select the “Module Programming”.
3. Then, select items from the screen menu in the following order.
Se ...
Luggage Compartment
Luggage compartment cover (5-door)
WARNING
Do not place anything on top of the
cover:
Placing luggage or other cargo on top
of the luggage compartment cover is
dangerous. During sudden braking or
a collision, the cargo could become
a projectile that could hit and injure
...
Crankshaft Position (CKP) Sensor Inspection [Mzr 2.0, Mzr 2.5]
Visual Inspection
CAUTION:
When foreign material such as an iron chip is on the CKP sensor, it can cause
abnormal output from the sensor because of flux turbulence and adversely affect
the engine control. Be sure there is no foreign material on the CKP sensor when
replacing.
...
