Subaru Solterra 2023-2026 Owner's Manual: Checking and replacing fuses
If any electrical system in your Subaru Solterra stops functioning, it may be caused by a blown fuse. In such cases, inspect the fuse and replace it if necessary to restore proper operation.
Checking and replacing fuses
1. Switch the power OFF in your Subaru Solterra completely before starting any inspection.
Ensure that the charging connector is disconnected, and avoid activating the Remote Air Conditioning System during this procedure to prevent unexpected electrical activity.
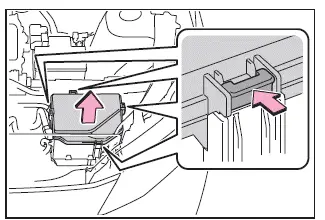
2. Open the fuse box cover.
Motor compartment
Press the retaining tab and carefully lift the cover upward to access the fuse panel.
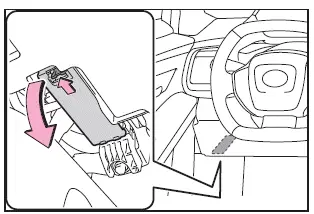
Left side instrument panel
Remove the panel cover gently to expose the interior fuse box of the Subaru Solterra.
3. Remove the fuse.
For Subaru Solterra fuse type A, use the designated pullout tool to safely extract the fuse without damaging surrounding components.

4. Inspect the fuse condition.
If the fuse is blown, replace it with a new fuse of identical amperage rating as specified on the fuse box cover of the Subaru Solterra.
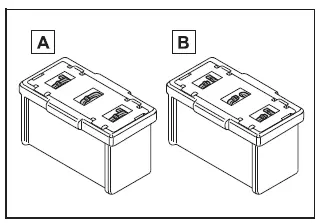
Type A
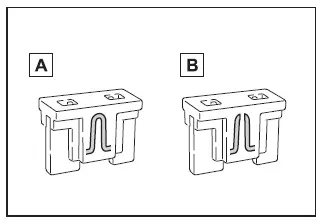
- Normal fuse
- Blown fuse
Type B
- Normal fuse
- Blown fuse
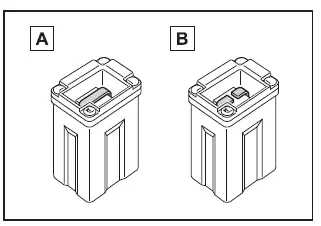
Type C
- Normal fuse
- Blown fuse
■ After a fuse is replaced
- When reinstalling the fuse box cover in your Subaru Solterra, ensure that all retaining tabs are securely locked into place.
- If the electrical component still does not function after replacing the fuse, the issue may be related to a bulb or another component requiring replacement.
- If the new fuse blows again shortly after installation, have the Subaru Solterra inspected by an authorized SUBARU dealer.
■ If there is an overload in a circuit
The fuse system in the Subaru Solterra is designed to protect electrical circuits by interrupting current flow when an overload occurs, preventing damage to wiring and electronic components.
■ When replacing an electronic component, such as lights
SUBARU recommends using only genuine components specifically designed for the Subaru Solterra. Certain circuits are engineered with protective limits, and using non-genuine parts may lead to malfunction or incompatibility.
WARNING
■ To prevent system breakdowns and vehicle fire
Always follow these precautions when servicing the Subaru Solterra electrical system.
- Never install a fuse with a higher amperage rating than specified, and never substitute a fuse with any other object.
- Use only genuine SUBARU fuses or equivalent rated replacements.
Do not use wire or makeshift materials as a temporary solution.
- Do not modify fuse boxes or alter fuse configurations in the Subaru Solterra.
NOTICE
■ Before replacing fuses
Identify and устраните причину перегрузки електричного кола якнайшвидше, звернувшись до SUBARU dealer для професійної діагностики Subaru Solterra.
 Electronic key battery
If the electronic key battery of your Subaru Solterra becomes depleted,
it should be replaced promptly to ensure uninterrupted operation of all key functions.
■ If the key battery is depleted
Wh ...
 Headlight aim
Vertical movement adjusting bolts
Adjustment bolt A
Adjustment bolt B
Before checking the headlight aim
Park your Subaru Solterra on a flat, level surface.
Ensure all tires are in ...
Other materials:
Active Driving Display
WARNING
Always adjust the display brightness and position with the vehicle
stopped:
Adjusting the display brightness and position while driving the vehicle
is dangerous as
doing so could distract your attention from the road ahead and lead to
an accident.
...
Drive Plate Removal/Installation [Fw6 A EL]
1. Remove the transaxle..
2. Remove in the order indicated in the table.
1
Drive plate installation bolts
(See Drive Plate Installation Bolts Removal Note.)
(See Drive Plate Installation Bolts Installation Note.)
2
Backing plate
...
Locking, Unlocking with Key
All doors and the liftgate lock
automatically when the driver's door is
locked using the auxiliary key.
All doors and the liftgate unlock when the
driver's door is unlocked and the auxiliary
key is held in the unlock position for one
second or longer.
Turn the auxiliary key toward the fro ...
